In this article we talk about how to cancel Shopify.
But before we start, read this out:
While it may appear everybody is using Shopify to run their e-commerce sites, it may not be the best fit for you.
If you have second thoughts, it could be time to switch to a new e-commerce platform. Several excellent Shopify alternatives are entirely free to use, which is ideal if you’re on a tight budget.
Join us as we guide you on how to cancel, pause, or deactivate your Shopify account, whether you’re bored of it or want some reassurance before you jump in. Here’s a guide on how to close Shopify store.
7 Things to do before you cancel Shopify Subscription
Before closing a Shopify account, we need to confirm a few things to ensure that we cancel the account successfully.
The following are the most important things we should do before canceling a Shopify account.
1. Backup and Export Customer Records
Customers are the backbone of any business, so we need their records at the tips of our fingers. With a customer’s purchase history, we can quickly gauge their preferences, which can help us improve marketing and sourcing.
Therefore before closing Shopify, back up the customer information and data so that if we reactivate our store, we’ll readily have the clients’ data, and we can get started much quicker.
To create a backup for your store, log in to your Shopify admin dashboard and click the Products tab on the left pane.

After that, the next thing you will want to do is to export your store’s product data. To do that, click the Export tab at the top bar. Upon click, you’d see a popup modal box.
Check the All products option to export all your product data and the CSV for Excel, Numbers, or other spreadsheet programs option.
Finally, click the Export products button.
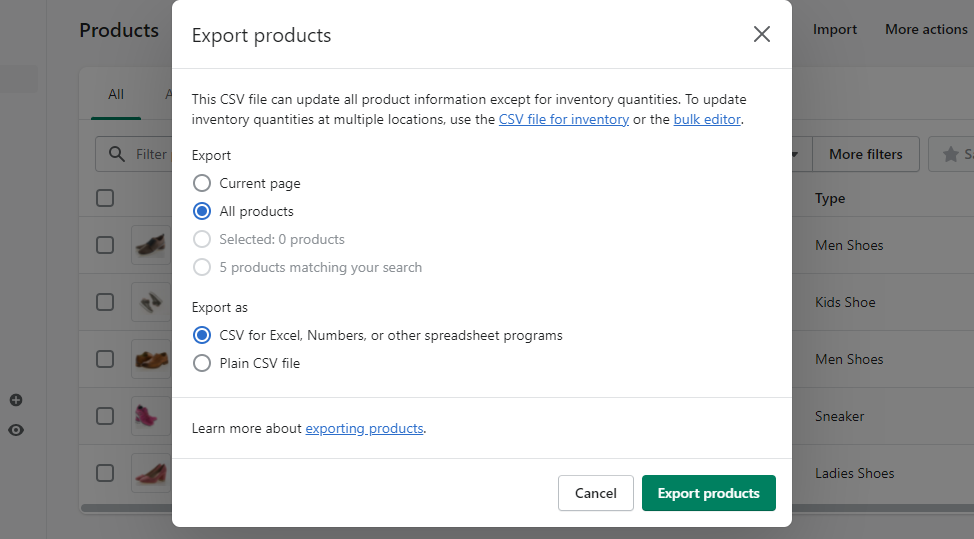
The exported CSV file would be automatically sent to your Shopify’s registered email.
2. Pay Shopify / Third-party Apps Subscription Fees & Stop Auto Renewal
We need to confirm that there are no outstanding charges to the specific Shopify account. If there is, we have to pay them.
Next, we need to turn off auto-renewal for any custom domain connected to the specific Shopify account. This is to avoid unexpected charges when domains are renewed.
If you fail to cancel any paid app subscription on your store, you will still get billed after canceling your Shopify account.
To avoid that, cancel all app subscriptions before attempting to delete or pause your store.
To delete an app on your store, from your admin dashboard, click the Apps tab on the left, locate the app you would like to cancel and click the Delete link

Most Shopify stores use other third-party apps to extend their stores’ functionalities. These third-party apps come at a cost and are usually billed via the Shopify platform or separately, e.g., Mailchimp.
Before closing the shop, reaching out to the third-party apps that are subscribed to is critical. This is to cancel them (if the shop is closing down for good) or stop them temporarily (an arrangement where the subscription charges are paused until the shop is re-opened).
As for data, each app may have different data policies. Therefore, check the data policies of each of the third-party apps. We mean confirming whether the data is kept after canceling the account or whether we can get the data back once the account is reactivated later.
3. Transfer Your Domain before you cancel Shopify
Suppose your store runs on a domain purchased from Shopify, and you still want to reuse it after canceling your Shopify account. In that case, we recommend you transfer it from Shopify to Namecheap (better domain registrar) before canceling.
To do so, click the Settings tab from your admin dashboard. Then navigate to Domains.

4. Keep in touch with customers
Closing your store might be a shock to your long-term consumers. Ensure you are honest and clear about your choice to close the business and your plans. It’s important to keep communication open to develop strong consumer connections and a strong brand. For example, display a temporary closing notification on your store’s website for possible consumers.
Therefore it’s critical to be transparent with customers and maintain communication with them.
Honesty will lead to deep customer relationships and a good reputation.
5. If you’re going to be closed for a while, engage on social media
Temporarily shutting your store doesn’t have to imply halting all operations! After all, your following count, engagement rate, and content exposure will all play a role in your future success.
Engaging on social media is particularly important if we plan on reopening our store sometime in the future. We should notify our customers that while the shop is temporarily closed, we’ll be open again soon.
During the period that the shop is closed, it’s good to try new ways to engage customers. This might even lead to new breakthroughs.
6. Sell Your Shopify Store
Many entrepreneurs are looking for something to invest in, and we have it. Therefore, before canceling the store, we can consider selling it. Shopify has made it easy to sell a business.
Simply list it in Shopify Platform’s Exchange Marketplace or sell it on Flippa. These sites have partnered with Escrow services which ensures that we can get the amount of money agreed upon with the buyer and the transfer process is straightforward and secure.
7. Determine the Right Shopify Alternative for Your Business
If you are canceling your Shopify account because you no longer deem it fit for your business, it’s important to know the right eCommerce platform to use instead.
This will help to prevent unpleasant surprises and avoid potential pitfalls.
How to Delete a Shopify Account
Before deleting, note that we won’t have access to Shopify admin once we delete the Shopify account. If we want to log back in, we have to reactivate the store and enter our credit card details.
So how do we delete a Shopify account?
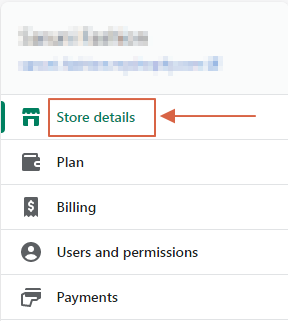
Step 1: We log into the Shopify admin account, and click Settings

Step 2: Click Plan.

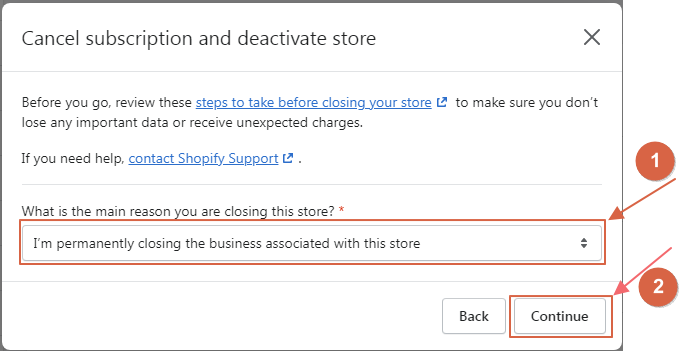
Step 3: Click Deactivate then Cancel Subscription And Deactivate Store.

Step 4: Choose a reason for deactivation and click Continue.
Step 5: Finally, enter the password and click Close store or Deactivate now.

How to Cancel Shopify Free Trial
Step 1: We log in to our Shopify account as the store owner.

Step 2: In the Shopify admin, click Settings and Plan.
Step 3: In the Store details section, click Sell or Close store.
Step 4: Once we’re sure of our decision, we choose a reason (for the closure) from the drop-down menu and click Close store. Finally, we enter our password to confirm the decision.
How to Pause Shopify Subscription
Here are a few things to note before pausing the Shopify Subscription;
- The Pause and Build plan isn’t available to Shopify Plus stores.
- You can’t sell your products, but you can still access your Shopify admin and edit your products.
- To use this feature, our store needs to be on a paid Shopify plan and should be older than 60 days past the free trial period.
- We can’t pause store if we’re on a Shopify trial and haven’t chosen a pricing plan.
- When we pause our Shopify with the Pause and Build a plan, our store runs at a reduced cost of $9 per month.
- We recommend uninstalling any third-party apps that charge monthly fee to avoid being billed when pausing the Shopify store.
As for how to pause the Shopify store, do the following;
Step 1: Log in to the Shopify store as the store owner.
Step 2: On your Shopify admin page, click Settings, then click Plan
Step 3: Proceed to click Pause or deactivate store, then select Pause and build plan.
Step 4: Read the outlined details and click Switch to Pause and build.
3 Best Shopify Alternatives for Small & Medium Businesses
1. Site123

SITE123 is a no-cost website builder that allows users to create bilingual, SEO-friendly sites and sales funnels without knowing how to code. It has an admin dashboard that allows customers to create various groups, assign personnel access permissions, and view prior interactions with customers on a unified platform. The main features that give Site123 an edge over Shopify are:
- Availability on Linux
- Site123 supports 15+ languages
- Provides 70+ integrations
2. BigCommerce

BigCommerce, a NASDAQ-listed online platform, offers retailers software as a service. From small to large firms, the company’s platform comprises search engine optimization, online shop design, hosting, marketing, and security. The main features that give BigCommerce an edge over Shopify are:
- BigCommerce outperforms Shopify in terms of design functionality as BigCommerce provides more customization.
- BigCommerce has a more prominent number of built-in tools. Although Shopify’s sales tools are more flexible, BigCommerce comes with more helpful features.
- BigCommerce also provides built-in rating and review features, and you can only access these features through a third party in Shopify.
3. Squarespace

Squarespace is a content management system for managing and building blogs, websites, online storefronts, or portfolios. It allows companies of all sizes to create professional websites using a drag-and-drop interface. Squarespace now has a total of 2,608,015 active websites around the globe. The main features that give SquareSpace an edge over Shopify are:
- Squarespace is a substantially more affordable option. Squarespace’s best features are available for only $54 per month. Meanwhile, you’ll need to invest at least $299 to get the best features with Shopify.
- Squarespace provides more artistic freedom. It would be an excellent choice for people who want to create a website that displays stunning pictures and photography to demonstrate their skills.
- Squarespace offers award-winning templates and a wider choice of designs than Shopify.
Frequently Asked Questions
1. Does Shopify Charge Account Holders if They Cancel Their Accounts?
It depends if they owe Shopify any outstanding money. Shopify account holders have to pay any money they owe Shopify. They need to pay this before they cancel their accounts.
2. How do I Permanently Delete my Shopify Account?
Log in to your Shopify admin as the store owner. Click Settings, then Plan. Proceed to click Sell or close your Shopify store. Finally, enter your password and Confirm.
3. Does Closing a Shopify Store Delete it?
No, you can still log back in by entering your credit card information and reactivating your store.
4. How Long Does it Take for a Shopify Refund?
A Shopify refund takes up to 10 business days to be credited back to the customer. If the Shopify stores’ account doesn’t have enough money, the refund is tried again in 3 business days.
5. Why Can’t I Close My Shopify Store?
It may be due to pending app fees that you have to pay before closing your Shopify store.
6. What is the price of a Shopify domain?
The cost of a Shopify domain is $11 per year.
7. How can I restart my Shopify store?
You can restart your usual monthly subscription paying cycle by re-entering your payment card information in the Shopify admin panel. To resume your Shopify online store, go to the Shopify dashboard and select: Settings > Plan > Choose a plan > Select a plan > Start.
8. Once I have closed the account, can I create a new account with the same name?
Shopify will retain the store’s data for two years; thus, if we desire, it is possible to reactivate the account and retrieve the data. However, if we close the store completely, we are not allowed to create a new one with the same name or .myshopify URL.
9. Can I delete the account at the end of the Shopify free trial?
Shopify has the automatic facility of freezing the account after the free trial is over and we have not made payment for the plan. However, if the payment has been made, remember that Shopify does not refund the subscription amount. Thus, to avoid spending extra money on unwanted Shopify plans, it is better to build our own eCommerce website and make an informed choice beforehand.
10. Is it possible to migrate Shopify stores to other online platforms?
Yes, it is possible to migrate the store from Shopify to another platform but there is no automated tool available to facilitate this migration. Hence, we will have to move the content and assets from Shopify to other platforms manually.
11. Who is the owner of the Shopify domain?
The domain belongs to the store owner, irrespective of the fact that the domain was purchased via Shopify or any other third-party registrar. Thus, we can transfer the domain’s management as well.
12. Does closing Shopify store cancel subscription?
When you close/deactivate your Shopify store, your subscription plan will be automatically canceled.
13. Does Shopify give refunds after canceling a subscription?
The simple answer is no. You will only qualify for a refund if you were erroneously billed after canceling your subscription.
Conclusion
That’s how you may cancel your Shopify account. When it comes to shutting your online store, the advice in this book will come in handy. We have highlighted all the steps you’ll need to follow to cancel Shopify, pause, and delete Shopify account.
Was this article helpful to you? We’d love to hear from you.