LiquidWeb HIPAA Hosting – Does it make you HIPAA Compliant?

Needless to say, HIPAA Compliance negligence can be a nightmare.

In this article we will find out what HIPAA is and how LiquidWeb HIPAA Hosting can help you in HIPAA compliance.

But first:

What is HIPAA?

HIPAA stands for Health Insurance Portability and Accountability Act.

The primary purpose of HIPAA is to protect the right to conceal or reveal sensitive patient health records. Under this, no company, organization, or individual can access your personal health information without your permission.

A HIPAA qualification assures a premium level of security when getting Protected Health Information (PHI) on a website. Information like blood group, weight, height, fingerprints, allergies, etc. can be hacked into and misused.

A violation of HIPAA is punishable by fines of up to $50,000.

HIPAA Compliance Checklist

A HIPAA breach is a serious issue in the medical industry.

However, acquiring a HIPAA certification isn’t easy either. You need to abide by certain rules and regulations when asking for a patient’s PHI.

The following is a compliance checklist that should verify if a certain product or service is safe to engage with or not.

1. Implementing Written Policies, Procedures and Standards of Conduct

For your web hosting service, this could mean verifying the policies and procedures around who is allowed to access your personal information and for what purpose.

2. Designating a Compliance Officer and Compliance Committee

Your web hosting needs to be prepared to deal with any coordination or HIPAA-related challenges linked directly to your on-site compliance officer. The compliance officer needs to be immediately alerted at the time of a HIPAA breach to avoid further issues.

3. Conducting Effective Training and Education

It’s critical that your hosting provider’s support and technology staff receive HIPAA training in order for them to support your HIPAA objectives. It is advisable to make sure that your hosting company is aware of HIPAA regulations and how to best assist you.

4. Developing Effective Lines of Communication

A HIPAA web hosting provider should offer a variety of channels of communication to handle both your HIPAA requirements and additional support issues. Your HIPAA environment needs the best level of support you can find, whether it be via phone, email, live chat, or ticketing systems.

5. Conducting Internal Monitoring and Auditing

Your hosting company needs to log who uses your infrastructure and track that access on a regular basis. Anyone having access to your servers may be violating HIPAA, which could result in fines for your company.

6. Enforcing Standards Through Well-Publicized Disciplinary Guidelines

Making sure your infrastructure complies with HIPAA regulations is a joint duty of your hosting company. The consequences of non-compliance should be understood by their engineers and support workers.

7. Responding Promptly to Detected Offences and Undertaking Corrective Action

In addition to communicating any potential breaches or areas of concern in relation to your HIPAA requirements, your hosting provider ought to be ready to give you Corrective Action Reports in the case of an incident.

HIPAA Non-Compliance Penalties

Ignorance of the HIPAA Rules is not an acceptable defense for breaking the rules. Each covered entity is in charge of making sure the HIPAA Rules are known and adhered to. The maximum penalty may be imposed when a covered entity is found to have willfully broken a HIPAA law.

What is a HIPAA violation?

A violation could be intentional or accidental. When excessive PHI is released and the threshold for the minimum necessary information is broken, this is an example of an unintended HIPAA breach. PHI disclosures must be kept to the absolute minimum of details required to fulfill the disclosed purpose.

Unintentional HIPAA infractions are subject to financial penalties, however, these are less severe than those for deliberate violations of the HIPAA Rules.

Consequences of HIPAA violation

Depending on the severity of the violation, the law prefers to resolve HIPAA violations mainly using non-punitive actions, like voluntary compliance or assisting through technical guidance to eradicate areas of non-compliance.

Regardless, if the loss suffered by the noncompliance is much greater in scale and allowed to sustain for a long time, financial penalties are appropriate.

The penalty structure operates under 4 distinct levels:

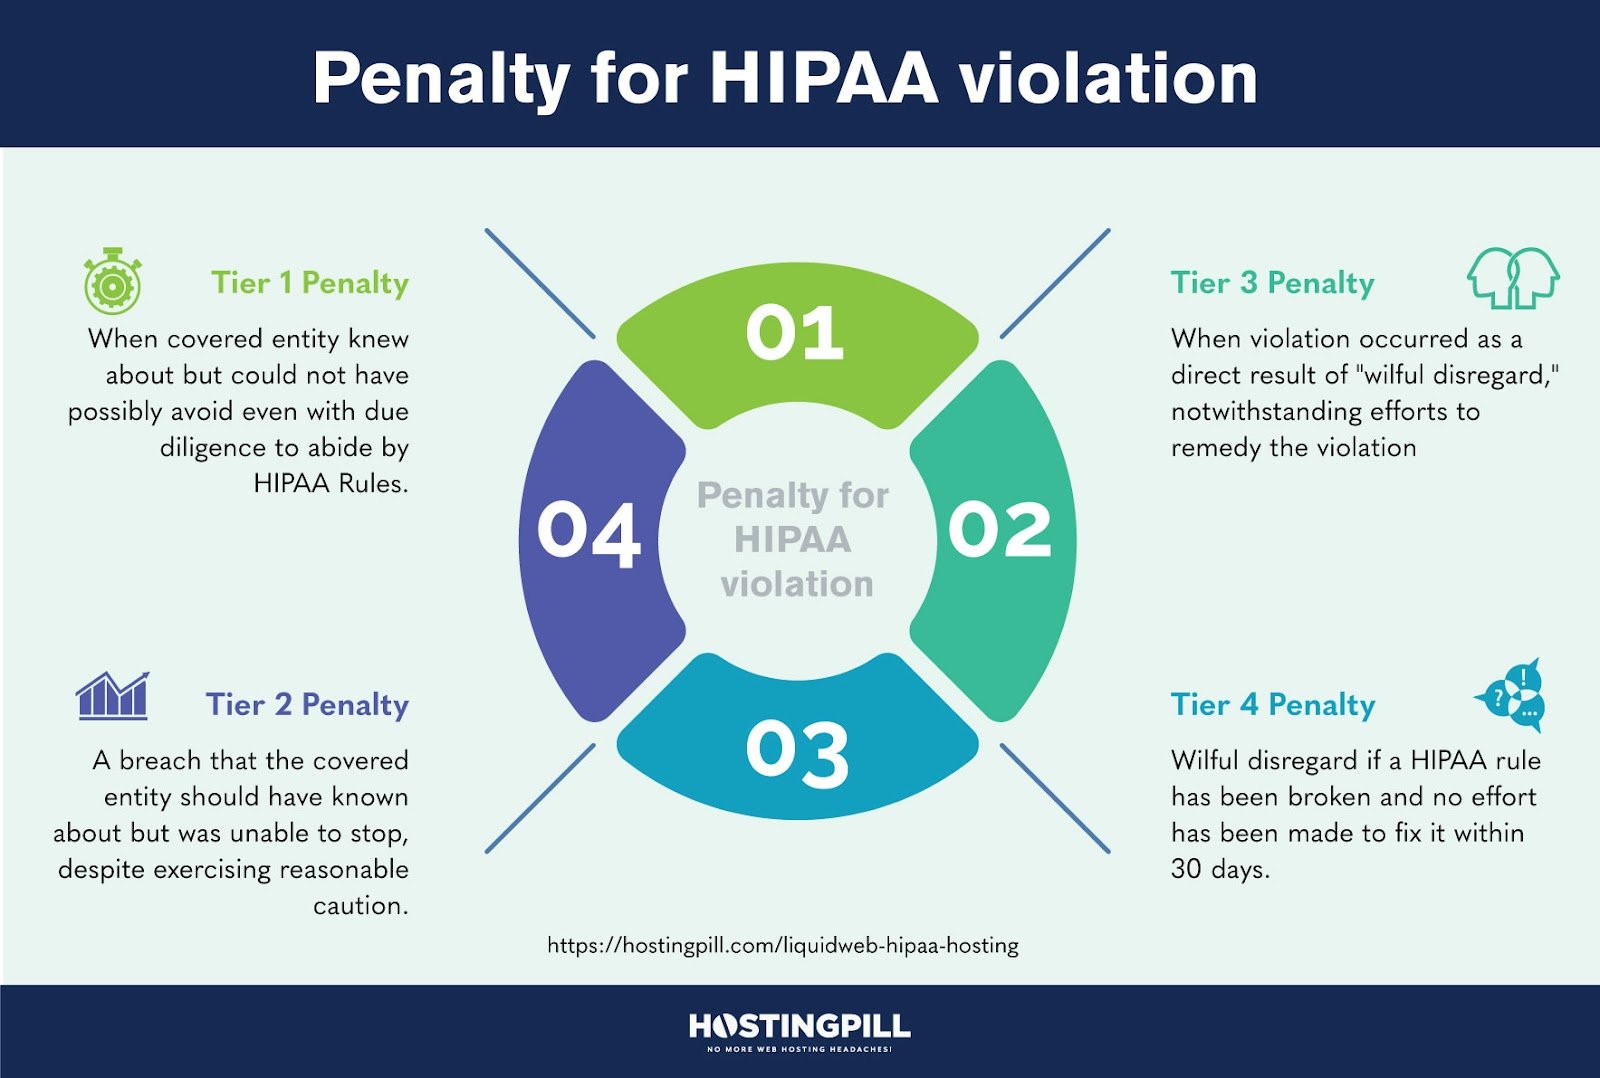
  • Tier 1 Penalty: An infraction that the covered entity knew about but could not have possibly avoided even with due diligence to abide by HIPAA Rules.
  • Tier 2 Penalty: A breach that the covered entity should have known about but was unable to stop, despite exercising reasonable caution. (But not to the extent of wilful disregard for HIPAA Rules)
  • Tier 3 Penalty: Instances in which a violation of HIPAA Rules has occurred as a direct result of “wilful disregard,” notwithstanding efforts to remedy the violation
  • Tier 4 Penalty: Wilful disregard if a HIPAA rule has been broken and no effort has been made to fix it within 30 days.

LiquidWeb HIPAA Compliant Server Features

Now that you know enough about HIPAA, let’s look into how LiquidWeb protects your PHI.

LiquidWeb offers Managed dedicated, VPS, and cloud-dedicated solutions and adheres to HIPAA regulations. LiquidWeb also has a HITECH certification, a law created to protect electronic health records.

They have dedicated data centers for processing health records. Dedicated data centers provide better performance, management, and control of all information stored in a database.

Servers are managed by an on-site crew that can be available for assistance throughout the day. You also have a hardware firewall & VPN protection. VPNs are great for data services that could span over a secure global network.

At the time of a data breach, data backups become essential. Without backups, your critical health information could be lost costing you more time and resources. No matter what kind of security you have, backups are the last resort solution to every IT problem.

LiquidWeb offers Acronis Cyber Backups which are known to be award-winning backup services. They handle multiple MSP business clients to prevent downtimes, safe-keep data and provide malware protection.

All servers are data encrypted for the worst-case scenario.

LiquidWeb certainly hits all the marks for HIPAA Compliant Hosting features. Let’s dive a little more into security.

Security

When it comes to security, LiquidWeb is a serious contender.

Since you get options for Linux and Windows, a common distinction needs to be made. Linux is a tad more modular than Windows. You have access to a wide variety of tools which mostly come open source and with great support.

As for Windows, there is more mainstream community support for security tools. Your in-house engineers can find solutions to varied problems more effectively.

Dedicated servers themselves offer data solidarity. Not having a shared model allows more flexibility when creating partitions for separate purposes or creating backup options. Also, not to forget— the significant performance boost.

Even if your project deals with AI or ML-based technologies, you cannot go wrong with Acronis.

LiquidWeb’s advanced feature set includes ServerSecurePlus on top of its basic security features. These features function at a technical level in your server and would mostly be non-intrusive.

When it comes to HIPAA, more security cannot be arbitrary. You could benefit from as many security blankets as you can afford. And with LiquidWeb, you can afford these features at every price tier no matter how small or large your project.

Sneak Peek inside LiquidWeb HIPAA Hosting Dashboard

LiquidWeb’s dashboard looks functional. It looks clean and to the point. You can argue a more graphical presentation would’ve been nice but in this case, what you see is what you get.

The above is my current dedicated server running on LiquidWeb. As you can see, it has an active IP and the assigned server is in US Central.

The server is running CentOs 7, a popular Linux distribution, along with 2xSSDs, a backup HDD, and 16GB DDR4 SDRAM. The whole setup is powered by an Intel Xeon E3-1230v6 processor.

This is the server monitoring area. There has been more activity in the last 48 hours. The backup storage drive has also progressed, which means it has been automating backups multiple times during the day.

The server load itself has not been too drastic. No sudden spikes or dropouts. Server bandwidth however has spiked. Perhaps due to our testing but nothing too huge has been thrown at the website.

This is the Acronis Dashboard. It is certainly more graphical due to it being a multi-faceted backup system. The protection status displays our dedicated server being its top priority. Other features on the sidebar include protection, software management, downloadable reports, etc.

The last section to talk about is the Reports section.

You can track multiple server states, vulnerabilities, hardware resources, threats, email protection, etc. The Acronis CyberFit score combines multiple metrics like disk health, disk encryption, firewall, VPN, and NTLM traffic to create an overall rating that gauges how effective your current system is against cyberattacks.

Price & Pricing

Let’s begin with Linux HIPAA Servers.

The Standalone HIPAA Server is the starter tier from LiquidWeb. Although Dedicated, you will have one single unit of a server. The price starts from $229/mo.

The server comes with a Xeon E3-1230v6 quad-core processor which accrues the base cost of $174/mo. You can upgrade/customize RAM, Storage, Backup Drives, and the PSU unit as you like with additional costs. Primary Storage is the most expensive component of the whole unit.

For the price, your features are minimal but important for a singular establishment. Your potential website, database, or application will have ample processing power and storage for a long duration.

The main system selling features are On-site helpers, Acronis Cyber Backups, and Threatstack Oversight Intrusion Detection System.

Threatstack is a cloud-native platform that surveys your cloud application from its core to its very server environment itself. It is a server security component that works on a much deeper analytical level than any other feature. You can prioritize high-severity threats, ensure coverage, and achieve compliance requirements.

The HIPAA Server & Firewall Package is the mid-tier plan from LiquidWeb. This plan comes with a single dedicated unit as well. The price starts from $428/mo.

Why the severe bump in the price you might ask? This plan comes with Hardware Firewall and a VPN service.

A hardware firewall is a physical tool used to impose a network border. This firewall is used to perform an inspection of both inbound and outbound network traffic as well as to enforce access rules and other security policies. All network links that cross this border must travel through this firewall.

Adding to that, a VPN makes you anonymous when exchanging data with different servers. Your IP could be transported to a different locality to protect it from being hacked and looked into.

A hardware firewall and VPN connection add an additional layer of encryption, making your PHI data even more secure.

The rest of the features staying the same, is the price bump worth it? That will come later.

The HIPAA Multi-Server Package comes with multiple dedicated units to distribute your database or applications into. The price starts from $657/mo.

This tier is meant for a much bigger operation. You will need to have to chat with a representative to get your specific requirements across to a team of professionals that will execute your plan with a focus on customized HIPAA hosting needs.

FAQs

Once I get HIPAA-compliant hosting, am I HIPAA-compliant?
  • Not necessarily. LiquidWeb states clearly on its website that having a HIPAA-compliant server DOES NOT make you or your website HIPAA compliant. It isn’t a title that can be owned with a certification but a status that can be claimed with steady client performance and satisfaction.
To be HIPAA Compliant, do I need to have Offsite backups?
  • Although not a formal requirement, backups are an essential component of a website handling ePHI. Without reliable backups, patient information cannot be safeguarded at the time of a data breach or malware infestation.
What risks and penalties does a HIPAA violation follow?
  • Violations, whether intentional or unintentional, incur fines in tiers. You could be charged with minimum fines ranging from $100 to $50,000 per HIPAA violation. Further violations could draw much harsher criminal or civil charges.

Conclusion: Does LiquidWeb HIPAA hosting make you HIPAA compliant?

This is LiquidWeb themselves stating their position on HIPAA. They offer HIPAA-dedicated servers but do not claim to be the providers of the title itself. It is not a preliminary action that can be completed to attain the certification.

Just because you buy some server from LiquidWeb and call it a day does not qualify you to manage PHI. Considering the penalties, there is more to this title than just good technology or on-site security, or personnel management.

HIPAA is a collection of duties done with a persistent track record. What duties you may ask?

1. Implementing Written Policies, Procedures, and Standards of Conduct

2. Designating a Compliance Officer and Compliance Committee

3. Conducting Effective Training and Education

4. Developing Effective Lines of Communication

5. Conducting Internal Monitoring and Auditing

6. Enforcing Standards Through Well-Publicized Disciplinary Guidelines

7. Responding Promptly to Detected Offenses and Undertaking Corrective Action

The keyword is experience. Your company will need to have web hosting that offers HIPAA features and combine it with the commitment to handling PHI with extreme care.

So LiquidWeb does make you HIPAA. Should you still get LiquidWeb?

Absolutely. LiquidWeb offers top-of-the-line features when it comes to security and server management. If you are doubtful about starting your HIPAA journey, LiquidWeb might be your best starting point.

That’s it for this review. Please let me know your comments down below.

7 Best Wix Alternatives (#1 is my favorite)

Have you been looking for Wix Alternatives?

There are a few downsides of using Wix. That’s the reason most users are looking out for Wix Alternatives.

With Wix the long-term pricing is expensive. If you choose the basic plan which is the cheapest plan available, then you need to bear with the Wix Ads.

To remove Ads, you need to choose a more expensive plan. Also, its website designer is low on design and editing. This makes creating a complex website design a tedious task.

In case you are searching for Wix alternatives, then here is a consolidated review.

11 Best Website Builders for Mac (No. #1 is Amazing)

Creating website on a MacOS is a challenging task. But by trying few website builders for Mac, I am sure you will be at ease.

MacOS does support basic website building, however, when we speak about large scale enterprise level websites, this would need something additional.

MacOS with all its UI, high-end design and security is far from being a completely perfect platform to build websites.

4 Best Ecommerce Platforms (No# 1 is Awesome)

Looking for Best Ecommerce Platforms?

Here’s the list. But first, hear me out:

E-commerce, the word sounds like music to my ears.

The way all of us are bound by e-commerce shopping is just unexplainable.

It has made our lives simpler.

A lot of new e-commerce ventures turn almost every day. In case you are reading this, probably you are looking forward to e-commerce development.

E-commerce development is incomplete without an e-commerce platform.

So now the question is, how exactly should you choose an e-commerce platform?

Let me quickly put across the factors that you need to look out for while choosing an e-commerce platform.

Which is the Best Website Builder? (8 Tested & Reviewed)

Best Website Builder has many qualities, the primary being: “It should be damn easy to use!!

You want to build a website for your hobby, or your personal blog. Maybe for your small business.

You need something that is relatively user-friendly, but which still lets you control a good deal about your website and make something that looks good.

Well, the best option for a lot of people is to go straight to a website builder.

9 Best Website Builder for Musicians (No. #1 is Just Awesome)

We have Website Builders for Entrepreneurs, Website Builders for Accountants, Website Builders for Photographers but what about Website Builder for Musicians?

Have you ever wondered which website builders would be the best choices for musicians?

Combined with social media and a great website you can gain immense popularity and can quickly reach your target audience.

Choosing the best website builder for musicians needs you to look at several parameters, such as: cost, performance, speed, security, look-and-feel and so many other things.

In this post, I will walk you through some of the best website builders for musicians.

These are not simply hosting companies: they are oriented specifically towards out-of-the-box, easy customization. Hence, “website builders.”

Your 50-Step SEO Checklist for Web Success

Looking for an SEO Checklist? Sure, this is the one.

But first, listen to this:

Do you know that 68% of all online traffic begins with a search engine? Some people might call you a perfectionist. But to make your content shine on the web, you need to go the extra mile.

No one ever said that SEO was easy. But with the right tools and a little know-how, you can make your website’s SEO success a reality.

We’ve put together this 50-step SEO checklist to make life a bit easier. It covers everything from basics, like keyword research and page titles. And more advanced SEO tactics, like backlinks and schema markup.

Basic SEO Checklist

Like most bloggers, you’re always looking for ways to optimize your blog. But do you know the basics of SEO?

If not, don’t worry – this SEO checklist will teach you the basics so that you can start optimizing your blog today!

1. Create and submit a sitemap

Sitemap helps search engines to find and index important content on your website. You need to create and submit the XML sitemap to Google and Bing. Usually, the sitemap on this URL: “/sitemap.xml”.

You can find your sitemap here.

2. Create a robots.txt file

A robots.txt file tells web robots (or crawlers) which pages on your website they are allowed to visit and index. To create a robots.txt file, simply create a text file and save it as “robots.txt” at the root of your website.

3. Set up Google Search Console

Google Search Console is a free webmaster tool. It helps you to check your site’s search performance. You need to set it up to see how your website performs in Google search results.

checklist-for-web-contents-seo-success

4. Set Up Google Analytics

Use Google Analytics. It’s a free tool that helps you measure your website traffic. Also, it helps to understand how users interact with your site. It’s a must-have for any website owner.

checklist-for-web-contents-seo-success

5. Use Ahrefs Webmaster Tool

Ahrefs Webmaster Tool is a paid tool, but it’s worth the investment if you want to improve your website’s SEO. It allows you to see what keywords your website ranks for, backlinks, and more.

checklist-for-web-contents-seo-success

6. Install the Yoast SEO plugin

Yoast SEO is a free WordPress plugin that helps you optimize your website for SEO. It’s one of the most popular SEO plugins available, and for a good reason.

Yoast SEO makes optimizing your website’s title, meta descriptions, and content easy.

Yoast SEO

Keyword Research Checklist

Keyword research aims to identify the right keywords to rank higher on Google. By targeting the right keywords, you can improve your website’s SEO and increase traffic to your site.

7. Find the primary keyword

You must find a primary keyword relevant to your content. This main keyword should be high search volume and low competition. You can use various tools to help you find the right keywords for your content.

8. Use Google Suggest

Google Suggest is a great place to start your keyword research. When you type a keyword into the Google search bar, Google will show you related keywords.

Google

9. Use the Google Keyword Planner

The Google Keyword Planner is another great tool for finding keywords. It lets you see how many people are searching for a particular keyword.

checklist-for-web-contents-seo-success

10. Use LowFruits

LowFruits is a great tool for finding low-competition keywords. It offers different options for finding keywords. The tool uses Google Suggest and looks at related phrases.

Low Fruits

11. Search online communities

Online communities like Reddit are great places to find long-tail keywords. They allow users to ask questions and get feedback from other community members.

12. Use Quora and Answer the Public

Quora and Answer the Public are two great resources for finding question keywords. They allow you to see what questions people ask about a particular topic.

checklist-for-web-contents-seo-success

Content Checklist

After completing your keyword research, optimizing your website content is time. Here’s a checklist to help you get started.

13. Identify long-tail keywords

Long-tail keywords are more specific and have a lower search volume. But, long-tail keywords are often easier to rank. They also generate more traffic than general ones.

14. Identify relevant keywords for your business

Not all keywords are relevant for every business or website. That’s why selecting the right keywords to target carefully is important. Relevant keywords are relevant to your business and have a high search volume.

The term “keyword relevance” refers to how often a keyword is mentioned on a web page and the importance of that keyword to the overall topic of the page.

While there is no perfect formula for calculating keyword relevance, you must ensure your page is focused on one topic and use the keyword in the title.

15. Optimize your title and meta descriptions

Your title and meta descriptions are important elements of your website content. They should be clear, concise, and keyword-rich.

16. Use “The Skyscraper Technique”

The Skyscraper Technique is a popular content marketing strategy. It involves creating in-depth content better than competitors’ content on Google. You can use this technique to improve your website’s SEO and increase traffic to your site.

17. Break paragraphs into 2-3 sentences

Short paragraphs are easier to read. Research has shown that people are likelier to skim content than read it word-for-word. That’s why breaking up your paragraphs into 2 or 3 sentences is important.

But again, don’t have all paragraphs in 2-3 sentences, have variations. Otherwise it will create monotony and make the whole article boring.

18. Write in-depth articles

To rank higher on Google, you need to write in-depth articles that provide value to your readers. Go beyond the surface level and give your readers the information they need.

19. Use multimedia in articles

Multimedia is a great way to engage your readers and keep their attention. What’s more, it increases the user’s time on site. That is one of the Google ranking factors.

So adding images, videos, and infographics to your articles can help you rank higher on Google.

20. Delete “deadweight” pages

“Deadweight” pages are pages on your website that don’t generate traffic or leads. These pages can hurt your website’s SEO and should be deleted.

Tip: Use Google Analytics to find pages that hardly get traffic in a month. Then either delete those pages or revamp them with better content.

On-Page SEO Checklist

On-page SEO is the process of optimizing your website content to improve ranking.

You can use many different techniques to optimize your website content. It includes using keywords, adding schema markup, and using multimedia.

21. Use schema markup

Schema markup is code you can add to your website’s HTML. It helps search engines understand your site’s content. Adding schema markup to your site can improve your website’s SEO and increase traffic.

checklist-for-web-contents-seo-success

22. Add a primary keyword to the URL

Adding a primary keyword to your URL can help you rank higher on Google and get more traffic to your site.

23. Use keywords in the title front

Using keywords in the front of your title can help you rank higher on Google.

24. Use short links

Short links are easier for people to remember and can help you rank higher on Google.

25. Use a primary keyword in the first paragraphs

Google gives more attention to your blog post’s first 100-150 words. That’s why it’s important to use your keyword once in the first two paragraphs.

26. Use keywords in subheadings, like H2, H3, H4

Make sure to use a primary keyword in your subheadings, including H2. H3. and H4 titles.

27. Use external links

Linking to other websites can help you improve your website’s SEO and increase traffic.

28. Use relevant internal links

Linking to other pages on your website can help improve your website’s SEO.

29. Optimize image names

Image optimization is important for ranking higher on Google. Make sure to give your images descriptive, keyword-rich file names.

30. Optimize image ALT tags

The ALT attribute is used to describe an image for people unable to see it. It is also used by search engines to help rank the image in their search results. Adding keywords to your image ALT tags can help you rank higher on Google.

Optimize image ALT tags

31. Use Synonyms and LSI Keywords

Using synonyms and LSI keywords can help you rank higher on Google. The search engines are smart. They can recognize the keyword when you use synonyms, so no more “keyword stuffing”.

Besides using synonyms, you can also use LSI (Latent Semantic Indexing) keywords. LSI keywords are keywords that are related to your primary keyword.

Using LSI keywords can help you improve your website’s SEO and rank higher on Google.

Link Building Checklist

Link building is the process of acquiring links to your website from other websites. You can build links using various methods. For example, guest posting, finding unlinked mentions, and pitching resource pages.

Link building is important for SEO. It helps improve your website’s search engine ranking.

By acquiring links from other websites, you increase the number of links to your website. This tells Google that your website is valuable and worth ranking higher.

32. Publish guest posts

One way to build links to your website is by writing guest posts for other websites. When you guest post, you include a link back to your website in the author bio section.

Guest posts help to increase exposure to your website. Besides, it can also lead to traffic from people who read your guest post and click on the link to your website.

33. Check your competitors’ links

Another way to find link-building opportunities is to check your competitors’ links.

Use a tool like Ahrefs to see what websites link to your competitor’s website. If they are linking to your competitor, there’s a good chance they would be willing to link to you as well.

34. Find unlinked mentions

Another way to build links is to find unlinked mentions.

Enter your website URL into the search bar. Then BuzzSumo will show you all the times your website has been mentioned online. If any mentions don’t have a link back to your website, you can reach out to the site owner and ask them to add a link.

35. Reclaim lost links

If you’ve ever changed your website’s URL or had a removed page, there’s a chance you’ve lost some links in the process.

You can use a tool like Ahrefs to find these lost links. Then reach out to the website owner and ask them to update the link.

36. Give an interview to a Youtube blogger

Youtube bloggers are a great way to reach a new audience and promote your website or business. You can find bloggers who are relevant to your niche and offer value to your target audience.

If you have a Youtube channel, use the Youtube cover template. The tool allows you to create eye-catching channel art and impress subscribers.

37. Mention influencers in your articles

Influencers are people who have a large following on social media. Mentioning an influencer in your article can help you get traffic to your site.

38. Pitch resource pages

Another way to build links is to pitch resource pages.

A resource page is a page on a website that lists helpful resources on a certain topic. For example, if you have a dog blog, you could pitch to a resource page that lists helpful websites about dogs.

To find these pages, you can search for “keyword” + “resource page”.

39. Use cold email outreach to build backlinks

Cold email outreach is reaching out to websites and asking them for a link. This can be done by finding the website owner’s contact information using Hunter.io. Then send them an email asking for a link.

40. Build contextual backlinks with link roundups

A link roundup is a blog post that rounds up the best resources on a certain topic. For example, a blog about dogs could have a link to the best websites about dogs. To get featured in a link roundup, you can reach out to the website owner and pitch them your website.

Link building is an important part of SEO, and many ways to build links. Using this checklist, you can ensure you’re covering all your bases of link building.

Technical SEO Checklist

Technical SEO is the practice of optimizing a website for better SEO visibility. It can include improving website speed, ensuring mobile-friendly design, and fixing crawl errors.

41. Find crawl errors

One way to improve your website’s technical SEO is to find and fix crawl errors.

Crawl errors are problems that prevent Google from indexing your website properly. These can be found in Google Search Console under the “Crawl” tab. Once you find them, you can fix them and submit your website for re-indexing.

42. Check your site’s loading speed

Another important factor in technical SEO is website speed.

A slow website can hurt your search engine rankings and frustrate users. You can check your website’s speed with the Speed test tool. Once you know your website’s speed, you can work on making improvements.

43. Ensure your website is mobile-friendly

More people use mobile devices to access the internet. So, making sure your website is mobile-friendly is important.

Google has a tool called Mobile-Friendly Test. It can be used to check if your website is mobile-friendly. If it’s not, you can make changes to make it more mobile-friendly.

44. Secure your site with HTTPS

One of the most important technical SEO factors is security.

You should make sure your website is secure with HTTPS. This will help protect your website from hackers and give users a better experience. You can buy an SSL certificate from a reputable provider and then install it on your website.

45. Fix broken links

Broken links can hurt your website’s technical SEO. These are links that lead to pages that no longer exist.

You can find and fix broken links with a tool like Ahrefs. Once you find them, you can reach out to the website owner and ask them to update the link.

46. Plan your website structure

Another important factor in technical SEO is website structure.

A well-structured website is easy for search engines to crawl and index. It’s also easier for users to navigate.

You can use a tool like Screaming Frog to audit your website’s structure. Once you know where your website needs improvement, you can make changes to improve it.

Plan your website structure

47. Ensure your site is indexable

If your website isn’t indexable, it won’t appear in search results. Check the site for problems like duplicate content and no index tags.

There are a few ways to ensure your website is indexable by search engines.

  • One way is to submit your site to Google and other search engines using their submission forms.
  • You can also use a sitemap to help search engines find and index all the pages on your website. A sitemap is an XML file that contains a list of all the pages on your website.
  • Finally, you can use robots.txt files to tell search engines which pages on your website they should and should not index.

48. Make sure your website is accessible at one domain

If your website is accessible at multiple domains, it can hurt your technical SEO. You should make sure your website is only accessible to one domain. You can redirect all traffic from the other domains to your primary domain.

When a website is accessible at multiple domains, it means that the website can be accessed from multiple URLs. This can be helpful if you have a website with multiple domains (e.g., www.example.com and example.com).

You can use a 301 redirect to tell browsers and search engines that the website is the same and to send traffic to the preferred domain (e.g., www.example.com).

49. Install an image compression plugin

One way to improve your website’s technical SEO is to install an image compression plugin. This will help reduce the size of your images, improving your website’s loading speed.

Many different image compression plugins, such as Optimole or Imagify, are available on the market today.

50. Fix 404 pages

If you have 404 pages on your website, you’ll want to fix 404 errors as soon as possible. Not only are they bad for user experience, but they can also hurt your SEO.

You can use a tool like Google Search Console to find and fix broken links.

Conclusion

It’s no secret that good SEO practices can help your website rank higher in Google search results. Following this 50-point SEO checklist will ensure you haven’t missed anything important.

So what are you waiting for?

Use this SEO checklist to improve your site ranking and see more traffic from Google today.

How to download YouTube videos on Mac?

YouTube, the planet’s largest video website, has a diverse user base that searches, views, and uploads videos daily. YouTube allows kids who enjoy watching clips to watch them offline. This article will show you How to download YouTube videos on Mac.

Below are some methods to download YouTube videos on Mac:

Method 1: Using the Browsing app

Use the “savefrom” site to download YouTube content. Here’s how:

Launch the browser and go to YouTube to discover the video you want to save. Now, in the URL field, type “ss” before “com/” so that it looks like “https://ssyoutube.com/watch” and press the Enter button or “Start.”

Download YouTube Videos on Mac

It involves moving to the site, allowing you to get any video. Choose the video type and resolution before clicking the “Download” box.

Download YouTube Videos on Mac

It will start downloading and appear in the Media Player application or File Manager.

Method 2: Using the VLC player

Press the “Download.DMG File” option to download and install the application on your Mac.

Copy the URL of the YouTube clip you would want to save. Launch VLC Media Player. After installation, you will locate it under the Applications directory. Navigate to the “File” option. It’s found on the top bar side of the display. Choose “Open Network.”

VLC Player: Download YouTube Videos on Mac

It brings up the “Open Source” dialog box. Use Cmd+V after selecting the “URL” field here. It will insert the link into the area. Press the “Open” option. It can be found in the lower right of the panel. The content is now added to the VLC list.

Use VLC Player to Download YouTube Videos on Mac

Choose “Media Information” from the “Window” option. The “Window” is located near the upper screen.

C:\Users\Sujith\Desktop\download.YouTube_mac_5.png

Use Cmd+C to copy the “Location” Link here. This link is located beneath the panel. Addresses here would be copied to the clipboard.

C:\Users\Sujith\Desktop\download.YouTube_mac_6.png

Copy this URL, paste it into any browser, and then hit “Return.” The content will start playing in your browser. To download, right-click it in the browser, then choose “Download Video As.”

C:\Users\Sujith\Desktop\download.YouTube_mac_7.png

Now open it in your favorite video player.

Method 3: YouTube Premium

The official method for saving YouTube videos on Macs is to use YouTube Premium. To preserve downloaded contents, you must connect to Youtube at least once in 30 days. To download the video, follow these steps:

Use your browser to visit YouTube to get YouTube premium. On the left-hand side, click “YouTube Premium,” and you will see all of the offer’s details here. To try YouTube Premium, click on this button that says “Get YouTube Premium.”

You’ll have to ensure you’re logged into your Google account. You will get a congratulatory message after you conclude signing up.

Youtube Premium

On the main YouTube homepage, in the top left-hand corner, you’ll see some text indicating that you’re now a premium member. You can now download videos.

Below the video page, you’ll notice a new button for the download. Click on this, and this will start to download the video.

C:\Users\Sujith\Desktop\download.YouTube_mac_8.png

In the top left-hand corner, you can now click on the menu, and you’ll see that there’s now a new button that says “Downloads.” Click on this, and you can see all downloaded content.

In the top right-hand corner, you can click “Download Settings” and decide what resolution you want for all your downloads.

C:\Users\Sujith\Desktop\download.YouTube_mac_9.png

Method 4: Using Chrome Extension

You can download videos from YouTube with Google Chrome browser extension:

Navigate to the “YouTube Video Downloader” extension site. The website will auto-identify your browser. After you’ve confirmed the browser, press “Add To Chrome.” Get and deploy the extension. Reboot your browser after that. Visit YouTube and look for the clip you wish to save.

Now notice a video recorder icon beneath the content. Press this icon to store videos on your Mac. You can select one of the accessible formats.

C:\Users\Sujith\Desktop\download.YouTube_mac_10.png

Method 5: Using QuickTime

Mojave Macs might use QuickTime to save any videos. Below is how it’s done:

Use “Cmd+Space” to launch QuickTime Player and begin inputting “QuickTime.” Select “File” then “New Screen Recording” from the toolbar at the beginning of the window. A pop-up box will show.

Use QuickTIme to Download YouTube Videos on Mac

Before proceeding, press the downward icon adjacent to a red icon and ensure that Internal Mic is chosen. Select the reddish button.

C:\Users\Sujith\Desktop\download.YouTube_mac_12.png

You will be presented with indications stating that you can press to capture the window or drag to capture a portion. Move the cursor across the video. Now press the “Record” button. Launch the YouTube video and ensure the audio is turned on.

Once YouTube content has finished playing, press the stop option in the upper menu. The clip would load for you to preview beforehand, saving it.

Shorten the start and end of the clip by clicking the “Edit” option and selecting “Trim.” Then, using the yellowish bar, pick the section of the content that you wish to retain and press “Trim” to save the choices. The screen records would be stored on the desktop by design.

FAQ to download YouTube videos on Mac

1. How can you copy the URL from YouTube?

Browse YouTube on your Mac and check for the original video. Enter any phrase into the search bar and press the search icon to find it. Then, select content that will begin playing at the top of the window. For copying the link, select in the URL bar, then use “Cmd+C.”

C:\Users\Sujith\Desktop\download.YouTube_mac_13.png

You can also copy using the share icon located beneath the video window. Press the “Share” button there.

C:\Users\Sujith\Desktop\download.YouTube_mac_14.png

Now, on the pop-up, select the option “Copy.”

C:\Users\Sujith\Desktop\download.YouTube_mac_15.png

The address is copied to Mac’s clipboard. Then paste it within an application.

2. Where to check for the downloaded files on Mac?

On Mac, downloaded videos are often kept in a separate folder named “Downloads” under your user profile directory. macOS provides a shortcut to the Downloads directory within the dock.

You could also locate the Downloads directory with “Finder,” a document management tool. Press the Finder logo in the dock, resembling a smiling face, to launch it.

C:\Users\Sujith\Desktop\download.YouTube_mac_16.png

Check on the left side of the Finder screen and select “Downloads” from the “Favorites.”

Conclusion

According to Google, downloading licensed YouTube content from unknown sources is unethical. Likewise, legally saving YouTube content necessitates the purchase of a paid service.

Using Chrome, Safari, and other browsers, use addresses to save YouTube videos on Macs. If you intend to change any downloaded content, a few top editing tools can help.

How to Screenshot on Mac

You can use many standard keypad actions to take a snapshot on any Mac. But if you’re using the MacBook Pro with Touchpad, you can also use an extra shortcut. This article shows you many ways on How to Screenshot on Mac.

Screenshot techniques for Mac

Each Mac produces high-end snapshots, which you could subsequently modify as desired.

In Macs, you can take a snapshot in different ways:

Method 1: Using Keyboard Shortcuts

(a) Shift-Cmd-3:

Press "Shift+Cmd+3" to record your complete display.

How to Screenshot on Mac

A little thumbnail peek will appear on the bottom-right side of the panel whenever taking screenshots.

How to Screenshot on Mac

When you have more than one monitor, it will capture and save snapshots of each monitor.

(b)Shift-Cmd-4:

"Shift+Cmd+4", begin dragging to determine precise areas from screens for grabbing. After taking the picture, let go of the touchpads or mouse buttons. Then, tap thumbnails to alter the snapshot if it appears within the corner of the display.

How to Screenshot on MacYou also have the following choices:

When the spacebar is pressed and released:

How to Screenshot on Mac

The pointer changes it into a tiny camera symbol that you may hover across open windows. When taking a snapshot of the screen you want, tap on that. Choose thumbnails to alter the snapshot if it appears in the screen’s corner.

Alternatively, wait until the image is saved to your Mac. The said technique yields screenshots with a whitish border and a subtle shade.

While moving to select a region, hold down the spacebar while holding down your trackpad/mouse:

It allows you to move the chosen part on the display while locking in its form and shape.

Sometimes a couple of pixels displace the initial draft region. So it may easily adjust by holding the spacebar until having to release the mouse button.

Simply holding the Shift option:

It freezes inside all sides of a crosshairs-made chosen area except the bottom edge. It allows you to slide the mouse upward or downward to set the bottom border upon moving. It emphasizes a specific location beforehand, releasing the touchpad/mouse button.

Reorient the right border of the selection region by releasing the Shift while continuing to hold down the mouse click. Users could switch between dragging the beneath and right edges by holding down the Shift while using the trackpad/mouse button.

(c) Shift-Cmd-5 (via Mac Snapshot App):

The Snapshot program is included with MacOS’s present releases. For instance, this could be Catalina, Mojave, Monterey, or others. Hit "Shift+Cmd+5" to launch that application. The display’s bottom might show a little navigation pane.

How to Screenshot on Mac

How to Screenshot on Mac

One can capture a snapshot of the whole screen, a particular panel, or a selected area. These are via using the three symbols on the left. One can capture footage of the entire display/targeted area using the latter two symbols on the right.

The snapshot would be taken using the Capturing button on the very right. It has Mac’s snapshot menu featuring all components’ labels. There are several settings available here.

In addition, there’s a submenu titled “Options.” These are after choosing the “Capture” button. Here one can select saving snapshots, how long one would like to wait until the image is made, and other options.

(d) Shift-Cmd-6:

You could also take a snapshot of what’s now displayed on a Retina display. This feature is available on the earlier 15/16-inch MacBook Pro or a modern 13-inch Mac Pro (with a Touch Bar). To capture a long and slender snapshot on the Touch Bar, press "Shift+Cmd+6".

How to Screenshot on Mac

Method 2: Using third-party Apps

CleanShot X is an excellent program that offers a wealth of functionalities. For example, it can take widescreen shots, including micro ones.

Its functionality extends beyond Mac’s native application, which is already superior. Additionally, it lets you take pictures of particular panels regardless of the background. Further, scroll grabs could take screenshots of entire pages on long sites.

Try hiding desktop-based icons to ensure photographs always appear neat. Tick the “Hide while” option under “General” inside “Settings.”

CleanShot X

Snapshots could be pinned since they are always viewable. It helps present instructions in blogging and tutorials. You can check its prices here.

How to screenshot the selected portion on Mac?

To take a screenshot of a selected portion on Mac, use "Shift+Cmd+4". To begin, you drag to determine precise areas for grabbing. For moving your choice, hold down the Space key when you drag. Moreover, click Escape “Esc” button to withdraw shooting snapshots.

CleanShot X

After taking the picture, let go of the touchpads or mouse buttons. Then, tap thumbnails to alter the photo if it appears within the corner of the display. Alternatively, you can stand by for the snapshot to store on the desktop.

How to screenshot the whole screen on Mac?

To take a screenshot of the whole screen on Mac, hold “Shift+Cmd+3.” A little thumbnail will appear on the bottom-right side of the panel whenever taking screenshots. Then, tap the thumbnail to alter the photo.

How to screenshot the whole screen on Mac

The picture would be copied to the clipboard, allowing you to put it into a different application. Alternatively, you can wait for the snapshot to be saved on the desktop.

How to screenshot a particular window on Mac?

To take a screenshot of a particular window on Mac, you hold “Shift+Cmd+4+Space” and drag to precise areas from the screen for grabbing. The pointer changes it into a tiny camera symbol that you may hover across open windows.

Moreover, click Escape “Esc” button to withdraw shooting snapshots.

How to screenshot a particular window on Mac

When taking a snapshot of the screen you want, tap on that. Hold down an “Option” button when clicking to remove its window’s shadowing from snapshots. Choose thumbnails to alter the snapshot if it appears in the screen’s corner. Alternatively, wait until the image is saved to your Mac.

How can I use QuickTime on a Mac for taking a moving snapshot?

The procedure for taking a snapshot in QuickTime is as follows:

First, launch QuickTime. Next, select “File” from the context menu. Then, select “New Screen Recording.” Now, from the submenu, choose “Record Entire Screen.” Then tap any place on display with a camera symbol that would appear as the pointer.

moving snapshot

Each document you want to grab should be scrolled over. Then re-click “File.” Next, choose “New Screen Recording.” Finally, to end capture, hit “Stop Screen Recording.”

How to take screenshots with Touch Bar?

Hit the Touch Bar’s “Screenshot” option. Upon taking screenshots, press “Save To” and then choose what you want to accomplish with this.

How to take screenshots with Touch Bar

The snapshot can be opened directly inside the Preview, Mail, or Messages application or copied to a clipboard. It can be saved to the Documents directory or Desktop.

A snapshot of complete program windows would be taken using the “Window” feature. Hover the mouse pointer well over the program you want to snap while this selection is chosen, and then tap.

The conclusive selection, “Entire Screen,” is what it says. All the information shown on the monitor will be captured in a snapshot when you press “Entire Screen.”

How to take screenshots with Touch Bar

How to Screenshot on Mac with Preview?

To capture the whole or a portion of the display, use Preview. Then launch the document or photo you wish to take a snapshot of within the Preview program.

Attempt either of the below:

Full display: Select “File,” then “Take a Screenshot,” and then select “From Entire Screen.”

A section of the display:

Go to “File,” following “Take Screenshot.” Afterward, “From Selection” would be picked. Next, pick an edge of a region you wish to grab with the cursor, start dragging over it, and then let go.

Only one window: “File,” then “Take Screenshot,” then “From Window” should be selected. Finally, select the panel by clicking it.

How to Screenshot on Mac with Preview

How do you screenshot web pages on Mac?

Use “Shift+Cmd+3” for quickly obtaining online pages. As a substitute, you could snapshot a complete page using the browser’s capture tool. However, how you accomplish this will vary depending on the browsers.

Here’s an instance with Firefox:

Open Firefox, then navigate to a web page you want to take. Next, use your right mouse button on the web page and select “Take Screenshot.” Next, tap “Save full page,” as in the mini settings tab you’ll find in the top-right corner if you’d like the snapshot to capture the whole thing.

Next, select “Copy” to add the photo to clipboards or Download to save the image to the Mac in PNG format.

To record a portion of a page, hold-tap location upon that, move the mouse to enclose the region you want to take, and then let go of the clicking. Then, select “Copy/Save” once more to obtain an image.

How do you screenshot web pages on Mac

How to print screenshots on Mac?

"Shift+Cmd+3" keystrokes should all be held down simultaneously. Inside the edge of a display, thumbnails of the snapshot can appear. In such cases, tap it to reveal the picture. Otherwise, an automated desktop saving of the image would take place.

How to print screenshots on Mac

When required, resize or modify the image. As for print, select “File,” next “Print,” or else hold "Cmd+P."

modify the image.

Where can we find screenshots taken on Mac?

It is in the “desktop” directory. “Screen shot [date] and [time].png” is the image format when a snapshot is taken and saved to the desktop. For example, the image name is "Screen shot 2022-09-09 at 1.05.00 PM.png."

Where can we find screenshots taken on Mac

One may modify the shared snapshots folder on Mac using “Options” inside the “Screenshot” application. Thumbnails could also be dragged to a directory or file.

How to share Mac Screenshots?

Once you’ve taken a screenshot with “Cmd+Shift+4,” drag a box. You can click the little thumbnail in the bottom right corner of your screen and hit “options.” Then, you can send it via “mail” or “messages.”

How to share Mac Screenshots

The same goes for “messages.” It’ll just open a new message that you can send to someone. So if you go to mail, it’ll open a new email with the screenshot attached, and you can send that to somebody.

Or, if it’s something that you have on your desktop, you can drag it onto the app icon when it’s on the desktop.

It’s a nifty little-known shortcut. But when you drag it onto “mail,” it’ll open a new email message, and you can send it straight from there.

Same with “messages.” If you drag it down onto the “messages” app, it’ll open a new message with that screenshot in the body. Then you can type the person’s name to send it to them.

How can I store Mac screenshots in a clipboard instead of a file?

Hold the “Ctrl” button when taking a snapshot to copy the picture to the clipboard.

So, to create a snapshot of a full screen, hit the “Control” button on keyboards while holding the “Shift+Cmd+3” combo. To grab a section of the screen, press "Shift+Cmd+4" whenever necessary.

How can I store Mac screenshots in a clipboard instead of a file

How can I auto-save screenshots on Mac?

To grab the entire display, execute “Cmd+Shift+3.” The capture would be auto-stored on a “desktop,” like a PNG document. It includes the names like “Image” and then a number, for instance, Image 1.

How can I auto-save screenshots on Mac

How do I rotate screenshots on Mac?

Start the document you wish to rotate in the “Preview” program.

To turn any pictures, select them and then use the “Touch Bar” or “Rotate Left” feature to move them towards the left. To continue rotating, keep pressing.

Holding the “Option” button while selecting the “Rotate Right” feature will cause the picture to turn right.

Flip any photo: Select “Flip Horizontal”/”Flip Vertical” underneath “Tools.”

How do I rotate screenshots on Mac

Where are my screenshots getting saved on my Mac?

By design, images are immediately stored on the desktop when you use one of the snapshot keyboard actions.

Sometimes images are not stored on the desktop but rather in specified directories. For instance, most applications offer a directory just for snapshots. So it is often made using a program that provides a keyboard function to take photos.

To find where the software’s settings are kept, look in the “Applications” directory.

Applications

To stop saving them, hold “Cmd+Shift+5”. Ensure “Desktop” / “Other Location” gets chosen within “Options”. Be mindful of ticking “Remember Last Selection.” Then, execute a “Capture.”

Other Location

Conclusion

A well-written snapshot annotation can offer the same guidance as a few paragraphs of content. Moreover, it is relatively easy.

In contrast, now it’s simpler than ever. It is because of the inclusion of a specific MacBook snapshot and clips capturing option within macOS.

You could also try a few site builders for Mac if you want to integrate screenshots on your site. Enjoy!

Webflow Review: 8 Pros & 2 Cons of Using Webflow Site Builder

Due to services like Webflow, website designing has reached new heights. What seemed complex a few years back, has been completely eased out by a lot of website builders.

Knowing which website builder suits your requirement requires some background knowledge about the website builder along with understanding what it offers.

One such website builder which has been increasingly popular is Webflow.

Webflow is a drag and drops website builder to build responsive websites. It was first started in 2013 and is headquartered in San Francisco, California, USA.

But, Webflow has a more unique pitch than most website builders:

What if you could combine the usability of a website builder with the power of code? And a fully featured CMS (content management system)?

So from that alone, Webflow probably sounds like a great website builder.

Which leads to questions:

What is like to actually use Webflow? Is it good? Is it suitable for YOU?

Well, hold on, before you decide if Webflow is suitable for you.

Through this review, I will unveil some of the pros and cons of the oddest website builders around.

Pros

  • loads of features provide EVERYTHING you need, including: an overall website builder; templates; content management system; ecommerce and marketing tools; and more.
  • Specifically, the design tools are very powerful and rival what you can do with code
  • wide range of plans means a lot of customer choice
  • secure host
  • easy to use, relative to powerful features
  • great performance
  • good customer support
Cons

  • limited code customization
  • plan variation may be confusing
  • more of a learning curve because of the many powerful features
  • Traffic limits on some plans

Pros of Webflow:

One of the biggest advantages with Webflow is that you can start using it for free. Well, this is free forever. A suitable place for individuals having a low budget.
webflow

WebFlow Features:

It would be appropriate to add their features as one of the pros.

Well, certainly there is a reason for this.

Its drag and drop website builder immensely supported by HTML, CSS, JavaScript is powered to build visually appealing and interactive websites which can also support animations.

However, no code is needed on your end to build your website on Webflow.

The CMS (content management system) and E-commerce supported by Webflow allow easy website designing. Similarly, the editor along with seamless web hosting capabilities makes it quicker to launch your website.

The plans include advanced SEO controls and the sites developed with Webflow are all SEO friendly.
advanced-SEO
seo-friendly

Apart from this, you get access to over 100 responsive templates. Webflow provides a REST-based API which you can use to update/add/delete items from your CMS.
plans

Plan Flexibility:

Webflow provides versatile plans. As I mentioned you have the option to choose their free plan which remains free forever. With the free plan, you can use two projects with full designing and publish on webflow.io.

But of course, you’re probably wondering about the real question: how much is Webflow, actually?

Let’s get into the real Webflow pricing. There are two types of paid plans:

The plans are divided as –

  • Site Plan – This is a basic website building
  • Account Plans – This is a more advanced website building with added features.

types-of-plan
Site plan provides 2 types of plans-

  • Website Plans
  • E-commerce plans

siteplans
There are 4 plans with the basic plan starting at $14/month.

Webflow Pricing

The E-commerce plans also contain 3 different plans, starting at $29/month.

Webflow Ecommerce Plans

This is a bit on the higher end, but overall the Webflow ecommerce price range is like other website builders, including e-commerce focused website builders.

The standard plan contains 2% transaction fees, while the other plans do not have any transaction fees.
webflow-payments
The plans support a host of marketing features with few basic and advanced level marketing support. This is available irrespective of the plan you choose.

The e-commerce plans possess a revenue cap for the first two plans.

A point to note is that the renewals are higher priced as compared to the first-time pricing.

So those three e-commerce and four “website” plans are ALL part of the first main category, of “site plans.”

While it has lot of options, the Account plans do too.

Accounts plans have 2 types of plans:

  • For In-house teams
  • For freelancers & agencies

Webflow Type of plans
In the in-house teams plan, you have one free plan along with 2 other paid plans. The plans available are as highlighted below.

Webflow In-house Team Plan

The Freelancers & Agencies there are 2 plans as highlighted below.

Webflow Freelancers & Agencies Plan

Overall the plans are affordable for the loads of features each plan offers. Given the fact that you have so many plan options, you can choose the best plan based on your website requirements.

Webflow Security:

Along with providing several features, Webflow also has appropriate basic security controls. Each plan is supported with a free SSL certificate.

All its plans include a backup and versioning.

Webflow-security

Beyond this, the complete website can be password protected and secured.

webflow-password-protection

Webflow provides enhanced security by ensuring it has the required compliance.

In addition to meeting industry security standards with ISO 27001 certification, Webflow is undergoing another audit soon.

Moreover, the payment processor Webflow uses is secure:

Webflow-security compliance

Which is essential for having a secure online store.

Ease of Use:

You might be wondering about Webflow’s ease of use.

After all, even though you don’t have to know code at all, Webflow offers so many features that it might not seem easy to use.

But the good news is that even the features Webflow offers themselves are easy to use.

There are a lot of intuitive web design features added onto Webflow’s website builder.

Your website designing only requires simple drag and drop functionality. And again, with zero code required.

webflow-editor

The website editor provides a simplistic view with all menu aligned at extreme left.

You can select an element and customize it. Webflow supports over 2000 fonts.

webflow-fonts

While I say each element can be customized, I would also mention that this in no way is basic customization. You can create some really complex customizations.

webflow-customization

So that’s why Webflow is such an impressive website builder. And although Webflow offers tons of features in the site builder, the overarching focus is on ease of use.

The huge range of features that come by default negate the need for plugins, which you would usually need on a rival CMS like WordPress, or even rival website building companies like Shopify or Wix.

However, you can still add HUNDREDS of third party applications through the app Zapier, which Webflow allows easily.

But I’ll talk more on the CMS feature later in this review. For now…

Templates:

Webflow as a website builder provides a good 100 template collections. These templates are completely mobile responsive.

You can customize this using the inbuilt Webflow’s code-free editor.

Webflow provides a list of website templates to search from.

webflow-type-of-template

The best Webflow templates do cost money.

But luckily, Webflow also provides a good collection of free templates for e-commerce, CMS, Business, and others.

It’s easy to find a template right for your specific site.

Webflow segregates each template based on the domain and presents a list of template designs.

webflow-template-collection

All in all, Webflow provides a great selection of templates. The templates work well with the site builder, and are great for making a responsive website.

Response and Uptime:

Webflow has very good uptime and is super fast. It has to be, or it wouldn’t be as successful as it is:

Webflow processes 3x more pageviews through its customers’ sites a month than CNN.com and BBC.com combined.

It’s roster of high profile clients means that Webflow is trusted with, and successfully, delivers excellent performance.

Along with uptime, Webflow also provides a good response time with fast speed support. The infrastructure used by Webflow is designed to ensure consistent, fast speed for your site.

webflow-speed example

Webflow supports the immediate scaling of resources. All plans include CDN for fast speed. While the more advanced plans include Advanced Global CDN.

That’s essential for anyone who anticipates steady site growth, or even just if you want to be ready for the moment your site explodes in popularity.

The most basic plan supports 2,50,000 site visits per month.

I have an issue with that, that I’ll get to later in this review, but it’s not big.

CMS support:

Webflow’s CMS is flawlessly integrated into the rest of the software and features.

If you used another CMS, like WordPress, you would need to connect a web host and domain, plus perhaps even buy a page builder add-on within that CMS.

You can see my review of the best WordPress alternatives for more on that topic.

Or if you used a more normal website builder with less features, you’d probably have minimal CMS features (like Wix).

You can check out my review of the best Webflow alternatives to see more on how its competitors compare. But ultimately there’s a loss of features for Webflow alternatives.

So using Webflow’s CMS is much easier to use than another CMS but also more powerful than a typical site builder.

You can quickly create a blog post, and review and manage all your other content.

Additionally, Webflow provides good CMS support.

To illustrate this better, Webflow also provides elaborate videos showcasing each feature in more detail.
webflow-cms

E-commerce support:

Webflow has an equally good support for e-commerce designing. This is not only evident from its e-commerce plans, but also from the customizations it provides in its editor for e-commerce store development.
webflow-ecommerce-support
Setting up and designing your store can be completed in a matter of a few clicks.

As with regular site editing, no code is needed.

Plus, ecommerce features include more than just ecommerce site design. Marketing tools are also included to elevate every step of your ecommerce game.

Here’s one example of this:webflow-ecommerce-email design

Customer Support:

If you ever feel lost while using Webflow, then no need to worry, since Webflow provides a huge array of resources you can review.webflow-support

One of the best things about the forum is that you can always get the latest tips and fixes.

For example, some of these important topics were last updated with information less than an hour before I typed this:Webflow-forum

The forum is a great resource, but Webflow University is the real highlight here.

Webflow university has a ton of information that basically substitutes for a knowledge base.

Just about every single aspect of making a good website, or how to use Webflow specifically, is there, a further boon to ease of use.

Apart from the host of customer support options, Webflow also provides an instant resource finder option.

instant-answers

If still, you need help, then you can also message their customer support. The customer support typically provides email responses within a few hours.

webflow-send-msg

Webflow has a good blog collection which is also informative.

webflow-send-msg

Webflow provides support with a lot of video tutorials covering each topic.

For anything else, Webflow has an FAQ section as well.

webflow-faq

Cons of Webflow:

Webflow has a lot of intuitive features, no doubts about this. But does this also have any shortcomings?

Like every other platform, Webflow does have few shortcomings, which I would highlight over here.

I will not speak about their higher renewal rates or transaction fees in the e-commerce basic plan. This is something that a lot of its competitors also incorporate.

So, what exactly are these cons?

Code Customizations:

Webflow is easy to use with its drag and drop options. However, if you are looking for complex code level customizations, then this is not possible.

While Webflow works well with its predefined templates and editor customizations, it provides minimalistic code-level customization.

Additionally, while you can export your site’s code via download, you can’t wholly import site code into Webflow.

Plans:

The plans provided by Webflow are versatile, as I have highlighted earlier. While this gives a huge choice, in several cases users may find these plans confusing.

Additionally, it can feel unnecessarily complex at first: it’s not like most rival website builders, which don’t have the same range of plans.

On first glance, it does take some time to decipher which plan is the most suitable one. Having said this, I would also like to mention that Webflow’s customer support guides you through your queries pertaining to suitable plans.

Steep learning curve:

Webflow provides a huge list of features. With a long feature list also comes a steep learning curve.

So, if you are just getting started, this may require going through multiple tutorials before actually starting to explore and use their editor.

Thanks to their good resource collection along with a number of video tutorials it eases the learning curve to a greater extent.

Additionally, as I said earlier, the website builder and CMS are ultimately intended to make web design easier.

So it gets easier to use Webflow quickly, and the learning curve doesn’t last too long, thanks to both support and a good interface.

Ultimately there’s just a natural tradeoff that happens when you’re trying to develop websites with code, but without actually writing code.

Traffic limit

While most hosts and website builders will give a number as to how much traffic a given plan can support in a month, these are usually just estimates.

In fact, most companies will say explicitly that traffic numbers are not formal limits set by the plans, just an estimate of capacity.

This is not the case with Webflow:

Webflow Pricing

However, the limits are pretty reasonable proportionate to price, features, and performance.

Do I recommend WebFlow?

In this review I looked at a lot of pros and cons.

Like others Webflow does have few cons, but nothing that is a serious concern. At the end of the day, it’s clear there’s a lot more to like about Webflow than not.

Webflow provides plans which would fit any website budget, any type of site, and a range of site requirements.

Whether you maintain a blog or informational site that requires an extensive CMS, or whether you just need the best one-page site ever–all the tools are there.

Its feature list, ease of usage, template collections, seamless editor and great customer support, are something which you just can’t miss, they stand out among website builders.

Frankly, Webflow may add some complexity its competitors don’t have, but it’s also the closest a site builder has come to giving users power of code in terms of what they can create.

If you are truly looking for a simple to use drag and drop editor which can create visually appealing site designs, then Webflow is a one-stop shop for that and much more.

But if this review sounds too good to be true, don’t take my word for it! The best way to find out if you like it…is to just try it!

Remember, you can make a site for FREE and only pay when you feel ready:webflow-free

Hope this review was helpful to you.

Happy site building!

Submit review

Submit a short but detailed review and get FREE link to your website.

Review Title

Ratings

Uptime

Performance

Value for money

Customer Service


Overall Rating

Upload image (Optional)