How to Screenshot on Windows?

Do you want to keep duplicate copies of internet banking transactions or event tickets for emergencies? Then you require taking a screenshot of the screen. We have compiled a list for knowing How to Screenshot on Windows.

How to Screenshot on Windows

Method 1: Keyboard Shortcuts

Print Screen

Hit the “PrtSc” button or “Print Screen” to record your complete display.

The snapshot would be transferred to the clipboard rather than stored as a document.

Next, launch a photo editing program (like Microsoft Paint). Then paste your screenshot further into editors, then save the image.

How to Screenshot on Windows: Using Keyboard Shortcuts

Alt + PrtSc

Push “Alt + PrtSc” to take a screenshot of the current window you are working on. It would copy that to the clipboard on Windows 10, requiring pasting into a different application to store it. Under Windows 11, it might immediately copy but keep it within the “Screenshots” directory.

How to Screenshot on Windows: Use Alt + PrintScreen

Windows key + PrtSc

Push the “Windows icon + PrtSc/Print Screen” combination to catch the complete panel and save it instantly. It’ll store in the “Pictures” then “Screenshots” directory by default.

C:\Users\Sujith\Desktop\screenshot_windows_3.png

Method 2: Snip & Sketch tool

Snip & Sketch with Windows 10 would be the ideal way to take screenshots, alter, or exchange screen grabs. To run it, press the key sequence “Windows Icon+Shift+S.”

So at the beginning of the display, a little dialogue box offers choices. Choose between taking a rectangle, free-form, windows, or an entire display grab. Then, inside the bottom-right edge of the monitor, a previewing notice would display. To access the application, tap on that.

How to Screenshot on Windows: Snip & Sketch Tool

Method 3: Snipping tool

Starting with Windows Vista, this tool has been available. “Snipping Tool” is still readily available through the search box.

To take the screenshot, press the “New” option. A rectangle clip is a standard, yet you can take free shape, whole screen, and window sections. It would not immediately store; you must explicitly save upon exiting. And it copies screenshots to the clipboard.

How to Screenshot on Windows: Snipping Tool

Method 4: Screenshot Web Pages

One may snap a photo of the entire page via the browser’s capturing feature. But, it will vary based on browsers.

So here is an illustration using Firefox:

Launch Firefox and head towards the web page you desire to view.

Then, tap the mouse’s right button on the site to pick “Take Screenshot.”

When you prefer the picture to catch the entire page, touch “Save full page.”

It’s on the small settings section inside the upper right.

Then, choose “Download” to store it on your computer.

Also, use “Copy” to copy the picture to your clipboard within PNG format.

Hold-press a spot on the web page.

Then drag the cursor to encompass the area you wish to take and release your finger from pressing.

To get a snapshot, choose “Copy/Save” again.

C:\Users\Sujith\Desktop\screenshot_windows_6.png

Method 5: Via Third-party Apps

If most integrated Windows solutions don’t please, there are many 3rd party snapshot programs. All provide their own set of extras. One such is Greenshot, that’s open source and free.

You really can record entire (scrollable) web content with Greenshot.

Elements of the image can be easily annotated, highlighted, or obscured. You can save the snapshot to a document, transfer them to printers, or copy these to the clipboard. You could also link to an email, share with Office apps, or publish to websites including Flickr.

Method 6: Windows Game Bar

“Game Bar” would be an interface you may use to create screenshots and video recordings within many Windows games and applications. Hit “Windows Icon+G” to launch it.

Choose the camera symbol inside the overlay option to create a whole-screen image. When selecting the record option, you could also capture a video. You could also use audio by tapping the mic symbol.

It saves images through PNG format towards the “/Videos/Captures” directory. You could also access it from the app by selecting “Show all captures.” It is beneath the snapshot and record controls.

C:\Users\Sujith\Desktop\screenshot_windows_9.png

Method 7: Screenshot in PowerPoint

Within PowerPoint, choose “Screenshot” inside the “Images” category here in the “Insert” section. Next, select the thumbnail photo of a frame to include a snapshot of the complete screen for your file.

C:\Users\Sujith\Desktop\screenshot_windows_11.png

Tap “Screen Clipping” to append a section of the initial one inside the “Available Windows.”

C:\Users\Sujith\Desktop\screenshot_windows_12.png

While doing this, the display turns whitish, and the cursor changes to a crossing. Then hold the mouse’s left button while dragging to pick the portion of the display you wish to clip.

The panel or display section you chose is added automatically to the file. To modify and improve the snapshot, utilize the “Picture Tools” tools.

Method 8: Using Google Chrome Extensions

You can take screenshots on Windows using Google Chrome Extensions. Some of the known extensions are:
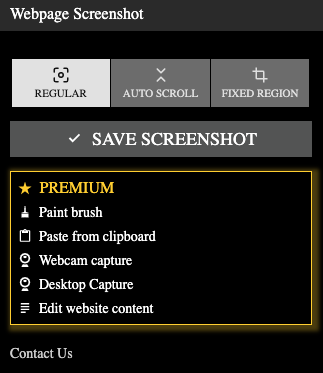
(a) Webpage Screenshot

This image has an empty alt attribute; its file name is Screenshot-2022-10-03-at-3.20.00-PM.png

(b) FireShot

This image has an empty alt attribute; its file name is Screenshot-2022-10-03-at-3.19.10-PM.png

How to Save Screenshots on OneDrive?

Users might use Microsoft’s OneDrive and take a snapshot. Then they could be prompted to store snaps to OneDrive in an automatic state.

Photos would be stored on the clipboard, enabling you to paste these right away. It will also be held in the computer’s “OneDrive/Pictures/Screenshots” directory. Thereby instantly transferring into cloud storage.

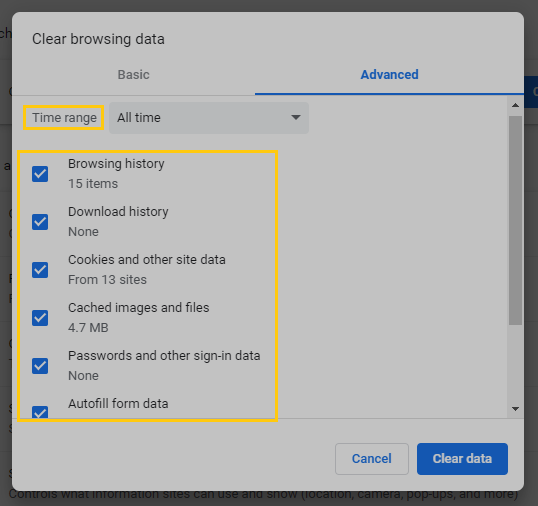
Inside the taskbar’s notification center, click a whitish OneDrive service logo. Choose “Settings.”

C:\Users\Sujith\Desktop\screenshot_windows_7.png

Select “Automatically save screenshots” here in the “Backup” section.

C:\Users\Sujith\Desktop\screenshot_windows_8.png

How to Share Screenshots on Windows?

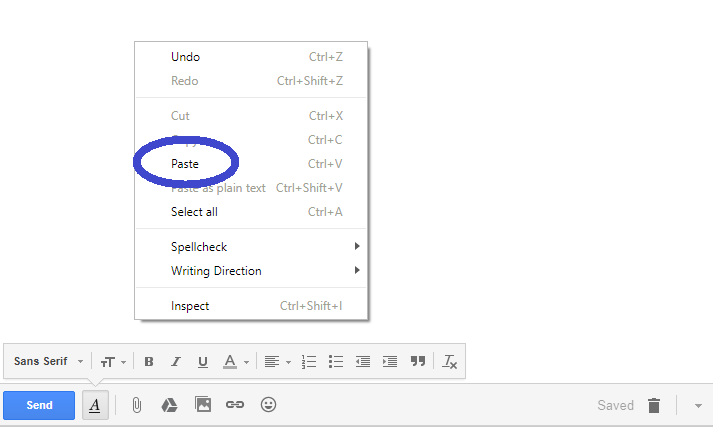
Navigate to the screen from which you want to capture a picture. So as previously said, hit the “PrtSc” key. Thus, your snapshot will be copied to the clipboard. Next, launch any email client, messaging software, or site.

Then, right-click a blank place within the app you’re writing and choose “Paste.”

C:\Users\Sujith\Desktop\screenshot_windows_10.png

Conclusion

One well-developed photo annotation might provide the same information as several content columns. Furthermore, it’s indeed relatively simple. Windows OS includes specialized snapshot actions and clip-taking features.

Once you have taken screenshots you can use those to create your own website using these website builders.

How to Download YouTube Videos on iPhone?

Daily, people worldwide view one billion hours of YouTube content. You might wish to save YouTube videos on your device for individual or commercial use. However, the tricky part is figuring out How to download YouTube videos on iPhone?

You could save YouTube videos on your iPhone with a couple of clicks without using a computer. So let’s have a look at the top techniques down below.

How to Download YouTube Videos on iPhone

Method 1: Using Blackhole Spliter App

Download the Blackhole Spliter app from Apple’s App Store to your iPhone. Once installed, navigate to the YouTube clip and copy its video Link. Next, launch the app.

Tap the Blackhole icon to start downloading the content to your iPhone.

Blackhole Spliter App

That is sufficient. Using it is the simplest technique for downloading YouTube videos. They are stored in the “Photos” app. You can find the video by choosing “All photos.”

Method 2: Using the Browser app

Launch Safari, navigate the “Upull” site, and paste YouTube’s video link. It will automatically show a window with options. Choose the appropriate resolution and file type for the video.

Browser App to download Youtube Videos

You can also download with proxies by using the “proxy” button. If the video opens in a new tab, tap there and save the video. For instance, hold a single finger on the iPhone’s display for roughly a second. Then tap “save/download video.”

Method 3: Using the URL

You can use a site like “yt1s” to download Youtube Videos on iPhone rather than using any apps. Yt1s supports all file types for downloading, like MP4, 3GP, MP3, FLV, MO, WMV, WEBM, M4V, and others. You can also convert them.

Process:

Search by name or copy-paste any YouTube URL you want to download.

Then, select “Convert” to begin the process.

Next, select the YouTube video type from the drop-down box and click the “Get link” button.

It will then convert.

You tap “Download” to save.

Youtube Downloader

Method 4: Official YouTube app

YouTube content for iPhone can be saved using the Official YouTube app. So, take the following steps:

Open the YouTube app on your iPhone.

Search and open the video you want to save.

Then, hit the “Download” arrow beneath the video.

Official Youtube App for iPhone

Select the video’s downloading resolution. It could come in 144p, 360p, or 720p resolution.

Now, click the “Download” option to begin downloading the video.

Download Quality

To view video files or compilations, move to the app’s “Library” menu and select “Downloads.”

Note: You can get videos without the “YouTube Premium” account. But you will no longer be able to download HD versions, only videos of quality 360p.

Method 5: Screen Recording

After the iOS 11 launch in 2017, you can screen record any YouTube videos. This approach is available directly on the iPhone, keeping it simple and free.

Visit “Settings” then “Control Center” to activate video recording. Navigate to the “More controls” column and touch the “green Plus (+) symbol” beside “Screen recording.” This procedure enables capturing videos.

Now visit YouTube and look for the content. Switch to landscape mode. Within the Control Center, swipe upward, then touch the Record option (circular button).

Screen Recording on iPhone: download YouTube videos on iPhone

Whenever the video is finished, hit the Record option once more to end the session.

Then save that video, or it will be saved to the Camera Roll.

Edit the video:

A notification will appear within the notification panel.

To access the video, tap the notification.

You may customize the recording by opening it within the “Photos” app.

Next, launch the video and click the “Edit” button on the top-right side.

Underneath the video, a sliding bar should emerge.

Scroll them at either corner of the slide, enabling you to modify each frame.

To implement changes to the start or conclusion of the video, shift the toggling bar.

Once you’ve finished adjusting, press “Done.” Before leaving the editing, select “Save as new clip” to save it.

FAQ on How to download YouTube videos on iPhone

1. How to copy the link from the YouTube App on the iPhone?

Open YouTube on an iPhone and search for the specific video.

Tap the video to play.

It should have a variety of icons beneath the streaming window.

There, tap the right-pointing curvy icon.

It displays the Share section.

Share option: download YouTube videos on iPhone

Then, tap the first choice on the window “Copy link.”

Copy Link option

Tapping it copies the URL to the iPhone clipboard. To insert the Link inside an app, long-touch any input location and tap “Paste.”

2. How to store YouTube content on the camera roll in an iPhone?

Launch the video from the “Downloads” folder. Then, touch the “Share” or “Open In” button on the left-bottom side.

download YouTube videos on iPhone

Next, tap the ‘Save Video’ box to store YouTube videos on your iPhone’s camera roll. It saves the videos under “albums” in the “Photos” app.

Save Video on iPhone: download YouTube videos on iPhone

3. What exactly is YouTube Premium?

YouTube Premium is a paying membership that allows users to download media from YouTube’s official app. It is a pro version that provides different user plans.

The basic paid scheme starts at $11.99 per month for individuals, $17.99 for families, and $6.99 for students. A yearly fee of $119.99 is charged. Moreover, YouTube Premium gives a free 30-day trial among its special features to new customers.

Also, view YouTube Music and Videos without advertisements, within the background, and even offline.

4. How to download audio only from YouTube?

Try one of the various video conversion sites to download YouTube videos as audio. For example, as discussed in Method 3, you might convert every YouTube URL to an mp3 type in seconds.

Conclusion

Use the methods we suggested to download your preferred YouTube videos and watch them later. Use URLs to download YouTube content on any iPhone using Safari, Chrome, or other browsers.

Downloading copyrighted YouTube clips from unproven resources is illegitimate, as per Google. Furthermore, legally accessing YouTube material requires consumers to obtain a premium subscription. You might want to try a secure VPN or proxy for your iPhone while downloading videos.

How to download YouTube videos on Android (4 Methods)

Assume you’re driving to a distant location and wish to view YouTube videos. In such cases, you must know How to download YouTube videos on Android. You may discover almost every form of content on YouTube to stream on Android.

Till now, YouTube included over 2000 million monthly logged-in viewers. Moreover, buffering triggered by unreliable connectivity is eliminated when viewing downloaded videos.

Methods to Download YouTube Videos On Android

Method 1: YouTube app

You may save YouTube videos for Android via the YouTube app.

Just follow these steps:

Using your Android phone, launch YouTube.

Kindly check for the clip you wish to save.

Click the “Download” icon towards the bottom of the clip.

Choose the downloadable resolution for the video.

It could be 144p, 360p or 720p.

Choose Download Quality in Youtube App

Now, press the “Download” button to download the video.

To access video files or collections, go to the “Library” section of YouTube’s app and click “Downloads.”

Note: You might download it without the “YouTube Premium” membership. However, you’ll lose the ability to download HD ones, limiting the picture quality to 360p.

Save to the SD card

If you have an SD card inside the device, your downloads can be saved to the gallery. Yet follow these steps:

Click the profile image just at the top of the display within the app. Then select “Settings.” Now choose “Background and downloads.”

Android Device Settings

Next select “Use SD card (download videos to the SD card).”

Select SD Card to Store Youtube Videos

Then navigate to the clip you intend to save on the SD card. Then, as said in Method 1, hit “Download” underneath the video.

Note: When you do not enable an SD card, all videos will be saved to your device’s internal storage. Check if there is sufficient space here on the SD card to download the clip.

Method 2: Download using browser app

To download YouTube clips, we can go to savefrom.net website. The steps to execute are as follows:

Start a web browser and navigate to youtube to find the clip to save. Then, in the URL box, put “ss” preceding “com/” so it appears like “https://ssyoutube.com/watch” and click the “start” or Enter key.

C:\Users\Sujith\Desktop\download.youtube_android_5.png

It would take to “savefrom.net,” which allows saving any video. Select the clip type and resolution, then click the “Download” button.

C:\Users\Sujith\Desktop\download.youtube_android_6.png

It should begin downloading and will be available in the Media Player app or File Explorer.

Method 3: Using a third-party app

Google limits third-party apps which download YouTube clips. Therefore Android-based apps are not available in the Play Store. Instead, install the downloader in “APK” format through sites.

So use Snaptube since it is the best one. Snaptube is a multi-purpose app allowing you to watch and save various types of video content.

To utilize the Snaptube app, follow the below steps:

To begin, open your browser and navigate to Snaptube’s main site.

Then save Snaptube’s APK to the device.

Next, touch on the downloaded file to allow you to install the program.

Now, start the app upon installation and search for items to download.

Once you’ve found the right results, touch on the picture thumbnail to have it launched on the app.

So to download, touch on the download symbol beneath the window.

SnapTube

Choose quality and type for the clip, and wait to be stored on your gadget.

Choose Download Video Quality in Snaptube App

That is it! This simple procedure allows you to access the Snaptube app freely and save videos. You may also copy and paste the video link directly into such applications.

Follow here to view the location of the downloaded media in the app:

Then, tap “My Files” on the Snaptube’s bar below. Locate the particular video, then tap on this symbol:

C:\Users\Sujith\Desktop\download.youtube_android_9.png

Select “Location” to get the precise memory location.

Method 4: Download YouTube videos on Android using URL

You could also use a site like “y2mate” to save YouTube videos through the URL without relying on 3rd party applications. Y2mate enables downloads from all file types, including MP4, MP3, 3GP, FLV, WMV, MO, M4V, WEBM, and others.

Procedure:

Look up by title or copy and paste any hyperlink you wish to convert.

Then, press the “Start” option to initiate the conversion process.

Next, choose the YouTube clip format to save, and press the “Download” option.

Download Video and Audio from Youtube

FAQ on downloading YouTube videos for Android

1. How to get a URL through the YouTube App?

Launch YouTube from an Android device.

Enter any keyword into the search box and press the search option to see results.

Select a clip.

Your video would begin to play now at the beginning of the display.

It should contain various icons below the playing window.

Then, tap the rightward-pointing curved symbol beneath.

It brings up the Share options.

C:\Users\Sujith\Desktop\download.youtube_android_11.png

Next, select “Copy link,” the very first option on the screen.

C:\Users\Sujith\Desktop\download.youtube_android_12.png

It takes the URL of the clip into the Android clipboard. Long-press any input region, then hit “Paste” to put the Link into an application.

2. Can you share Youtube videos you’ve downloaded on Android Phone?

Whenever you save YouTube videos on Android through the official app, your video is solely saved inside the app. It implies that after downloading from YouTube, you will be unable to share with people.

But, if you get YouTube clips on Android via third-party apps, these would be saved on the device’s internal/external storage. Thus, allowing you to share these with everyone quickly.

3. How can you download only audio from YouTube?

To save YouTube videos as audio, utilize one of the several video converters. For instance, as described in Method 4, you could convert any YouTube URL into an mp3 format within seconds.

4. Is it legal to download YouTube videos?

Getting YouTube clips from unverified resources is unlawful, as per Google. But it also can result in account suspension. So big Tech asks its users to purchase a paid subscription to get YouTube content legally.

5. What is YouTube Premium?

YouTube Premium is a paid subscription enabling downloading content from the YouTube app. A premium version is a paid product that offers various user schemes. The standard paid program begins at $11.99 monthly, $17.99 for a family, and $6.99 for students. An annual fee is $119.99.

However, YouTube Premium offers a 30 days free trial of its unique features for new users only. YouTube Videos and Music can be accessed without ads, playing in the background, and viewing it offline.

Conclusion

You may download your favorite YouTube videos and view those later using the methods explained here. You use URLs to grab YouTube videos for any Android phone using Chrome.

Snaptube is the best Android freeware content downloader. Also, if you want to publish your videos on a dedicated platform, click here.

Top 3 BigCommerce Alternatives (As low as $9/mo, 2000+ Apps)

While BigCommerce powers several websites, there are a lot of concerns raised by its users like unintuitive jargon for beginners or difficult to use advanced features which is why you should consider BigCommerce Alternatives.

Below are few reasons why you would wish to choose BigCommerce alternatives.

  • BigCommerce is expensive around pricing options
  • It limits online sales per year based on pricing plan
  • Third-party apps, plugins, and software are priced separately
  • Though it mentions no transaction fees, this is applicable only to few selected payment gateways
  • Propagates leading payment gateways. No standardized payment options for credit cards
  • Smaller app marketplace
  • High switching cost to alternate platform
  • Low on inventory management
  • Expensive themes with very few selection of free themes

Clearly, these are some of the concerns you have to ponder about in case you are a BigCommerce user.

Through this post, we will discuss, top 3 BigCommerce alternatives to provide you a wider spectrum around the next set of options.

Complete Guide to DNS Records

Customers trust developers to launch new websites without interfering with their daily lives. The purpose of this article is to provide DNS Records in detail to website owners.

What are DNS Records?

DNS Records are records that provide data about a domain including the IP address associated with that domain and ways to handle requests for that domain.

DNS records are made up of several text documents published through DNS syntax. Such syntax is string symbols that function as a DNS host’s command line.

DNS Records hold data, including where our web page is located online. Also, it contains whoever hosts our services, like email. It is additionally known as “Zone Files.”

DNS is a mechanism that connects people to pages by comparing human-readable hostnames (such as hostingpill.com), including the unique ID of hosts in which the site is kept. DNS is the shorthand for Domain Name System.

Here’s a look at a couple of records.

DNS Records

The most popular DNS Records

NS record

The NS (nameserver) record indicates the authoritative server for that domain. The IP address of the destination can be found from an NS record using DNS lookup.

Domains typically have several nameservers indicated. For instance, “ns01.hostingpill.com” and “ns02.hostingpill.com” might be used.

A and AAAA record

“A” records point domains to IPv4 addresses, whereas AAAA records point to IPv6 addresses.

“A” record, most commonly used, keeps pointing domains to IPv4 addresses, like “11.22.33.44”. So everything you require to establish it on our domains would be one IP address to refer to.

Empty records (known as ‘@’) direct our primary web address to a host. Users could run various web servers. In such instances, users could configure sub-domains to locate different IP addresses.

Eventually, the wildcard, generally seen as ‘*’ or ‘*.yourdomains.com,’ behaves like a grab record. Moreover, it reroutes any subdomain that hasn’t been identified to another IP address.

The “AAAA” record works exactly like “A”. Besides, it refers to the IPv6 addresses that look like “FE88::0101:B4FF:FE2E:8238”.

MX record

MX record (Mail Exchange) directs email to the mail server. It is associated with email-based hosts. Hosts are typical “@,” and even the variables are the locations of email hosts. These, too, have “Priority” variables that rank distinct mail hosts.

Each email host service uses a unique set of constant MX records. It indicates that even if users recognize they’ll be serving email. For instance, it could be with Office365. We’ll be able to locate its records quickly, and we’ll have to construct them. The same is accurate for everything else.

It could send emails with our domain name, like “user1@example.com”. Go here for the technique for configuring your email DNS.

CNAME and DNAME record

CNAME (Canonical Name) is a DNS record that maps an alias to a domain name. It allows us to generate redundant names that refer to our web page’s identical segment. For instance, it could have “buy.onlinecart.com” established as the primary record.

Users could save DNS queries by constructing a CNAME “purchase.” But pointing this to “buy.onlinecart.com” rather than producing “purchase.onlinecart.com.”

Another would be to alter where users are directed when sub-domains on our property alter. So users might well have relocated “buy” to “famousbuy.onlinecart.com” here. So users create CNAME transmitting “buy” to the newest place fast, correct, and auto.

The DNAME ‘delegation name’ record generates domain aliases. Yet the alias also redirects all sub-domains. E.g., consider developers of ‘example1.com’ who purchased the web address ‘website.org.’ They could assign it a DNAME pointing to ‘example1.com.’

Also, its indicator might stretch to ‘blog.website.org’ and every other sub-domains.

TXT record

TXT record is used to feature text information gathered from external resources to domains. Yet they are most widely used as “proof” toward 3rd party services when we own and handle domains.

SOA record

“Start of authority” SOA keeps track of crucial details around a zone. It holds domain administration data. It contains domains, like an admin’s email account and the time domains were last modified. It also includes the recommended interval for host refresh.

Illustration of SOA:

name: example1.com

record type: SOA

MNAME: ns.mainserver.com

RNAME: administrator@example1.com

SERIAL: 1111111111

REFRESH: 85200

RETRY: 6900

EXPIRE: 3900000

TTL: 10900

PTR records

“PTR” (Pointer record) record is used for giving domain names connected to IP addresses. PTRs are frequently referred to as the reverse of “A”. So PTR links any IP addresses to domains, whereas “A” links domains to IP addresses.

It is frequently used in specific email applications like spam detection. It’s used to ensure a mail server is allowed to access the address an email originates from.

It gives a web address for use in reverse searches. A person who owns an IP address of our site, which is typically our backend host, must determine the PTR record. Whenever we establish a host, several hosting providers would configure it for us.

PTR is saved underneath IP addresses inverted and appended as “.in-addr.arpa.” For instance, “255.2.0.192.in-addr.arpa” is where the PTR reference for such addresses “192.0.2.255” might be kept.

SRV record

SRV (Service) record is used for a particular target port to direct traffic from each domain to the other. SRV enables redirections of specific services, like VoIP/Chat, toward a different place. It also supports Instant Messaging (IM).

An XMPP method is denoted by “_xmpp” within the sample below, and “_tcp” indicates a transport method. The hostname is “example1.com.” The destination host is “server.example1.com,” and the port number inside that host is “5123.”

An illustration could be:

_xmpp._tcp.example1.com. 85900 IN SRV 11 4 5123 server.example1.com.

CERT record

Domain certifications are kept in CERT along with other DNS data. It contains certificates with public key storage. So one can operate a speedier web page.

Users should operate websites utilizing HTTPS when they manage a form of e-commerce. So it could be while handling user data (login credentials). Moreover, users are forth with web assets and think about safety.

Thus we must obtain a certificate. It enables sending encoded information as requested, confirming the legitimacy of our website.

NAPTR record

A “Name authority pointer” NAPTR is used with an “SRV” record to build URIs that lead to specific locations using regular expressions.

It is used with telecommunications or VoIP solutions. For instance, VoIP operators allow them to trace their email. Moreover, it enables phone contacts with SIP hosts using “SRV” to place callings.

Conclusion

You now need to possess a firm foundational knowledge of DNS Records. You only require the details provided here to understand the basics. There’s much to know when it pertains to computer networks and DNS.

Professionals who wish for dependable networking must establish records maintained on hostnames planet wide. Thus it allows everyone to navigate the web comfortably.

What is HTTP 307? How to fix it?

Web applications may show error messages like HTTP 307.

HTTP 307

Here a rerouted request is processed using the initial request’s function and body.

What is HTTP 307?

The location header specifies a 307 “transitory relocation” of requested data to Links. There’s only one distinction between HTTP 307 and HTTP 302. HTTP 307 ensures the function/body wouldn’t alter whenever requests are forwarded. Both cannot be cached except if the reply explicitly permits it.

Use HTTP 303 in situations in which you desire the function used to be altered to GET. Thus, it’s helpful when you wish to respond to the PUT function with verification messages. Messages could be, for example, “You properly uploaded ABC” for any uploaded assets.

A few older clients have been inaccurately modifying the function of 302 to GET. It results in erratic behavior here on the Internet of non-GET functions and 302. As opposed to the predictable behaviors of 307, they behave the same as “GET” queries.

The client side should not alter its request function. When undertaking a fully automated routing to a target source, this shouldn’t happen. A target source is a temporary place at distinct URIs.

Clients should keep using the exact request URI as we advance. It’s because the rerouting could alter over time.

Hosts must create Location headers with a URI mention for an alternative URI. It is inside the reply. The hosts’ reply payload contains a brief hypertext memo with the web link to various URIs.

What causes HTTP 307?

Identifying the source of an HTTP 307 message could be challenging.

There are various factors, but they might not occur frequently.

  • It may take up to 24 hours once you construct Amazon S3 buckets for such names to spread over whole Locations. It’s due to Queries to Region end-points not located in similar Regions and with the bucket. It is during this period that may result in 307.
  • Such redirection could be due to HTTP Strict Transport Security (HSTS) or browsers on a host. Firebase hosting makes use of this safety mechanism.
  • Chrome, for instance, invokes this sort of pre-request redirection. But there is no “real” HTTP request or status code.
  • Browsers report when there’s an internal redirect within them before sending the request.
  • The issue could have been thrown from the Kestrel server. It’s when you try to deploy the ASP.NET core application in the Linux operating system. Due to this, the web application could not work.
  • All the HTTP calls redirecting to the HTTPS URL could be a cause. For instance, port 5000 was for HTTP calls and 5001 for HTTPS calls.
  • While trying to load analytics.js on Chrome, the 307 redirection occurs.
  • The host’s incorrect configuration may result in erroneous responses.
  • Incorrect reroutes could well be a cause.

How to fix HTTP 307?

Spend time locating the web page that starts HTTP 307 redirection.

Yet let’s discuss these and look at some workable solutions.

  • Rather than reply, you desire to put a 307 on a web page. Use “Server.Transfer” while redirecting in ASP. It instantly hands access over to the desired web page rather than sending browsers a reply. For instance:

Server.Transfer(“page_target.aspx”);

Next, add below to “Page Load” for the targeted web page:

Response.StatusCode = 307;

Response.StatusDescription = “Temporarily Redirecting”;

  • Go back to the source code to fix this automatic redirection from HTTP to HTTPS. Then remove the automatic redirection. In the case of ASP, you could go to the “program.cs” file and remove the middleware code.

Use HTTPS redirection once you remove the redirection code. Then publish the code for the deployment again. The user might want to test the application after deployment with the help of HTTP. If so, the user can remove the automatic redirection middleware.

Otherwise, the user has to set up the HTTPS with the SSL certificate in the Kestrel server.

  • As with the AWS Cloudfront interface, invalidate anything with the “/*” prefix. It’s to resolve the “Access denied” that appears after forwarding to a protected S3 bucket.
  • You must erase the browser’s cache and cookies to trigger any HTTP request. Use “Ctrl+Shift+Del” during this whole stage if using a Windows computer. Afterward, select “Advanced.”

Select “All Time” as within the timeframe and tick practically every box. It is essential to include Caches and Cookies inside this list to delete. To complete, select “Clear.”

Clear Browsing data

  • Attempting to submit a query via a new incognito/secret window is another option.
  • You can discover which extension triggered the redirection as follows:

First visit “chrome://net-internals/#events”. Then trigger the request, for instance, google analytics. Go back to the chrome “chrome://net-internals/#events” tab. Then look for URL_request matching your request (use the search box to filter the search).

Click on the entry to show the log on the right side. You will see the request’s extension name, id, and other information. After finding the extension name and id, you can visit “chrome://extensions.” Then disable/remove the extension that modified the request.

  • Fix 307 redirect in jQuery. 307 is automatically handled by browsers and cannot be intercepted by jQuery. Use a different “statusCode” to do the redirect. For instance, 410 Gone. Do this when you don’t have access to your server code.
  • Fix hosts on Arduino. A slight re-formatting of your decision code to use “else if” instead of “if” would make it easier.

If you receive a “Command” URL, you must respond with 307. If you don’t receive it, then reply with the homepage. If you receive a “Command” URL, you must respond with 307.

If you don’t receive it, then reply with the homepage. So it applies if you aren’t receiving anything except the ones you are specifically looking for.

  • Fix malformed Nginx. Nginx before 1.1.16 did not support returning 307 responses. You can read the change log with 1.1.16.

We recommend bringing developmental servers to stable ones if you need this functionality. For instance, Nginx 1.0.5 is ancient at this point.

  • Fix via WordPress’s “Redirection” add-on. Set it up and follow this link’s steps noted in “Method 2”.

How to avoid 307 error?

The suggestions made here may prevent the HTTP 307 state.

  • Set up the AWS CLI (AWS Command-line Interface) when you access buckets via it. The Amazon S3 buckets and the AWS CLI should be within the same zone. Ensure you use the latest AWS CLI edition to avoid issues executing instructions.

Queries are forwarded to standard S3 endpoints. It’s when you use an Amazon CloudFront deployment among Amazon S3 origins. It could be s3.amazonaws.com. Conventional S3 end-points are located in “us-east-1” sector.

One could alter the originating web address of a distribution. It’s whenever one needs to reach Amazon S3 within 24 hrs of establishing buckets. Bucket’s geographical end-points must be included in the web domain to avoid issues.

One could alter the originating hostname:

It could be “awsexamplebucketname.s3.amazonaws.com” to “awsexamplebucket.s3.us-west-2.amazonaws.com.” So it is in instances when buckets are in “us-west-2”.

  • Do state AWS Regions for buckets of HTTP queries. You lessen DNS redirection frequency by doing it. You also avoid problems with its amplification. Use the “—region” element with the query to state an AWS Location, for instance, when you use an AWS CLI.
  • Keep redirections with alternate URLs specified in the link’s rel=”alternate” tag/Sitemap. It could need to avoid issues.

Avoid using automatic redirects for language purposes based on either the “Accept-Language” header. It also applies to IP address geography.

  • Googlebot will have problems as it crawls from the United States. Instead, put a friendly notice on for international sites’ page saying:

“I see you are in the United States. Tap here to see our US site.”

Conclusion

“Temporary Redirect” 307 cannot affect SEO because it happens within browsers. So unless you get another kind of 307, it’s nothing to worry about. After removing browser add-ons, you can experience 301 redirects rather than 307.

If the URL is temporary, please use a 307. Use only 302 if you want URLs redirecting to show in the search results with the page’s content you are shifting to. If something isn’t temporary but endless, use 301 redirects and not anything else.

Reroutes are essential techniques. It lets us modify the site’s related Addresses without breaking existing linkages. Redirections come in a variety of forms that we’re able to employ.

You may require an incident management program. It’s to assist us in the auto-detection of similar issues in the long term. Better versions of such tools could instantly notify you and your staff about errors.

What is HTTP 415? How to fix it?

Readers could become upset if a specific event reports on websites. Web apps may thus display traits resembling HTTP 415.

HTTP 415

When a host receives a query with an unclear payload, it will return this error. Its originating host declines to process requests. It’s because the target source doesn’t accept this technique.

What is HTTP 415?

HTTP 415 occurs when a host rejects a query due to incompatible content formats. It shows the “Unsupported media type” error message. This error occurs because some multimedia data set is sent to the host that it cannot take or understand.

A query’s specified “Content-Type” or “Content-Encoding” may have caused the formatting issue. Even a first-hand inspection of the contents could cause it.

What causes HTTP 415?

HTTP 415 occurs due to malfunctions in how browsers or the owner’s host communicate.

It could arise due to the following:

  • HTTP 415 occurs whenever proper “Content-Type” headers are absent. An error state of HTTP 415 indicates an invalid media format delivered.
  • A user might upload any picture with one type, like GIF, while a host demands something else, like JPEG. This scenario may result in an HTTP 415 error.
  • Incorrect signs of how a document must decode to get its original payloads could cause HTTP 415. “Content-Encoding” could contain an invalid listing of every encoding that multimedia includes.
  • The information delivered by the client and received by resource hosts may differ.

How to fix HTTP 415?

People may find it easy to make specific suggestions. But, instead of a user fault, it could be a programmer-stage problem.

Let’s explore them together and consider a few viable solutions.

  • You could begin by removing the pictures or videos from the platform. And then, uploading content of one of these types would be the best remedy.
  • Try reducing the image size on Android and other platforms. Then, try restarting the device. Finally, try converting the picture format. You could also use any image repair tool for this.
  • An “application/json” value for the “Content-Type” header’s attribute must often be in-use. It is for the recipient client application to select the most suitable method. It’s also to show the individual the information.

Or it’s handling the data. So “Content-Type” is to explain the information stored in a body. If you’re submitting POST queries via “Postman,” be sure to select these two features:

You must pick “JSON (application/json)” inside “Body”:

HTTP 415: Json in Postman

The second is setting the content type. And by inputting the value “application/json” in “Headers”:

C:\Users\Sujith\Desktop\HTTP_415_3.png

  • Fix via the permissive framework that enables WordPress. For instance, consider the various file formats you could upload to a media repository.

You control who might access content with the “PublishPress Permissions” plugin. For instance, you may prevent logged-out individuals from having immediate access to resources.

Configure WordPress so visitors would only access their uploaded data. Add conditions to enable members to alter the multimedia content of others.

  • Most likely, REST services have a glitch. The problem is fixed by deleting the section below with “charset=utf8”:

Bug:

con.setRequestProperty(“Content-Type”, “application/json; charset=utf8”)

Solution:

con.setRequestProperty(“Content-Type”, “application/json;”)

  • Another important fix is a client’s ability to recognize the appropriate format types. For example, a header called “Accept” could be in-use.

Within this parameter, you could specify which media formats allow for responses. For example, it may specify that the query is to a few select type subsets.

For instance:

Accept: image/*

“image/*” stands for many picture kinds, including image/png, image/gif, and more.

How to avoid 415 error?

Companies examine things from a variety of viewpoints.

The ideas presented here could stop HTTP 415.

  • In Android and related devices, avoid downloading unnecessary items. And uninstall unwanted apps since full memory can mess up.

Avoid using the same SD card on many devices. It ensures that browsers and hosts may receive and send correct file categories.

  • HTTP reply variables collect the information which users might use to solve conflicts. To prevent these results, be friendly with your messages.

Inform users of what occurred. Like an illustration:

HTTP/1.1 415 Unsupported Media Type

Content-Type: application/json

{

“error”: “Address with fresh blog posts reinforces JSON.”

}

  • To prevent this, update the browser’s app to its current stable variant.

The procedure is completed by entering “chrome:/chrome/” in the search box. You’ll be directed to Chrome’s “About” screen. Then, choose “Relaunch” when updating.

  • Details about earlier URL queries or other network actions are available through host logs. Moreover, it describes the connections between cloud services.

It might help in preventing the issue. All logs may display if you start configuring WordPress with the debugger option.

In this case, alterations to a source configuration “wp-config.php” record are necessary. So, use File Transfer Protocol (FTP) here to allow debugging.

Before the extract which cites “Happy blogging,” edit: the “wp-config.php” document. Then, copy, append, then save the following statements:

define( ‘WP_DEBUG’, true );

define( ‘WP_DEBUG_LOG’, true );

Conclusion

HTTP 415 falls under the 4xx class of HTTP responsive messages, known as client errors. Check out our “400s: Client Error” described in that link. HTTP 415 issue displays when using APIs (Application programming interfaces).

Likewise, any incorrect web page forms submitted by users could trigger this response. You may also have typos.

HTTP 415 is unique, though, because finding a solution, if you aren’t a techie, is challenging. You can guarantee an ideal user experience by conducting routine inspections and maintenance.

What is HTTP 418? How to Fix it?

People could get agitated if an event occurs on multiple websites. Thus, programs may exhibit characteristics similar to HTTP 418.

HTTP 418 error

Some web pages use this reply when receiving automatic requests. And other queries they don’t want to accept.

What is HTTP 418?

HTTP 418 is an April Fool’s gag instructed between 1994 and 2014. In this the host declines to prepare coffee when a client encounters an “I’m a teapot” response. And since it is always a teapot.

When momentarily out of coffee, the combination brewing pot must produce 503.

Google offers a brand-new Easter egg for host gurus and SEO nerds. It isn’t intended to be endorsed or put into practice. But Google, even so, put it into practice. The web page itself returns a host response of 418.

HTTP 418 Google I am a Teapot error message

You discover that teapots would pour tea further into the glass when clicking on it on browsers. Or when rotating a smartphone while viewing the web page.

HTTP 418 Google I am a Teapot error message

What is the origin of the 418 “I’m a Teapot”?

During April fool’s Eve, IETF frequently releases parody RFCs. For instance, somebody reportedly implemented IP communication using carrier pigeons. Thus, this warning message is a component of the official HTTP specifications.

HTCPCP (Hyper Text Coffee Pot Control Protocol) was a member of 5 similar Request for Comments (RFC). And it was released on 1st April ’98. It is standard for managing, analyzing, and troubleshooting coffee machines.

We believe the phrase around a “short and stout” reply is now more applicable to small teapots. Yet, it’s unclear if it’s since pots are just as ordinary as coffee machines being servers. Or if the authors had quite a poor time making coffee inside a teapot.

Larry Masinter, an engineer, wrote this programming joke. Then, around ’97, authors added the warning message to their textbook: “The Art of Unix Programming.” They also licensed it with IANA (Internet Assigned Numbers Authority).

What are its Commands and responses?

One expansion of HTTP is HTCPCP. Here are the commands:

POST/BREW: Starts the brewing of tea on HTCPCP hosts. But, it is not recommended to use POST for such a reason.

It is suggested to introduce the newest HTTP query header property called “Accept-Additions.” It will allow extra additives like:

Creams, vanilla, whisky, cows’ milk, raspberries, and aquavit.

GET: Gets tea via the HTCPCP host machine.

PROPFIND: Provides coffee-related metadata.

WHEN: Utilizing this, HTCPCP hosts would halt sprinkling milk further into the coffee. It is only relevant.

It also describes another erroneous response:

406 Not Acceptable: HTCPCP hosts cannot offer a required addition in certain circumstances. The reply could show a list of existing extras. According to the RFC, most automatic teapots can’t currently supply enhancements.

What causes HTTP 418?

Sites might cause this message even if it was initially meant to be a prank.

There could be a few reasons, and it’s an infrequent occurrence.

  • It could occur on older devices like old laptops. Primitive browsers could also be a culprit.
  • It could be due to runtime errors such as virus infections.
  • An abrupt slowdown of the broadband connection could also be a cause.
  • You might have been purposefully banned first by the plugin if it had “Login Limitations.” Or “Intrusion Detecting” functionalities activated.
  • A PHP or Apache “mod security” component in shared hosting might be to blame. For instance, it occurs on hosts like DreamHost.

How to fix HTTP 418?

Specific recommendations can be simple for people to put in place.

Let’s review them now and think about several potential remedies.

  • We search the whole platform’s system files for any 418 mentions. But begin at “wp-content” and move on to the others in WordPress.
  • Fix via cross-referencing various logs. You can receive a copy of the systems log to examine.
  • Try temporarily disabling each plugin module. Do this by appending the beneath statement to the “wp-config.php” document. It’s in WordPress:

define(‘ITSEC_DISABLE_MODULES’, true);

  • Disable any configuration which writes to the “nginx.conf” document in Nginx hosts. Or the “.htaccess” document in Apache/WordPress would be an alternative.
  • Whenever lockouts happen, a plugin could be set up to email a recipient with the cause of a lockout. We use this tool to identify the problem in platforms like WordPress.
  • Unchecking the “Extra Web Security” feature inside DreamHost’s settings for domains will resolve. Then, after a brief delay, pages begin to function while changes take effect.
  • Switch your registries in Node.js from “http://registry.npmjs.org/” to “https://registry.npmjs.org/.” Yet, when attempting to communicate without an HTTPS, append port “443” to addresses.

You could update them via the npm configuration document like the below:

npm set strict-ssl false

npm config set registry https://registry.npmjs.org/

You could also use the command:

npm config set registry https://registry.npmjs.org/

  • Ensure to update any antivirus software and undertake a complete computer checkup.
  • Ensure to update the existing operating system to a recent stable edition.
  • For further information on this, speak with the support team of your hosting company.

How to avoid HTTP 418?

Companies look at events from a range of perspectives.

The use of the following points could prevent alerts from occurring.

  • You must upgrade to the newest stable version of your browsing app. To do this, navigate to “Help” and then choose “About firefox” from the drop-down menu on the top right of Firefox. It would automatically look for new versions.

The updates will download if there is one provided. To finish after downloading, press “Restart.”

C:\Users\Sujith\Desktop\HTTP_418_2.png

  • HTTP reply parameters collect the data that users could use to resolve disputes. Make your messaging approachable to avoid this outcome.

Tell users what happened. As an example in PHP:

<?php

header(“HTTP/1.1 418 I’m a teapot”);

?>

<html>

<h1> Encountered 418 Response “I’m a teapot”</h1><br>

<p>It is an HTCPCP Host teapot. A replying thing could be stout and short.</p>

</html>

  • Avoid it by being cautious when referencing “Easter eggs” like these in your work. Avoid it even in coding sections that are presumably unreachable!

Conclusion

Remember that response 418 belongs to a 4xx family, meaning it denotes client error. 418 aims to clarify that you won’t get coffee via the teapot soon.

And you may want to explore somewhere. For instance, the famous 404 informs browsers of its querying items that aren’t existing.

Developers use this code in several Server-side exceptions and strong authentication. But it doesn’t matter, in our experience!

Moreover, Russia’s military portal issued a 418 response. It occurred whenever viewed from a location outside Russia. It happened anywhere from around 2021 to ’22. It was during the Russia–Ukrainian conflict as the DDoS invasion defense mechanism.

In the predictable future, 418 won’t be substituted with an authorized response message. Yet, though it’s not standardized, technologies let developers provide 418 as a state. For instance, it could be Golang and Node.js.

What is HTTP 409? How to fix it?

Users could get impatient if a scenario arises on many web pages. Then, apps could display errors like HTTP 409.

HTTP 409

What is HTTP 409?

HTTP 409 indicates that conflict with content’s present state prevented the user’s query processing.

It is a problem for search results as it frequently generates ambiguity. Moreover, it duplicates information. How the Content management system and the site communicate is also a concern.

The most common time for disagreements is in reply to a PUT query. It is when uploading a resource that is older than one that exists on the host. For instance, users can get this because of a versioning dispute.

The host must send a header with enough details to enable a client to identify the conflict’s origin.

Depending on the version control, the reply format would probably include data. These data would be relevant for integrating the difference.

What causes HTTP 409?

As its name implies, it is the consequence of a conflict within an HTTP query. As an aspect of examining this particular topic, we have to look at a lot of data.

There could be various causes for this.

  • It could occur in the context of dynamic pages. Such as web pages that show data retrieved from databases or other resources.
    • For instance, an asset may have an editing conflict due to many concurrent edits.
  • It could occur since each requested item isn’t in the anticipated condition.
  • Sometimes, naming your directory/documents with a restricted or banned name can fail.
  • It could be caused when the host is in an overburdening state.

How to fix HTTP 409?

Because the reason might vary based on the circumstance, there isn’t a universal fix. Either users or a server is at fault.

Let’s go through them together, along with some suggested answers.

  • Fix by regularly upgrading any operating system, including security updates. The updating option is easily accessible through “Settings” in Windows 10.
  • You might fix it by conducting an SFC inspection. It scans all secured documents, and a cached copy will replace damaged ones. A solution list is here.

Launch the command prompt. Continue holding the “Windows icon” then hitting “X.” Next, open “Command-prompt.” And make sure to turn on the administrator privilege. Use the code below and hit Enter to begin the SFC assessment.

sfc /scannow

Our operating system would examine the file system. We encourage you to keep an eye on that console as you proceed.

One might proceed with the stages after the first evaluation. Its goal is to confirm and approve a specific resource.

You could restore a particular file, each at a time. Here it scans “ieframe.dll” and could correct an issue.

sfc /scanfile=c:\windows\system32\ieframe.dll

We could scan files using “/verify,” while no modifications done:

sfc /verifyfile=c:\windows\system32\ieframe.dll

After tasks/alerts are complete or presented, the command-line interface should end. Then after, restart the system.

  • Run an anti-malware checkup on the machine. Search for malware/trojan and see if you can stop it. Infections may affect the way sites function in some instances.
  • If using Java, then delete temporary online records. Select “Control panel” from “Start.” Then, find but double-click the “java” symbol. Underneath “Temporary Internet files,” pick “Settings.” Hit “Delete files.”

Also, check all items on the “Delete temporary” screen and hit “Ok.” Then hit “Ok” for all other windows when closing.

  • It could be ModSecurity settings blocking CMS or WordPress scripts. A better way would be to fine-tune the “mod_security” to enable extra queries to route to a WordPress.

Here an illustration is Ten unsuccessful logins inside a Three-minute interval. Such rules would restrict access for said infringing Internet addresses lasting Five minutes.

To achieve it, update your customized Modsec client regulations. And insert the instructions below into the document.

This document is in “/usr/local/apache/conf/” for cPanel hosts. Here are some instances:

SecAction phase:1,nolog,pass,initcol:ip=%{REMOTE_ADDR},initcol:user=%{REMOTE_ADDR},id:5000134

<Locationmatch “/wp-login.php”>

# Configure brute force catching.

# Respond if the block flag is in place.

SecRule user:bf_block “@gt 0” “deny,status:401,log,id:5000135,msg:’Internet addresses closed for Five min, more than Ten logins in Three min.'”

# Configure Tracking. With successful logins, 302 redirects execute, and 200 state logins fail.

SecRule RESPONSE_STATUS “^302” “phase:5,t:none,nolog,pass,setvar:ip.bf_counter=0,id:5000136”

SecRule RESPONSE_STATUS “^200” “phase:5,chain,t:none,nolog,pass,setvar:ip.bf_counter=+1,deprecatevar:ip.bf_counter=1/180,id:5000137”

SecRule ip:bf_counter “@gt 10” “t:none,setvar:user.bf_block=1,expirevar:user.bf_block=300,setvar:ip.bf_counter=0”

</Locationmatch>

  • You could be identifying a file library’s URL rather than the target document itself.

Trying like this could fix – “http://server_name/file_library_name/new_document_name.docx,” for example.

  • Try changing the folder name of your site. For instance, alter from “group” to “groups.”
  • It may also occur due to document size constraints for POST on a remote server. For instance, the Tomcat (Java host) has a default POST scale restriction of 2 Megabytes. Check the “maxPostSizeparameter to fix.
  • Examine the URL. While attempting to create a directory “http://localhost:8080/directory/default/parent/newDirectory.” As “http://localhost:8080/directory/default/parent” might not exist.

Whenever placing the file inside the nested directory, ensure the directory exists. Do not forget about the trailing slash.

  • Browsers could cache the query. You may deactivate this through the Chrome development interface. Or by including the header “{cache: ‘no-cache’}” inside the script.
  • Fix via updating your platform’s URL to “HTTPS.” It is usually within “Settings” and then “General” in the dashboards. But then contact your provider for help diverting all “HTTP” communication to “HTTPS.”
  • Try reactivating and reconnecting security add-ons such as “Jetpack.” Try toggling off/disabling security and third-party extensions on portals and internet browsers. These may purposely hinder connection.

How to avoid 409 error?

Organizations look at situations from several angles. Using the tips provided below may prevent alerts from occurring.

  • The HTTP reply body collects details that the users might use to resolve the dispute. Thus, use user-friendly messages to avoid this.

You may well be able to specify a reply payload that a customer can use to solve the issue proactively. Or, at the very least, uniformly notify users what happened. For instance:

HTTP/1.1 409 Conflict

Content-Type: text/plain

You attempted to upload a document to a non-existent directory.

Make a directory and start trying!

  • Avoid it by checking any plugin conflicts. For instance, use the ‘Health Check & Troubleshooting’ extension. And perform a conflict analysis without disrupting typical site users.
  • The most effortless prevention may be to cut any unnecessary assets. For instance, we may drop a significant portion of our online activity. Throughout this step, on Windows PCs, use “Ctrl+Shift+Del.” Then after, choose “Advanced.”

As with intervals, pick “All Time” and check almost every item. Adding Caches and cookies to the list of things to erase is a must. To finish, tap “Clear.”

Clear Browsing Data settings in Chrome

Conclusion

Developers use 409 code when the HTTP query is legitimate. It’s beneficial for APIs. But the hosts’ present condition prevented it from processing. For example, you’re writing a fresh blog post. Yet it references a removed classification.

Yet, the glitch doesn’t always specify which part of a query it cannot handle. As a byproduct, situations like this may be tricky.

The web application may remain stable with routine checkups and examinations. It eases your stress.

What is HTTP 503 error? How to fix it?

Viewers could get restless if an incident happens on several internet pages. Applications may well show errors like HTTP 503.

HTTP 503

The host is not prepared to process the query, according to the “Service Unavailable” code.

What is HTTP 503?

HTTP 503 usually occurs when a host is congested or offline during maintenance. If possible, “Retry-After” HTTP headers must include the anticipated period for service delivery. So this reply may only be utilized under brief circumstances.

Since it is a transient circumstance and replies needn’t typically be stored. So any cache-based headers received to this reply must be handled.

Sometimes, this overload could rectify when supplies are once again accessible. But after a particular time.

What causes HTTP 503?

HTTP 503 often results from breakdowns in interactions between the owner’s host and browsers.

There might be many reasons for this.

  • This problem arises whenever the host, such as Apache, is down. Or, perhaps, whenever you do not have reliable broadband connectivity.
  • Our subscription is likely above its permitted RAM or CPU limits. It could be if the site is hosted in a Linux environment.
  • Anyone may get a warning if our hosting account reaches the threshold often.
  • Or it is experiencing any malicious disturbance, like a DDoS attempt.
  • Load balancers will display this if you access it when the host associated with it is busier.
  • An issue could also be brought on by improper setup of web applications. It could be like plugin incompatibility.
  • It could also be brought on by a large influx of people, like throughout a season deal. In such situations, the host is still up. But unable to handle the barrage of queries from several consumers.
  • A DNS setup issue might be the reason.

How to fix HTTP 503?

Some recommendations may be easily put in place by people. It could be as simple as restarting the server or reloading the website.

Now, let’s go over these and consider some potential solutions.

  • Switch to another browser. Default browsing settings may hamper a service. Checking with some other devices may also be beneficial.
  • You may fix this by reloading the website’s app pool. Here’s an instance with IIS.

Launch “IIS manager.” Then go to “Connections,” visit its host node, and choose “Application Pools” from a list. Then select the category of pools you want to end or activate. To halt/restart the pooling, move to “Action” and choose “Stop”/”Start.”

  • Try limiting WordPress’s “Heartbeat” feature. First, disable all options within it by selecting “Disable,” save and check. Ensure you install this extension.

Heartbeat WordPress Plugin Screenshot

You may also deactivate if you are currently utilizing “WP Rocket.” If it doesn’t work, modify autosaves to the lowest possible. Search “Modify,” reduce the frequency and save them.

Heartbeat Plugin Screenshot to fix HTTP 503

  • Deactivate every plugin for a while. It depends on platforms. Access the directory and rename that tool if you want to deactivate a specific one. Revert that to its actual name after verification. So you could begin turning each one at the moment.
  • Try clearing DNS caches in browsers. Launch “Chrome.” Enter “chrome:/net-internals/#dns” inside the search box. Pick “DNS” on the left side. Next, tap “Clear host.”
  • Please remember to flush the DNS in Windows. Holding the “Windows icon” while hitting “X,” select “Command-prompt.” And then confirm that the administrative permission is enabled.

Then after, test the below script. Restart the computer to finish.

ipconfig /flushdns

Anybody would first run “netsh int ip reset c:resetlog.txt” before executing.

  • In Android, enable and disable airplane mode. And then “force stop” browser apps via Settings. If not resolved, then erase “app data” as well. Restart the phone and check.
  • If using cPanel, navigate to “MultiPHP manager” and select the domain with an issue. Then ensure the latest PHP variant is assigned and click “Apply.”
  • The issue could be resolved by restarting all Wi-Fi-connected routers. To refresh your routers, press a button at their back. You may unplug it for a little while, then re-plug it.
  • Upgrade your server’s hosting program if you want additional bandwidth. By expanding the standard maintenance scheme, you can fix this.
  • We may talk to our hosting vendor if this issue remains unsolved. Thus details on this need to be available from them.

How to avoid 503 error?

Organizations examine events from a variety of perspectives. Utilizing the advice given below might stop warnings from happening.

  • Service logs provide information about previous URL requests and other internet activities. The links between the data centers are described. It could aid in avoiding the problem. The logs could be included if the debug setting for WordPress is set.

Modifications to the origin configuration “wp-config.php” document could be needed. To make debugging possible. We could do this using the FTP (File Transfer Protocol) application.

Beforehand the extract that mentions “Happy blogging,” edit: “wp-config.php” file. After that, copy and paste the text below and save:

define( ‘WP_DEBUG’, true );

define( ‘WP_DEBUG_LOG’, true );

  • HTTP reply headers gather the information that consumers may use to settle arguments. Use user-friendly messaging to prevent this result.

You could be capable of creating a return payload that a consumer can utilize. It is to address the problem proactively. Or, at best, consistently inform users what occurred. For illustration in Apache:

Append this inside the “.htaccess” document:

RewriteEngine On

RewriteCond %{REQUEST_URI} !.(css|gif|ico|jpg|js|png|swf|txt)$

RewriteCond %{REMOTE_ADDR} !^111.111.111.111$

RewriteRule .* Code_503.php [L]

Then, append the following to the “Code_503.php” document’s header:

header(‘HTTP/1.1 503 Service Temporarily Unavailable’);

header(‘Retry-After: 720’);

You attempted to request a service to non-existent content. Retry after a few moments and start again!

“Retry-After” specifies a twelve-minute retry period for said search results. Put any HTML or other script necessary to provide a helpful message below the code.

  • Keep an eye on the usage statistics to avoid this. Via the cPanel, it would be possible to see the use of CPU or RAM.

To do this, access cPanel. On the left portion, you can see the “usage statistics.” To view every bit of information, choose “Expand Usage stats.” To see just the first Five metrics, select “Collapse Usage stats.”

Conclusion

Regardless of the cause, 503 errors are often transient. The problem will automatically correct itself when the host restarts. And traffic slows down.

To find out what causes a message, we recommend searching the log or manual of a product implemented.

With regular inspections and testing, the web service could stay stable. Thus the tension is lessened.