
Today I am going to show you how to start a blog from scratch. And you won’t believe how easy it is to do.
So, let’s start your blogging journey!
We will need 4 things:
- Domain – Domain is the name of the blog which you type in the browser address bar. “www.HostingPill.com” is the domain of this site.
- Hosting – Hosting is the “home” of your blog where it will “stay”. It is usually a server at a web hosting company.
- WordPress – WordPress is the “software” that will power your new blog.
- Design & Themes – To make your blog attractive design-wise you will need to install WordPress themes.
Learn about the types of websites you can create with WordPress and know how you can protect the blog once it is up.
There are two ways you can buy domains and hosting:
- You buy domains and hosting from the same web host
- Or you buy both separately
If you ask me, I would recommend going for Option 2 (buying separately) for two reasons:
- You get better deals when you shop domains and hosting separately.
- You reduce risk by buying it from separate companies.
I recommend Namecheap for getting your domains and Bluehost for web hosting.
Namecheap, as the name implies sells domain names for a good price, there is no need to purchase your domain and hosting from the same supplier so I have shopped around.
BlueHost – I am using Bluehost for around 8 years now for some of my sites and have found them to be pretty reliable.
In this step by step guide, I’m going to buy a domain, set up web hosting, install WordPress, configure WordPress and then talk about how you can make money blogging.
 How to Start a Blog
Step 1. Register Your Domain
NOTE: If you already own a domain, you can skip this and directly go to
How to Setup Hosting for WordPress section.
First things first, it’s time to purchase the domain. You’ll want to think about what domain you want and what it says about your WordPress blog.
Believe me, choosing the right domain name is a difficult task nowadays since all the “good ones are already gone”.
You might want to check out these 7 Domain Name Tips to get the right name for your site or you can use these tools to generate domain name ideas.
Once you have listed some of the domain name options, it’s time to check their availability.
And for that, follow the steps below:
Step 1. Go to www.Namecheap.com and type the domain you want into the domain search box.

Step 2. If your domain is available then add it to the cart, consider also purchasing other TLD (Top level domains) of your name, for example, if your domain is ‘mytestdomain.com’ you might also want to pick up ‘mytestdomain.net’ and ‘mytestdomain.org’.
If your domain isn’t available, you’ll have to think of something else!

Step 3. Click on ‘View Cart’. Make sure everything is as you expect and double-check your domain name is spelled correctly. If you are buying a .com domain, you will notice that you also must pay a small ICANN fee.

Step 4. Confirm your order, I would recommend setting the domain to Auto-Renew.

Step 5. It will now ask you to create an account, fill in all the details and make sure you remember the password!

Step 6. On the next page, it asks you to fill in your account contact information. If you haven’t opted for domain privacy, then this information is public for anyone to see. Click ‘Continue’

Step 7. Pay for your domain, you can choose from a credit card or PayPal. Click ‘Continue’ and that’s it, you are now the proud owner of your new domain.

Step 2. Set Up Hosting For WordPress
Choosing the right web hosting company is a very important factor in starting a blog.
The market is flooded with hundreds of web hosting companies and they employ all tactics to get your business.
I have listed & answered few questions that most first-time site owners have about hosting.
You can see them here.
Now, that you are ready, let’s get to our hosting.
We will setup your Bluehost account to start your first blog.
It offer a free domain (on Annual plans) and a 30 day money back guarantee, so you never have to worry about anything.
Step 1. Go to www.Bluehost.com and click on Get Started Button.

Step 2. Select the plan you want to purchase. For this demo, we will go with their Basic Plan.

Step 3. On this page, depending on whether you have a domain or want to get a new one, you can make your selection.

Step 4. Once you have the domain, it’s time to enter your contact details.

Step 5. Now select the plan that you want to go for. The longer the term you select, the more discount you get.

Step 6. Enter your credit card details and make the payment.

Step 7. Once that is done, create your password on this screen (don’t forget it store your password somewhere for future reference)

Step 8. Now that you have created the password, it’s time to login!

Step 3. Connect your Domain to Hosting
So, once you have purchased your WordPress hosting from Bluehost you will need to set your Namecheap domain to point to this hosting.
Step 1. Login to your BlueHost account
Step 2. Click on domain settings
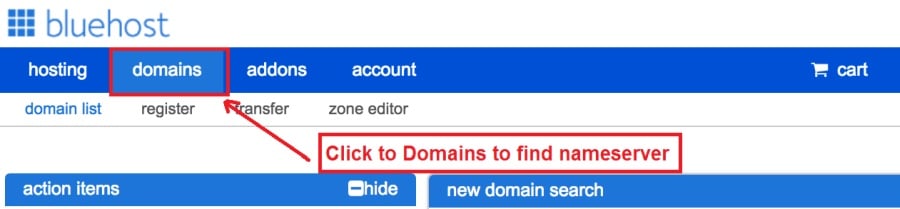
Step 3. Click on the ‘Nameservers’ tab
Here are the default Nameservers of Bluehost:
NS1.Bluehost.com
NS2.Bluehost.com

Step 5. Go to Namecheap and Login.
Step 6. Once you logged in go Domain List ==> Domains ==> Select Domain ==> Select Manage ==> Under NameServers, select Custom and place your Bluehost‘s nameservers there

Step 7. Click Save changes.
It can take up to 24 hours for this change to be completed so don’t worry if it doesn’t work right away.
Step 4. Install WordPress
Next, we need to install WordPress on the Bluehost hosting.
BTW, WordPress is a blogging platform for writing blog posts.
Thankfully Bluehost has an automated install so I will show you that.
Step 1. Login to Bluehost

Step 2. In the website section click on ‘Install WordPress’

Step 3. Select the domain you want to use for this WordPress installation, you will likely only have one domain. Leave the directory field blank.

Step 4. Now enter your blog name (can be changed later), username, email address, and password. Make sure to keep a note of these details. Make sure your password is secure, use an online password randomizer if possible, people will try to breach your WordPress blog.

Step 5. You can keep track of the installation progress at the top of the page, though typically installation takes 5 minutes.


As you can see it’s straightforward to get WordPress installed.
Now you can browse to http://yourdomain.com/wp-admin to login.
Step 5. Create a Blog in WordPress
Let’s get logged into the new WordPress blog.
1. Go to http://yourdomain.com/wp-admin and enter your username and password.

2. You should now be able to see the admin dashboard.

Once logged in it’s worthwhile getting a few things sorted before we move onto themes, plugins and adding content.
Customize Title and Set Front page
There are a few things I always like to set right after installing WordPress
Settings -> General Settings. Here you can set your blog title, tagline, main email address, time zone, date format & Language. Make sure you set all of these things correctly now, as it may come back to haunt you if you don’t!

Settings -> Reading. Here you can decide what function you want your WordPress blog to take. You can set your front page to take people straight into the blog post or you can set which static page you want to be your home page.

That’s all we really need to set for now. We can move onto the more interesting stuff!
How do I create new Pages and Posts?
To add new pages, go to Pages -> Add new, fill in your title, add some content and click publish. If you aren’t ready to publish the page, click draft.

To add a new post go to Posts -> Add New, it’s then the same procedure as above.

How to Add Pages/Posts to the Menu
To add these pages to the menu, go to Appearance -> Menu. Select your menu and select ‘add to menu’, you can then drag and drop to arrange it.

Themes & Design
With WordPress, it’s really easy to create any design you can imagine without writing a single piece of code. And that is made possible only by WordPress themes.
WordPress has a lot of free theme designs to choose from.
How to find the perfect WordPress theme
If you can’t find what you are looking for here, you can go for more choices here:
Themeforest – One of the oldest and the largest marketplace for WordPress theme. You get tons of high-quality themes at reasonable prices.

Creativemarket – A newer marketplace with quite a variety of WordPress themes. The themes on this site are quite different in terms of design than what you get on Themeforest.

GretaThemes – Another great platform where you can get free and premium beautiful WordPress theme for your site.

Astra – Astra is the most lightweight and fully customizable WordPress theme.

It provides basic and advanced design options for blogs, single blog pages with a dedicated Blog Pro addon. Astra works seamlessly with all popular page builders like Beaver Builder, Elementor, etc.
How do I Install WordPress Theme
To install a new theme for your WordPress blog, follow these steps:
Step 1. When logged into the admin dashboard select ‘Appearance’ and then themes from the left-hand menu.

Step 2. Click the ‘Add New’ button
Step 3. Search for your WordPress theme using the search bar at the top right. If you have been provided a theme file you can select upload theme from the top of the page.

Step 4. Click Install
Step 5. After a minute or so the new theme will finish installing. Now you can click customize and see what options you can change. This will vary a lot from theme to theme but usually, you can edit things like your logo, the rough layout of the page and some colors.


Install Plugins
What is a plugin?
Plugins – as the name suggests are tools that add functionality to your WordPress blog. The best thing which I like about WordPress is – these plugins.
Plugins can turn your site from a simple blog to a fully-featured e-commerce store, a user forum, a video streaming site, a member’s only site, and much more. Of course, you can combine most of these plugins together to add huge functionality to your blog.
For example, if you are using your WordPress site to sell products online it may be beneficial to add a forum for support.
Whenever you want to add functionality to a WordPress site, look to plugins before looking at creating something yourself / paying a developer to do it for you.
Installing plugins is easy, the hard part is deciding what plugins you want to install. There are thousands of plugins available for free, there are also many premium plugins available.
Where I can find more WordPress Plugins?
The two best resources on the internet for WordPress Plugins are:
1. WordPress.org – Tons of free plugins! But beware – some of the plugins are demo versions of the paid ones. Still, it’s a good place to find what you are looking for.

2. CodeCanyon – Home to some of the best plugins on the internet. Although they are paid, they offer really good value for money. I usually get my plugins from here.

And there are few advantages of going for paid plugins from CodeCanyon:
- You get 6 months of free support from the plugin developer. So, if something is not working, you can approach the plugin developer via CodeCanyon and they will fix it for you. What’s more, you can extend warranty support for 12 months by paying a nominal fee.
- The plugins are high quality, thoroughly checked by CodeCanyon. So, there are no chances of any malware in them. I had a bad experience in the past when I bought some free plugins from some random site.
Once you have decided on a plugin here’s how you install it.
How to Install a WordPress Plugin
Step 1. From the Admin Dashboard select Plugins -> Add New
Step 2. Search for the plugin you want, or upload it if you have the files

Step 3. Click Install, and give it a few minutes to install, the bigger the plugin the longer it will take to install.
Step 4. From the Plugins -> Plugins page activate your plugin, depending on the plugin you are using you may then be prompted to fill in some additional settings.
Here are some of my favorite Plugins:
Free Plugins:
- Contact form 7 (Free)– This is a simple free email contact form for your blog. It’s easy to set up, always works, and doesn’t take up much space!
- Askimet (Free) – If you are even considering allowing comments on your WordPress blog you need the Askimet comment spam plugin. This plugin massively reduces the number of spam comments you will get.
- Yoast SEO (Free) – Download this plugin before you download any. It’s a MUST HAVE plugin for SEO.
Paid Plugins:
- Visual Composer (Paid) – It’s THE BEST Page Builder for WordPress. Just drag and drop and you can create stunning page layouts in minutes. Love it!
- Ninja Popups (Paid) – If you ever want to have the ability for the user to signup for your email newsletter from your blog, this is the plugin to have. Few clicks and you get a beautiful popup done.
- BackupGuard (Paid) – It’s too easy to accidentally break your WordPress blog when installing a 3rd Party Plugin or theme, make sure you always have backups. And this plugin does just that. It’s a lifesaver!
How to make Money from your Blog
Now that you have your WordPress blog nicely set up, with some content, a slick WordPress theme, and some great functionality added by Plugins it’s time to monetize your blog! There are two core methods to for making money from your blog, and everything boils down to these
Affiliate:
Affiliate marketing is where you promote other company’s products directly and earn a commission from any sales made.
For example, say you have a football blog, you could add affiliate links to football boots in your posts and make a commission off any boots sold, typically this would be 5 – 15%.
There are hundreds of affiliate marketing schemes out there, you should research this further depending on your niche, you’d be surprised how many companies have schemes. Amazon offers one of the most popular ones, it’s easy too!
Add special affiliate links to ANY product on the Amazon and make a commission of 4 – 10%. Amazon may not be the best paying site (this will vary wildly depending on the niche of your blog), but they do offer a HUGE range of products.
Adverts
Adverts are simple, got spare space on your blog, place an advert, often you will find these placed in the sidebar and within the content of any articles. Adverts can generate anything from $0.05 to $5 per click depending on the niche of your blog.
Google AdSense is the de facto online advertising company, simply fill in a 2-page signup form and you can start serving adverts to all your visitors. You don’t have to talk directly to companies to sell your advertising space.
Google’s advertising pay-outs differ massively from niche to niche, a highly competitive niche like credit cards, insurance, loans, etc.. will pay higher than less competitive ones.
This is due to the nature of advertisers bidding to get their advert placed, in this same the more ‘popular’ your blog the more you can stand to earn.
Typically, you might expect something like a 0.5 – 3% click-through rate, i.e. the number of your visitors who actually click on the adverts.
A good combination of both strategies is usually recommended.
Next Steps
Now that your WordPress blog has been set up and you’ve monetized it’s time to start expanding and really pushing your blog.
Here are my top tips going forward:
- Schedule regular content, you won’t always be in the mood to write content, use the built-in post scheduler so you can write multiple posts when you feel like it while still allowing regular content to flow. Articles every few days are better than 5 on the same day. Here is another WordPress automation solution.
- Learn everything about SEO (search engine optimization) that you can, this is a huge topic, you will never fully learn it, but the more you know the more successful blog will be.
- Keep positive, your blog will unlikely blossom overnight, it takes months of hard work, but in the end dedication and good content pays off.
Good luck and start blogging!


