This Comparison of BlueHost vs Godaddy is based on actual testing done on their servers.”
Bluehost vs Godaddy is one of the classic comparisons ever done in Hosting industry.
Bluehost and GoDaddy are two of the biggest hosting providers out there, so big that they’ll come upon almost every major list of the best hosting options.
How on earth is it possible to choose, then?
GoDaddy is probably the better-known hosting provider of the two, but does that mean it’s better?
GoDaddy’s hosting pricing is also infamous for being less-than-clear, but is that really true?
Web hosting with GoDaddy seems generous in resources, but are there hidden limitations?
Bluehost’s front page gives a starting price of $2.95 a month, and GoDaddy offers a starting price of $5.99 a month, but is the price difference noteworthy?
Choosing the best hosting provider is tough, let alone the best hosting plan…even more so its two industry titans, Bluehost vs. GoDaddy.
Ultimately the choice is yours, and while it can be tough to pick, we’ll help you get there.
We’ve previously done Bluehost Vs DreamHost comparison and Bluehost came out on top by a significant margin. Now, let’s do Bluehost vs GreenGeeks and find who is better than them all.
I will do Bluehost vs GreenGeeks comparison based on below criteria:
Feature set – Do they offer everything you expect?
Performance – Will the website load in time?
Support – Are they friendly, fast and willing to help?
Ease of use – Does it just work with no messin’ around?
For each category, I’ll summarise what each company offers, where possible I’ll bring raw data in.
After I’ve compared, I’ll then assign a winner to each one. I’m an experienced web developer/consultant with experience of dozens of different web hosts, I know what features are worth having and which ones are just hot air.
This Comparison of BlueHost vs HostGator is based on actual testing done on their servers.”
It is time for us to witness a clash of the titans.
Bluehost and HostGator are two of the largest and most established hosting companies out there right now.
In a way, the two are related: they’re both subsidiaries of Endurance International Group.
These two brothers, or cousins, together have hosted millions of sites, and are two of EIG’s largest providers.
The truth is, however, Bluehost is an even larger titan—more of a behemoth, up there with GoDaddy in the power of its name and the amount of sites its hosted.
HostGator’s range is in the hundreds of thousands, while Bluehost likely has 2 million or more sites powered on its servers.
Does HostGator live up to its larger rival?
Or maybe the question is this: does Bluehost’s size lead it to overlook certain things, things with HostGator excels in?
These are all excellent questions, and I’m sure you have even more.
If you’ve been looking into what hosting company you want to go with, there’s a fair chance you’ve at least come across these two, if you haven’t put them on your list.
So without further ado, let’s get into our comparison of these two hosting companies!
DreamHost and Bluehost are some of the biggest and most well-respected names in the world of hosting. So in this review we’ll take a deeper look with a comparison of DreamHost vs BlueHost.
Two names in the industry that often confuse people into choosing the best and the next thing they do is google: DreamHost vs BlueHost. If that brought you here then you’re on the right track!
Bluehost might be the giant here: around since 2003, it supports over 2 million websites, easily making it one of the world’s biggest hosting companies.
DreamHost is no slouch, and in fact is the older brother of the two (if not the “bigger” one): DreamHost was founded in 1996 and supports over 1.5 million websites with some 400,000+ customers in over 100 countries.
Clearly, at this point a simple number comparison won’t do the trick. DreamHost and Bluehost are hosting companies of comparable size, reputation, and popularity.
So which one is better?
Naturally, no solution is perfect for everyone, and different companies may excel in different areas. In this comparison, I’ll discuss the strengths and weaknesses of these top-tier hosts in relation to each other, with a particular focus on shared hosting due to its popularity.
The appearance of the error varies depending on the browser being used, and some websites have their own specialized error pages. So, while your screen may not look exactly like the one above, the fundamentals remain the same.
This is an annoying error, owing to its ambiguity. It’s considerably difficult if it happens on a MAMP installation because there are more probable causes. In general, plugin incompatibility and a damaged or missing .htaccess file are the most prevalent causes of an HTTP 500 error in WordPress. Because this file is responsible for server setup, errors in it can result in a number of issues.
When your site suffers a PHP fatal error, another probable source of MAMP issues comes into play. This is frequently caused by faulty code or misconfigured files. In these circumstances, looking through your installation’s PHP error logs will usually disclose the file that’s causing the problem, as well as the precise fault with the code.
It is recommended to turn on debugging if WordPress gives you a white screen or a server error. While this might not resolve the error causing the problem, it will surely provide you with more information about what is going on.
You can easily enable the debugging by slightly modifying the wp-config.php file of your site.
Step 1: Look for WP_DEBUG in this file once you’ve accessed it. You should be able to set it to “true” if you discover it. If you don’t see what you’re looking for, you’ll have to make it yourself.
Step 2: In any case, you should have a line that looks like this at the end of the day:
define( “WP_DEBUG”, true );
Step 3: Reload your site after saving to see if anything has changed.
If you’re lucky, the server error will go away and be replaced by a new message that will tell you exactly where the problem is. If this happens to be the case, investigate the error’s all the sources.
Even if enabling debugging does not yield positive results, it is a good idea to keep it on until the problem is remedied. It will provide you and any developers with a better understanding of what’s going on. Remember to switch off debugging once everything is in order and you’ve completed the maintenance!
Fix 2: Checking the .htaccess file.
If one exists, the .htaccess file contains a set of rules that inform the server what to do in specific situations. It’s widely used to rewrite URLs or block malicious users from accessing your site.
Step 1: Check your WordPress root folder using your FTP editor to see if you have a .htaccess file. Before moving on to this, ensure that your FTP editor lets you see all the hidden files.
Step 2: If a .htaccess file exists, make a backup before deleting all of the contents of the entire file. This may eliminate some vital rules, but it will tell you if the error was caused by a file error.
If the error is no longer there, the problem was most likely with the .htaccess file. Attempt to restore the file and then delete sections of it. If the site starts operating again, you’ll know which block the problem is in. Usually, you may condense it to a single line like this. You can then remove that line or seek further advice from your developer or host.
Fix 3: Increasing the memory limit.
Boosting your memory limit can help resolve the error. To do so,
Step 1: look for WP_MEMORY_LIMIT in your wp-config.php file in the WordPress root directory.
Step 2: Change the value to something like “64M” if it exists. If it doesn’t, add the line below to the file:
Define(‘WP_MEMORY_LIMIT’, ‘64M’);
If this succeeds, you’ve just temporarily addressed the problem. Most likely, you have a malfunctioning piece of code (which could be a third-party plugin) that is using up all of your resources. Take a look at your resource use with various plugins on/off if your host offers monitoring to get a better understanding of what’s wasting those valuable megabytes.
Fix 4: Deactivating the plugins.
If neither of the preceding troubleshooting approaches works, disable all of your site’s plugins as a last resort. If this resolves the issue, you can activate them one at a time until the problem reappears. This will reveal which plugin is to blame, allowing you to search for alternatives or contact the plugin’s developer for help.
If you can access your WordPress dashboard,
Step 1: Go to Plugins and click on Installed Plugins to do so.
Step 2: Choose Deactivate from the Bulk actions dropdown menu at the top of the screen after selecting them all or deactivate them individually and check the website status.
Step 3: Reload the problematic page after they’ve been deactivated.
Step 4: If it works, go back to your plugin list and click on Activate to turn each one back on one at a time.
Refresh your page after reactivating each plugin individually. If it still loads, go to the next one and reactivate it. Repeat this method until the error reappears, and you’ll know which plugin is to blame.
You can deactivate all plugins via the file system if you can’t access your WordPress dashboard due to Error 500.
Step 1: Return to MAMP and open the wp-content folder in your website’s directory. Inside, you’ll see a plugins folder.
Step 2: Rename this folder to something like “plugins-disabled,” and everything inside will be turned off. Your WordPress dashboard should now be accessible.
Step 3: Log in there first, then rename the folder back to “plugins” while the dashboard is still open.
They should display in your dashboard’s Plugins section, where you can disable them all and test them one at a time.
Fix 5: Asking your web host provider
There are a few odd difficulties that can cause WordPress errors, but at this point, it’s probably better to contact your host. They can look into things like file permissions and other sources to see if the problem is a genuine server issue, which they can at least confirm.
Alternatively, you might simply choose to upgrade to a better host with WordPress-optimized servers. It isn’t necessary to spend a lot of money on this. For a low amount per month, you can get an adequate WordPress experience from the best web host providers.
Fix 6: Reinstalling WordPress again.
There are a few exceptions where a WordPress reinstall may help. Along the process, it might even fix file permission issues. It is recommended to follow the manual WordPress backup and setup instructions.
Conclusion
WordPress testing might be brought to a halt by an Error 500 notice. Although this issue is inconvenient, it does not have to slow you down. While the message may be enigmatic, the actual perpetrator is usually easy to track down and deal with. Also, following the above-mentioned steps and fixes will surely help you resolve the error.
ERR_CONNECTION_TIMED_OUT error mainly means that anything is wrong with your local network connection. Furthermore, it might also result from the situation when your website tries performing more operations than the Server’s capacity. Therefore, it mainly occurs when the website is using a shared host with a restricted memory limit.
As you visit any website and it is not loading, your browser will try for 30 seconds, and then it will terminate the connection. Further, it returns the ERR_CONNECTION_TIMED_OUT error, which indicates that there is some connection and communication issue.
Here are a few more reasons which might cause the ERR_CONNECTION_TIMED_OUT error, like:
Invalid URLError or delay in Server.
Incorrect settings.
Fixing the ERR_CONNECTION_TIMED_OUT error
ERR_CONNECTION_TIMED_OUT error is widely common, and this occurs when the Server takes too much time to reply to your request. Eventually, due to this, you fail to get access to the search results.
No doubt, this is a super frustrating error that interrupts your entire workflow. However, it can be fixed in just a few minutes, and you do not need to worry about it at all!
Here are some standard and tough measures that can help you get rid of the ERR_CONNECTION_TIMED_OUT error.
Fix 1: Clearing the cache, cookies, and browsing data.
Mainly, the browser saves excessive browsing data, including cookies, app data, cache files, and others. This saved data might cause the ERR_CONNECTION_TIMED_OUT error. Therefore, you must try resolving the error by cleaning the browsing data, cache, and cookies. Here are the steps for the same:
Step 1: Click on the three dots at the top right corner of the browser and then click on the option stating Settings.
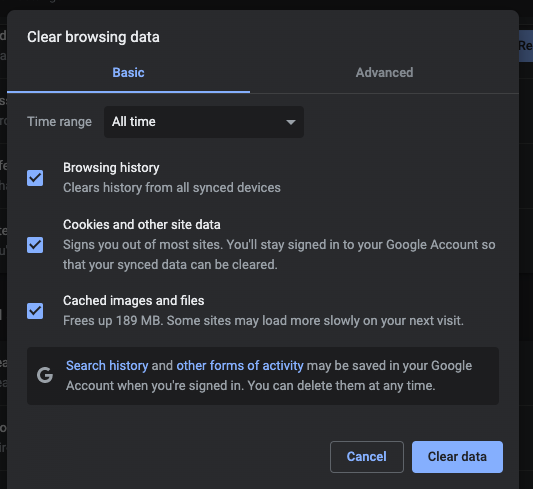
Step 2: Now, move to the Privacy and Security option and then click on “Clear browsing data.”
Step 3: Keeping in mind the time range, select Browsing history, Cookies and other site data, and Cached images and files from the displayed checkbox menu.Step 4: Select the time range as “all-time” and then click on Clear data.
This will help you clear the history and cache from the browser. Next, check again if the webpage is loading. If it is not, then try other measures mentioned below.
Fix 2: Checking the internet connection.
Another common cause behind the ERR_CONNECTION_TIMED_OUT error is the issue with the internet connection. Therefore, you must check the internet connection to make sure that the error is not caused.
For this, please switch off the router and then switch it back again in some time. Or, check if the Wi-Fi or the personal network connection is working fine or not. For this, try to connect the same on any other device and see if there is an issue or the connection is smooth.
This will help in identifying if the network connection is the cause behind the ERR_CONNECTION_TIMED_OUT error. If the internet connection is not the issue, the error might be due to some other reasons, and you can follow the other mentioned steps to resolve the problem.
Fix 3: Checking the settings of LAN
Various external factors, including viruses, might change the LAN settings of your device. Therefore, you must check the LAN settings to ensure that they are not the cause of the ERR_CONNECTION_TIMED_OUT error and resolve it if they are.
The steps are given below:
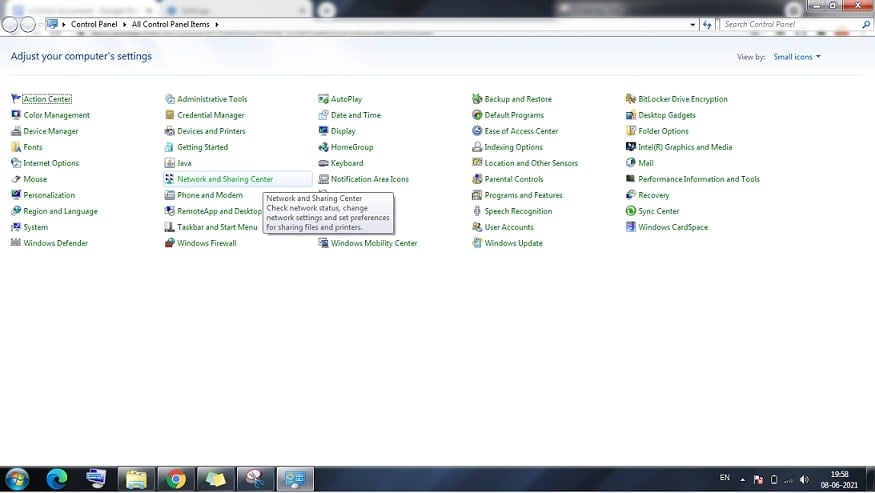
Step 1: Open the “Control panel” on your device and then click on the option “Network and Internet Sharing.”
Step 2: Now, move to the Change advanced sharing settings.
Step 3: Finally, check all the boxes for turn off settings and then click on OK.
Now, try to revisit the webpage and see if the error is still occurring. If the error still persists, you can try the other methods available here.
Fix 4: Checking the Windows host file.
The ERR_CONNECTION_TIMED_OUT error might occur if some Website URL and IP address are blocking the host file. This is a reason why sometimes websites also get blocked.
Therefore, it is essential to check the Windows host file, and you can follow the provided steps for the same.
Step 1: Run the Notepad or Notepad++ in the Administrator mode and click on Yes in the prompted User Access Control box.
Step 2: Click on the File option in the top tab and then move on to the option stating Open.
Step 3: Now, from the bottom right drop-down menu, select All Types, and then go to Local Disk C-> Windows-> System 32-> Drivers->, etc.
Step 4: Now select the host file.
Step 5: Now check if any website URL or IP address ends with a # sign. If there are any, then delete them all and save the changes.
Now, try to revisit the website and check if the error is still there. If the ERR_CONNECTION_TIMED_OUT error occurs, then follow the other measures to resolve it.
Fix 5: Renew IP address and Flush DNS.
The ERR_CONNECTION_TIMED_OUT error might occur due to any issues related to IP and DNS. Therefore, you can try resolving it by renewing the IP address and flushing DNS. Here is how you can do the same:
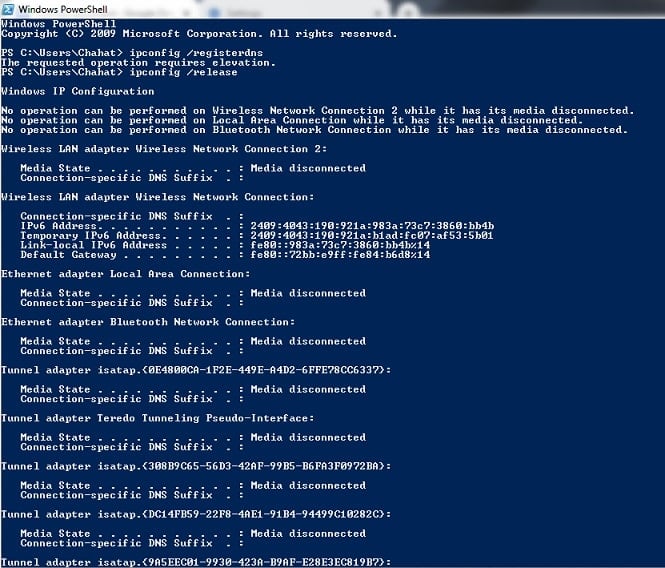
Step 1: Click on the Windows start icon and then open the Command prompt or Windows Powershell.
Step 2: On the opened window, type the following commands and press Enter after each one of them:
ipconfig/registerdns
ipconfig/release
ipconfig/renew netsh winsock reset
After completing it all, close the window and then restart the device to make the effects visible. Now, try to revisit the webpage.
Fix 6: Disabling the proxy settings.
Proxy servers help protect privacy, and they act as the intermediary between the web servers and the browser. These servers allow you to go online while maintaining the secrecy of your IP address, and they also filter the communication between the servers.
However, based on the IP address, the web server might reject the proxy, leading to the ERR_CONNECTION_TIMED_OUT error. This might also occur due to faulty configurations in the proxy settings. Thus, you must try to resolve the error by temporarily disabling the proxy server. Here is how to do the same:
Step 1: Click on the three dots in the top right corner of the browser and then click on Settings.
Step 2: Move to Advanced Settings and then move to System and click on Open Proxy Settings. You will be redirected to your device’s settings.
Step 3: Now toggle the Use a proxy server option to Off.
Now try to revisit the website and check if the error persists.
Fix 7: Running in compatibility mode.
There might be some compatibility issues with the website you are trying to reach, which might cause the ERR_CONNECTION_TIMED_OUT error. Take the following steps to resolve the problem:
Step 1: Find the Chrome icon on your desktop, then right-click on it and move to the Troubleshoot compatibility option.
Step 2: In the new window, select the Troubleshoot program option, then click on the program that worked in previous versions of Windows but won’t install or run now, and then click Next.
Step 3: Choose a windows version from the available options and then click on Test the program option. This will open Chrome in compatibility mode.
Step 4: If the error exists, then try the same with other Windows versions from the available option.
Now try to revisit the website and check if it works. Any of these solutions will surely be effective in resolving the ERR_CONNECTION_TIMED_OUT error, and thus you must give a shot to each of the mentioned.
Conclusion
These approaches that we have presented are correct, and you can utilize them without difficulty. The ERR_CONNECTION_TIMED_OUT error isn’t as serious as it may appear. However, it can prevent you from visiting any of the websites.
So keep in mind whether you’re having difficulty with a single site or all of them when using these strategies. As a result, use these procedures with caution and resolve problems swiftly.
Let’s talk about fixing DNS_PROBE_FINISHED_NXDOMAIN error today!
The Domain Name System is abbreviated as DNS. It redirects Internet traffic by connecting domain names to actual web servers. Simply, it is exactly like a request that looks like wp-bridge.com but is actually 35.224.212.152 on the backend. This error is different from the error Server IP address could not be found.
As a result, a DNS probe finished nxdomain error occurs as a result of a DNS misconfiguration.
If you typed a URL into your browser, DNS will act as an intermediate to connect the typed URL to an IP address – this is known as DNS name resolution.
Why?
Because you’ll get a DNS_PROBE_FINISHED_NXDOMAIN error if DNS is unable to resolve the domain name. Chrome, Android, Windows, and Mac are all susceptible to this issue.
* NXDOMAIN stands for Non-Existent Domain in this case.
Users are usually flexible when it comes to DNS problems. All they need to do is follow a few generic actions, which will quickly resolve these lengthy issues. As a result, some of the tried ways for resolving the DNS_PROBE_FINISHED_NXDOMAIN issue are listed here.
Fix 1: Check whether the typed URL is correct or not.
Let’s start with the most basic explanation for seeing the DNS_PROBE_FINISHED_NXDOMAIN error: you just typed the domain name incorrectly:
Double-check the URL for any mistakes you might have made while typing it into your browser. It’s ready to move on to the next procedure if you’re satisfied there are no errors.
Fix 2: Restarting the computer and device.
Restarting your computer is another simple but often successful technique to fix this error. If you’re getting the DNS_PROBE_FINISHED_NXDOMAIN response from a tablet or phone, try turning it off and on again.
This may be inconvenient to have to perform if you have a lot of open applications and browser tabs. As a result, feel free to save this answer until all other choices have been exhausted. Keep in mind, though, that many of these remedies will necessitate at the very least a browser restart.
Fix 3: Clearing the browsing data, cache, and cookies.
The next fix is to clear all the stored data, including the cookies and cache from the browser. This is also very effective in resolving most of the errors like the DNS_PROBE_FINISHED_NXDOMAIN error. Here is how to do it:
Step 1: Open the browser, select the three vertical dots (menu option), and select the ‘Settings’ option from the opened menu.
Step 2: A new page will open up, select the ‘Privacy and Security’ option from there and then choose the ‘Clear browsing data’ option.
Step 3: Tick all the available checkboxes and then select the ‘Clear data’ button.
Now restart the browser and try revisiting the website again. If this does not resolve the error, move to the next mentioned steps.
Fix 4: Releasing and Renewing the IP Address
Because this is frequently a client-side DNS issue, the first thing you should do is attempt to release and renew your computer’s IP address. This includes cleaning your local DNS cache, which is comparable to the cache in your browser. Here are the steps that you must follow for the same:
Step 1: Open the command prompt by pressing ‘Window key + R’ simultaneously and then type ‘cmd’ and hit Enter. Alternatively, you can also open the ‘Windows Powershell’ from the ‘Start’ menu.
Step 2: Type ‘ipconfig/release’ and press Enter to release the current IP address
Step 3: Type ‘ipconfig/flushdns’ and press Enter to flush the local DNS cache. You will soon receive a message stating “Successfully flushed the DNS resolver cache”
Step 4: Type ‘ipconfig/renew’ and press Enter to renew your IP address.
You may also use the netsh int ip set dns and netsh winsock reset commands to reset your IP settings and Winsock catalog.
Fix 5: Restarting the DNS Client Services.
You can try restarting the DNS client services, which resolves and caches DNS domain names if you’re using Windows. Here are the steps that you need to follow for doing it:
Step 1: Simply press the Windows logo key and R. Then, type “services.msc” and press Enter.
Step 2: Scroll down to “DNS Client,” right-click it, and then choose “Restart.”
If the restart option is greyed out for you, you can use the command prompt as an alternative. Here is how to do it:
Step 1: Open the command prompt or the Windows Powershell from the start menu.
Step 2: After that, type the given commands:
net stop dnscache
net start dnscache
Fix 6: Changing the DNS Server.
Altering your DNS servers what you may do next. DNS servers are given automatically by your ISP by default. However, you might try temporarily switching to a public DNS server like Google. Here is how to do it:
Step 1: Simply hit the Windows logo key and R in Windows. Then press Enter after typing ‘control panel’
Step 2: Then select ‘Network and Internet’ followed by ‘Network and Sharing Center’ and then click ‘Change Adapter Settings’ on the left-hand side.
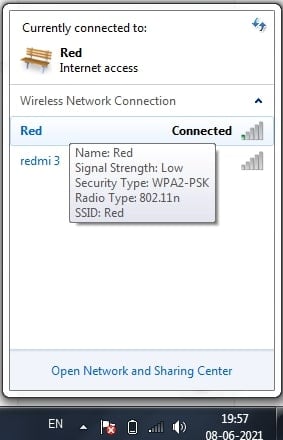
Step 3: Right-click on your current connection; depending on how you’re connecting, this will be either a Local Area Connection or a Wireless Network Connection. Then select ‘Properties’
Step 4: Click on “Properties” after selecting Internet Protocol Version 4 (or IPv6 if desired).
Step 5: Make a note of any current settings in case you need to go back to them. Select the “Use the following DNS server addresses” option from the opened drop-down menu. Replace the following with the following if it already exists:
1.1.1.1 and 1.0.0.1 for IPv4
2606:4700:4700:1111 and 2606:4700:4700:1001 for IPv6
Step 6: Click OK, then Restart your browser if necessary.
Fix 7: Checking the local host file.
A local hosts file is present on every machine. This is a file that contains DNS records that are manually mapped to IP addresses. This is usually only changed when you wish to preview your DNS before transferring domains to a new host.
However, there are numerous ways in which this file may have been altered or amended. If none of the preceding suggestions worked, double-check your local hosts file to make sure the website you’re trying to access isn’t included there.
Step 1: Additional access to the hosts file is usually required. As a result, the first step is to log in as an administrator to your text editor. Simply go to your start menu, choose your text editor, right-click it, and choose “Run as administrator.”
This may be done in any text editor, including Notepad++, Atom, and others.
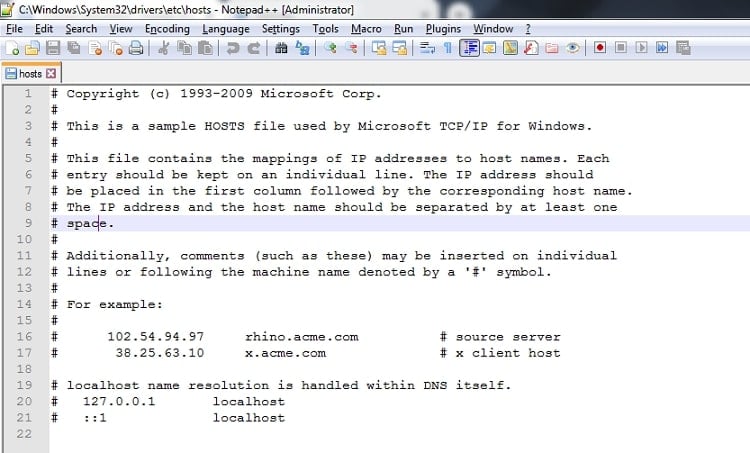
Step 2: Click File -> Open in your text editor and navigate to the following location:
C:\Windows\System32\drivers\etc\
Step 3: “Open” the hosts file by clicking on it.
Step 4: Double-check to see if the website you’re trying to access isn’t listed. Remove it if it is.
Fix 8: Resetting the chrome flags.
One way to fix the DNS_PROBE_FINISHED_NXDOMAIN error message is to attempt resetting Google Chrome settings and experimental features that were mistakenly changed. To do so, type the following into your browser’s address bar:
chrome://flags
You’ll have access to all of Chrome’s experimental features. In the upper right corner, click the Reset everything button. Close and reopen your browser after that.
Conclusion
Even though it’s inconvenient, the DNS_PROBE_FINISHED_NXDOMAIN issue is usually simple to fix. You should be back up and surfing the web in no time after clearing your DNS cache, renewing your IP, and trying alternative DNS servers.
There are many reasons why one would want to block websites, sometimes, they just bug you to a level where you want to break the screens of your device.
While some websites only irritate you to that extent others might be sending in harmful viruses that can damage your computer and files.
There are also websites that can steal information from your computer or online data and not everyone is able to avoid these websites or take care of them without blocking them.
The best way, of course, is to block these websites for good! There are different methods through which you can block websites on different browsers, or operating systems.
Read on to find out how to block websites on your operating system or device!
When you Google: How to create Music Website, you come across the building steps right away, which is not the best way to go about it. You need a detail-oriented approach to do something so technical.
So how do you handle creating a website for your band? If you have the support of a producer or a label, you can easily get a couple of thousands of dollars to hire professionals. What if you’re trying to get recognized on your own?
You’d have to get some free software and create a website yourself. With our guide on how to create music website, it’s going to be easier than you’d imagine.


 What is 403 Forbidden Error & How to Fix it?