IONOS Review: Features are Awesome, but what about Uptime?

What is IONOS Hosting?

I like to think of IONOS as the hidden giant of the hosting world.

This seems to be the case for America, at least—most people who aren’t familiar with hosting have taken only a few cursory looks and know more about GoDaddy and Bluehost.

Despite that, IONOS is one of the largest hosting providers in the world: they service more than 8 million customers and 12 million domains.

Perhaps it’s because IONOS is mainly centered in Europe, but nonetheless, it has a massive reach.

Although IONOS has been around since 1988—which is incredibly old in internet company terms—it hasn’t stopped growing.

In fact, they just recently changed their brand name to IONOS, reflecting a new integration with the cloud.

So, how does this hidden titan perform?

Is it genuinely outcompeted by the other famous names in hosting, or does it quietly dominate?

This review will speak from my experience and knowledge of the hosting landscape.

Submit review

Submit a short but detailed review and get FREE link to your website.

Review Title

Ratings

Uptime

Performance

Value for money

Customer Service


Overall Rating

Upload image (Optional)


BANGLADESH
Kawser Ahmed
https://www.exceldemy.com/


Jun 08, 2019

Uptime

Performance

Value for money

Customer Service

Overall Rating

I am using Known Host's a Managed VPS Package. I did not find any major issues. Here are some issues I faced while using this hosting: one day, I needed fast support from them. But the person who was in support was supporting me like he was waking up after every 30 minutes of time. I gave him a bad rating. Another issue I faced from them is downtime. Though the downtime was very small in numbers and time, so I am not taking this as a serious issue. So, my overall rating to Known Host is 4.5-5. This is a very honest review.


Feb 22, 2019

Uptime

Performance

Value for money

Customer Service

Overall Rating

I was have experience with their Linux hosting. It was nice experience. The price was cheap, there is many easy to navigate option, in the account area, and they always respond, when you send the question to them. I was pleasently surprised with the quality of their Linux hosting. Thank you.


Dec 13, 2018

Uptime

Performance

Value for money

Customer Service

Overall Rating

I was hesitant to buy this web hosting because it was very cheaper compared to others. To my surprise their hosting is good. Better than expected. They gave me the fastest Customer support service.

IONOS vs. Godaddy: 6 Tests Based on My Experience

IONOS vs. GodaddyIn this article we compare IONOS vs. Godaddy

But first, listen to this:

When it comes to choosing IONOS vs. Godaddy for web hosting, it is hard to decide which one excels over the other.  Let us step by step walk through the different feature comparison of these hosting companies.

IONOS is predominantly a web hosting company which was launched in 1988, with its headquarters in Montabaur, Germany.

It is one of the largest web hosting companies and has offices across 10 countries. It provides a wide range of hosting services with great performance.

GoDaddy is an American public domain registrar and web hosting company. It was first launched in 1997 and is headquartered in Scottsdale, Arizona, US. It has approximately 17 million customers worldwide.

How to Fix ‘Server IP Address could not be found’ error (6 Easy Methods Explained)

Stuck with  “Server IP Address could not be found” error?

Read this article on how to fix it.

The problem generally occurs while loading or accessing some specific sites only, which may hamper the working accordingly.

Now, this article deals with the step-by-step guide on fixing “Server IP Address could not be found” error.

Different ways to fix the Server IP address issue

Here are some of the few fixes which can help to eliminate the above problems which are as follows:

Method 1: Deleting the whole files present in the ‘etc’ folder:

It is one of the easiest ways to remove the errors of the above problem as some of etc files might hamper the processing. So, users need to follow these steps to achieve success.

(a) Go to C:\Windows\System32\drivers\etc

Open My Computer and there click on the C drive. After doing this, select on ‘Windows’ and then choose the folder ‘System32’.

After this, opt for the ‘drivers’ folder and then on ‘etc.’

(b) Remove all the unnecessary files

After that reaching the landmark, you will need to remove all the needless files present in the particular ‘etc’ folder

(c) Try reconnecting it with Chrome

After doing both the steps, users should try to re-access the internet by Google Chrome.

Server IP address could not be found

Method 2: Update the Network Adapter Driver:

With times there are chances that users might have set up either an incorrect, outdated or corrupt network adapter driver. It results in a few significant issues, including the above pop-up IP message. With these things in mind, users should update the Network Adapter Driver by the given steps below:

(a) Open the Control Panel

Users need to opt for the Control Panel by clicking on search and then entering “Control Panel” on the Search Box.

(b) Select Device and Printers and then Device Manager

Users need to then click on Device and Printers and later on Device Manager. There they must adjust the Network Adapter Driver accordingly by clicking on Network Adapter and then choosing the suitable network adapter connections.

Server IP address could not be found

Method 3: Clearing Chrome’s Host Cache

It is the major issue that arises when a user does not pay attention to clearing Chrome’s Host Cache.

If the cache is full or corrupt, then users will face difficulty accessing their favourite websites. For that, they can quickly fix the problems as given below:

(a) Open Chrome and then type Chrome://net-internals/#dns

Users need first to select the Chrome from the desktop and then type on Chrome://net-internals/#dns in the given address bar.

(b) Clear Host Cache

Users should then select Clear Host Cache given on the webpage after pressing Enter from the keyboard.

Server IP address could not be found

Method 4: Modify the DNS Server Settings

Outdated DNS Server Setting is one of the most prominent reasons for the outcome of this problem. Due to incorrect configuration in the DNS server settings, the issue might erupt as a whole. So, users need to follow these simple steps:

(a) Window logo key and key R

Users must click the Window logo key and key R buttons simultaneously to open Run Box.

(b) Control Panel

Then, users must type on the Control Panel in the given Run Box and press OK.

(c) Network and Sharing Center

Then users must click on Network and Sharing Center in the given Control Panel.

Server IP address could not be found

(d) Select Change Adapter Settings.

Then, users must click on the Change Adapter Settings from the Network and Sharing Center given in the Control Panel. Then, they must right-click the Connection Icon option from either Wireless Network Connection or Local Area Connection.

Server IP address could not be found

(e) Internet Protocol Version 4 (TCP/IPv4)

After selecting Properties, users must click on Internet Protocol Version 4 (TCP/IPv4) to check whether ‘Obtain DNS servers address automatically’ is already opted or not. If no, then users must click on OK, and if yes, then they must select ‘Use the following DNS server address’ to enter the suitable server address to click OK.

Here are the options where users can enter the suitable DNS server for the IP server compatibility i.e.

Preferred DNS server: 8.8.8.8

Alternate DNS server: 8.8.4.4

After this, users must check for the fixed problem of the solution.

Server IP address could not be found

Method 5: Renew and Flush Server IP address could not be found

Windows have the feature of storing the IP addresses of websites so that users can easily access it when they visit it next time.

But when the cache becomes corrupted or outdated, it may stop the accessibility to the specific website. For this, one must renew and then flush the DNS by following these simple steps:

(a) Open Command Prompt

To open a command prompt, users must press Windows+ R for Run Box and then type cmd by pressing Ctrl+Shift+Enter for opening an Administrator Command Prompt.

Server IP address could not be found

(b) Ipconfig /flushdns, ipconfig /renew, and then Ipconfig /registerdns

Users must then type ipconfig /flushdns and then press Enter. It will successfully flush the unnecessary DNS Resolver cache.

After this, users should then type ipconfig/renew along with pressing Enter for renewing the IP configuration.

Users must then type ipconfig /registerdns along with pressing an Enter button.

(c) System Reboot

After the above process, users should then reboot their PC for checking the optimum performance on the website.

Method 6: VPN

VPN (Virtual Private Network) can help to overcome the problems associated with IP address not found messages. Users should use a good VPN connection (such as NordVPN, ExpressVPN, and many more) so that there are no issues associated with some data theft or any addition of malicious files into the system, which may hamper the proceedings.

Conclusion

With these above steps, users can easily fix the “Server IP Address could not be found” error message.

Users must ensure to fix these IP address problems beforehand so that it might become severe in the future process.

How to Solve the “413 Request Entity Too Large” Error (3 Easy Ways Explained)

You must have noticed that the error name “413 Request Entity Too Large” contains a hint as to the solution and problem.

Before you begin digging, here’s a bigger hint: it’s in the word “Large.” In other words, the “413 Request Entity Too Large” error is a size issue.

When a client sends a request that is too large for the end server to handle, this error occurs.

Depending on the nature of the fault, the server may terminate the connection and block any future requests.>Let’s break down the error into its components:

  • “413”: This is one of the 4xx error codes (like 401 Unauthorized error, 403 Forbidden Error, 404 Not Found Error), which indicates a server-browser issue.
  • “Request Entity”: In this situation, the “entity” is the data payload that the client is requesting from the server.
  • “Too Large”: The entity is too big for the server to handle.

To be more specific and provide more clarity, this error has been renamed from what it was previously known as. Although the issue is now recognized as the “413 Payload Too Large” error, you’ll still see it referred to by the previous term many times.

error413 image3

The simple explanation for why the issue occurs is that the server is configured to reject huge explicit uploads.

Consider when you upload a file with a maximum file size limit: in most circumstances, there will be some validation in place to prevent the issue, but, if you’re getting the “413 Request Entity Too Large” error, those validation attempts might not be as foolproof as you believe.

Resolving the Error 413 request Entity Too Large, from its roots

Here are the three basics and most efficient ways to resolve the error from its roots.

Fix 1: Making edits in the Functions.php file.

First and foremost, you can work with your WordPress functions.php file to assist increase the file upload size for your site.

Step 1: To do so, go to your hosting control panel and log into your site using SFTP with the credentials you found in the control panel.

Step 2: You’ll want to look for the file itself once you’ve gotten in. The functions.php file should be located in your server’s root directory. This root is often referred to as www or public_html, or it might be the abbreviated name of your website.

Step 3: Once you’ve located it, open it in your preferred text editor. If you don’t see the file, use your text editor to create it.

error413 image1

Step 4: Once you’ve opened a file, type the following:

@ini_set( ‘_max_size’ , ’64M’ );

@ini_set( ‘post_max_size’, ’64M’);

@ini_set( ‘max_execution_time’, ‘300’ );

413 Request Entity Too Large

In brief, this increases the maximum file size for posts and uploads while also increasing the amount of time the server spends attempting to process the request. The numbers here can be whatever you like, but they must be large enough to cover the inaccuracy. In practice, 64 MB is plenty for all but the most intensive jobs.

Step 5: When you’re finished, save your work and re-upload it to the server.

Then see if the “413 Request Entity Too Large” issue is still present. If that is the case, move further.

Fix 2: Making edits in the .htaccess file

Your .htaccess file, like your functions.php file, is stored on your server. The difference is that .htaccess is an Apache server configuration file. You won’t see this file in your setup if you use Nginx servers. This is the strategy you’ll need if you’re using an Apache server.

Here is how to follow this fix.

Step 1: Similar to the instructions for functions.php, log into your server through SFTP first, then look in your root folder.

Step 2: The .htaccess file should be located in this directory, but if it isn’t, contact your host to find out where it is and whether your server is running on Nginx instead.

413 Request Entity Too Large

Step 3: Once you’ve located it, reopen it. There are a few tags, the most significant of which is # END WordPress. After this, copy and paste the given below lines:

error413 image2

php_value upload_max_filesize 64M

php_value post_max_size 64M

php_value max_execution_time 300

php_value max_input_time 300

In a nutshell, this is almost the same as adding code to the functions.php file, but it’s more like giving the server explicit instructions.

Step 4: Save your edits, upload the file, and double-check your site when you’re done.

If you’re still having issues, we recommend contacting your host again, since they’ll need to double-check several aspects of your setup.

Fix 3: Increasing the upload limit from Nginx Server.

Client_max_body_size is a directive for Nginx users that determines the maximum size of an HTTP request. Because the web server is configured to limit huge file sizes, the 413 error request entity too large occurs.

Nginx provides a setting called client_max_body_size that allows the client request body to be as large as it wants to be. An error notice appears if the request exceeds the value. That means we’ll have to change Nginx’s configuration to accept the file sizes we desire for uploading.

This directive may already exist in your nginx.conf file, which may be found at /etc/nginx/nginx.conf. If it isn’t, you can define a value for that directive in either an HTTP, server or location block.

server {

client_max_body_size 100M;

}

413 Request Entity Too Large

This directive’s default value is 1M (1 megabyte). You can change the value to 0 if you don’t want a request size limit.

Once you’ve found the value you want, save your changes and reload Nginx with the command service nginx reload.

Conclusion

Even though WordPress is a rock-solid platform, you’ll encounter a variety of WordPress issues over time, including the WordPress HTTP Error, WordPress Memory Limit error, etc.

The “413 Request Entity Too Large” issue, on the other hand, is caused by your server, not WordPress. As a result, this problem requires a different response than other platform-specific issues.

There’s no reason you can’t repair this mistake quickly if you know how to use SFTP. It has to do with the upload size defined in your server configuration files, therefore you’ll have to dive into your .htaccess or nginx.config files.

It’s simple to open your text editor and make the necessary modifications to these files, and you may also contact your web hosting service provider to get the issue resolved.

59 Best Handpicked Motivational Quotes to Start Your Day

Having a tough week? Why else you would be here! Don’t worry, these motivational quotes will help you.

We all have Talent, Skills, Abilities, success drive but sometimes what we lack is the Will to do. Don’t worry we’ve got you covered!

Here we have listed out the top best motivational quotes which can boost up your energy to do wonders.

Motivational Quotes of the Day

How to Resolve the WordPress Memory Limit Error (4 Easy Fixes)

Today we will show you how to fix WordPress Memory Limit Error.

But first, listen to this:

WordPress is a Content Management System that is written in PHP. This programming language is quite versatile, although it does have a few difficulties.

When working with such a system, it is essential to be well-versed with the steps to backup the WordPress websites to be safe after any new update or edits, as this will ensure that even if you get any errors, you can instantly get back to the previous version without having your website users face a downtime.

For example, if you don’t provide your WordPress installation enough memory, you could get the “PHP Memory Exhausted” issue now and then. While using WordPress, you may also face other errors, including the WordPress HTTP Error.

In a word, this issue indicates that your server isn’t supplying enough resources for WordPress to run the PHP programs it requires. This problem can have a detrimental impact on your site’s functionality, but there are a few things you can do to repair or even prevent it.

Causes of WordPress Memory Limit Error

To keep data such as plugins, themes, databases, and content, every website requires a specific amount of RAM. When the resources demand it, more memory is required. The web servers, on the other hand, set a restriction on how much RAM any script can use. WordPress comes with a memory allocation of 64M by default.

The memory limit error occurs when the demand surpasses the limit. This issue usually occurs when you add media assets to your site or when you install a new theme or plugin.

limit-error2

Why do servers set a RAM restriction?

After all, it is a vital component for server security. Servers must have adequate memory to simultaneously run several apps for various websites.

A badly written script without restrictions could take all of the server’s memory. The server breaks in this event bringing your site and all the other sites it hosts down with it. WordPress is dependent on PHP scripts, and therefore must stick to the assigned limits.

Resolving the WordPress Memory limit Error

The good news is that most WordPress issues are simple to diagnose and correct. Nonetheless, they might be scary to newbies, particularly because they provide little information about what went wrong and how to solve the problem. However, following these steps will help you resolve the error in every situation.

Fix 1: Increasing the PHP Memory limit.

You must manually establish a new memory limit for your server to increase the PHP memory limit. Editing the wp-config.php file on the server is required.

To get to the WordPress files on your server, you have two options. You can use either CPanel’s File Manager or an FTP client software. Here is how to do it with the File Manager:

Step 1: To access your CPanel, type /cpanel after your domain name (for example, yourwebsite.com/cpanel). To access CPanel, use the login credentials you received in your welcome email from your web host.

Step 2: Locate the Public.html folder in the File Manager.

Step 3: Right-click on the wp-config.php file and select Edit.

limit-error4

Step 4: Look for the end line specifying the memory or the one stating “That’s it, no more editing!,” and then paste the code underneath it.

define( ‘WP_MEMORY_LIMIT’, ‘256M’ );

This limits PHP memory to 256MB by default.

WordPress Memory Limit Error

Step 5: To save your changes, click Save. Reload your website to see whether the error has been resolved.

Fix 2: Disabling and then reactivating the plugins.

The memory exhausted issue is frequently fixed by increasing the PHP memory limit. If not, one of your website’s plugins may be creating the problem. To figure out which plugin is causing the problem, disable all of them and then reactivate them one by one until you find the culprit.

You’ll need to disable the plugins on the server because you can’t access your WordPress dashboard. To do so, you’ll need to re-login to your server. To access your server, follow the steps given below:

Step 1: Locate the plugins folder in the wp-content folder.

Step 2: The plugins folder should be renamed to “plugins-bad.” Don’t worry, none of the plugins you’ve installed will be removed.

Step 3: Make a new, empty folder called plugins. This will turn off all of the plugins that have been installed on your site. Reload your website to see whether the problem has been resolved. If your website is now working normally, the problem was most likely caused by a plugin.

WordPress Memory Limit Error

Step 4: Return to the wp-content folder now. Delete the previously created empty folder and rename the “plugins-bad” folder to “plugins.” This will restore your old plugins without requiring them to be activated.

Step 5: Now rename each plugin one by one and see which one caused the error and then delete the same.

Fix 3: Upgrade the Hosting Plan of your Website.

You shouldn’t have to worry about increasing your PHP memory limit if you utilize a good WordPress hosting service. If you use shared hosting, you’ll almost certainly have limited resources. If you’re seeing this problem, it’s probably time to increase your hosting package.

In most cases, upgrading your hosting package will result in more PHP RAM being available. As a result, you’re far less likely to encounter a WordPress memory limit problem. Your budget is the only constraint.

If you are unable to upgrade hosting plans at this time, you should contact your provider’s support team to see if they can increase your PHP memory limit on their end. If they can’t, it’s time to upgrade to another best web hosting provider that offers high PHP memory restrictions on budget rates.

Fix 4: Contact your web hosting provider.

If any of these approaches don’t work for you, it’s because your web hosting company won’t let you boost the PHP memory limit. You’ll have to explicitly request that your web hosting provider boost your PHP memory limit. Contact your web hosting service provider to take help for the same.

Conclusion

It’s aggravating to run across an error on your WordPress site, especially if it doesn’t provide much information. Thankfully, the WordPress memory limit error is a little more lenient than others. It informs you of the exact nature of the problem, and the path to resolving it is relatively clear.

Strikingly Review : New Site Builder Worth Trying

Introduction

Launched in 2012, Strikingly is a relatively new website builder that has steadily been growing in popularity. Strikingly is focused on offering a platform to build simple websites and online stores with zero coding or design skills.

In fact, you’ll be able to launch a professional-looking single-page website within a matter of minutes. As David Chen put it:

David Chen Quote

Founded by David Chen, Dafeng Guo, and Teng Bao, it was the first Chinese company to graduate from the technology startup accelerator, Y Combinator.

What are the Pros & Cons of Strikingly?

Pros

  • Highly responsive and super helpful 24/7 live chat support for all users.
  • Page editors strike a good balance between ease of use and creative freedom.
  • Offers a “forever free” plan.
  • The paid plans are relatively affordable if you plan to create more than one website.
  • Create and customize as many websites as you want for free.
  • If you want to create a one-page website, Strikingly is one of the most suitable website builders.
  • Easy to change website templates at any time.
Cons

  • Many of Strikingly features lack depth, such as SEO, shipping, discounts, and customer management.
  • The Free and Limited plans are very restrictive with Strikingly branding.
  • Comparatively expensive if you only want to host 1 website.

Features

Strikingly is not the most feature-rich website builder on the market. Instead, they offer a streamlined and easy-to-use platform for launching and managing a website. However, they do provide the essentials, such as:

  • Domain registration
  • SSL certificates
  • Blogging capabilities
  • Backup and restore
  • Ability to add custom code
  • Pop Ups

E-commerce

All Strikingly plans allow you to sell online one way or another. You can sell up to an unlimited number of products, whether it’s digital, physical, or memberships. You can also add a basic store to your site with just a few clicks using the visual editor.

Marketing and Memberships

Strikingly offers all the basic marketing tools you’d expect, such as signups, forms, live chat, and newsletters. You can also track your visitors and traffic using Google Analytics. If you have at least a Pro plan, you can even allow member accounts with registration, login, and account management pages.

Mobile Apps

Strikingly offers pretty powerful mobile apps for Android and iOS. These allow you to customize your website, manage your store, view real-time site analytics, respond to live chats, and even manage orders.

Widgets

Strikingly doesn’t offer a dedicated app marketplace. However, it offers pre-designed widgets and section areas that can greatly speed up the website design process. With just a couple of clicks, you can add fully designed galleries, forms, CTAs, or commerce widgets to your pages.

Ease of Use

Strikingly calls itself a website builder with “zero code or design skills required.” So, obviously, ease of use plays a big part in what it has to offer. Indeed, you can get signed up with Strikingly in less than 5 minutes.

From there, creating a new website is as easy as choosing a template, editing it using the drag-and-drop page builder, and clicking “Publish.”

Strikingly editor

The dashboard is also really straightforward with almost no learning curve. When you’re new to Strikingly, they’ll even provide you with a handy to-do list. This guides you through all the most important aspects of using the platform:

Strikingly dashboard

Pricing

Strikingly offers a free plan as well as a free 14-day trial of all paid plans. Strikingly billing is also quite flexible with the option to choose between monthly, annual, 2-year, 3-year, and 5-year subscriptions. The longer you subscribe, the more you save in the long term. In fact, you can save up to 50%.

The bad news is that the free plan is very limited. You only have 5 GB of monthly bandwidth, 500 MB storage per site, 5 pages per site, and 1 product per site to work with. You’ll also miss out on a lot of other premium features, like multi-language support and e-commerce. Not to mention host on a Strikingly subdomain, like mywebsite.strikingly.com.

While you can only host a single website, you can create and customize as many other sites as you want.

Here is a breakdown of Strikingly pricing plans:

Strikingly pricing

As you can see, higher-tire plans provide you with:

  • More hosted sites
  • More storage
  • More bandwidth
  • More pages
  • More products
  • Lower transaction fees

Other than that, you mostly unlock more and better e-commerce capabilities.

Overall, Strikingly’s pricing is slightly higher than other website builders. However, it’s still somewhat competitive considering that you can host multiple sites and can have e-commerce.

How fast is the website created on Strikingly?

First of all, Strikingly has an uptime guarantee of 99.99%. This is outstanding as most other web hosts only have a 99.9% guarantee. Most reviews and existing customers also seem to agree that Strikingly is highly reliable.

Unfortunately, Strikingly’s performance isn’t as good. We ran a performance test of a website we host with Strikingly and the results were good, but not great. Overall, our website got a C-grade with a performance score of 68%:

GTMetrix

However, two important Web Vitals, Largest Contentful Paint and Cumulative Layout Shift also got high scores. These are important for determining search engine rankings.

How good are Strikingly Templates?

Out-of-the-box, Strikingly offers around 100 ready-made templates. These are essentially fully-functional websites that you can launch with just a few clicks.

As you can see, they span a decent range of niches, from stores to blogs to startup sites:

Strikingly template

The designs are not the most cutting-edge or creative. However, they’re practical, modern, and easy to use. Another bonus is that you can effortlessly change a site’s template at any time.

E-commerce: Selling Online with Strikingly

All Strikingly plans allow selling online in one way or another. However, the scale at which you can operate and the type of selling you can do depends on your plan:

  • Free:
    • 1 product
  • Limited:
    • 5 products
    • 5% transaction fees
  • Pro:
    • 300 products
    • Paid membership subscriptions
    • 2% transaction fees
  • VIP:
    • Membership tiers
    • 0% transaction fees

You can argue that only Pro and VIP are really suitable for full-fledged online stores. There are just over 50 templates designed for online stores. Many of them specifically target those that mainly want a business site/blog with a simple store to sell some merchandise.

Other features Strikingly have that are important for an online store are:

  • Multi-language support
  • Membership options
  • Product reviews
  • Import/export products
  • Marketing and SEO

Adding a New Store

It’s incredibly easy to create a store with Strikingly. If you didn’t choose a store theme, you can still add one to your website just by clicking “Add store” in the editor:

If you did pick a store theme, just click “Store” in the left hand menu and it will open up all your store-related settings:

Strikingly Add Store

And, below you can see the settings in action:

product

Adding New Products or Services

Adding new products is just as easy. Assuming that you have your store settings open, all you need to do is click the big “New Product” button.

That will open up the product details page. As you can see, you have a choice between physical, service, or digital products:

Product Type

It’s pretty easy to configure the rest and stock standard if you’ve used any online store tool before.

The only catch is that you’ll at least need a Pro plan to create and manage different product categories.

Audience

Under “Audience” is where you can manage all your customer interactions. Once again, this is fairly basic and doesn’t allow for customer segmentation:

Audience List

However, customers will be labeled according to their membership tier.

If you’re a Pro user, you can also set up:

  • Automated emails
  • Discount coupons
  • E-commerce popups

However, newsletters and SEO settings are available to all Strikingly users. As you can see, Strikingly provides a handy checklist:

SEO Check List

That being said, these are very basic SEO tools. You can find more advanced settings with most other website builders.

Payments

Strikingly allows you to set the currency of your store to nearly any currency. Conveniently, they also offer four different payment methods:

Payment

In terms of payment options, Strikingly is kind of in the middle. Some of its competitors only offer one or two options while others offer up to 100. The good thing is that these are some of the most popular options, particularly in the U.S.

Shipping and Taxes

Taxes are another Pro feature. However, Strikingly offers three tax “modes” that make setting up your taxes somewhat easier: Flat Tax Rate, US State Sales Tax, and EU VAT tax.

In terms of shipping, you have slightly more flexibility. However, there are still no advanced settings like real-time calculations or third-party shipping integrations.

Mostly, you can define your own shipping rules. For example, you can set flat rate shipping or create shipping rates according to weight/pickup location. You can also create different shipping regions with their own fees and rates:

Strikingly shipping options

Help & Support

Strikingly provides 24/7 customer support to all its users, even non-paying ones. One-on-one technical support is mostly offered via live chat from right within the dashboard.

The knowledgebase is quite thorough and it’s great that there are also video tutorials.

Strikingly help guideUsually, the chat support responds almost instantaneously:

Strikingly Support

The support rep was friendly and helpful. In this, and subsequent support interactions, they were able to provide me with an adequate answer. I also liked the fact that they don’t try and force you to talk with chatbots or resolve the issue yourself first.

Inspiration

inspiration

inspiration

Summary

There are many website builders today that claim to make creating, managing, and hosting a website effortlessly. However, Strikingly is probably one of the easiest and most beginner-friendly options out there.

Strikingly consistently favors ease of use above complex or in-depth features. For those that just want a simple personal, business, or online store it will be a godsend. However, others might find its lack of depth too restrictive.

Still, Strikingly offers everything that someone new to website builders could want:

  • A low learning curve
  • 100+ pre-designed templates
  • Easy-to-use features
  • A no-code, drag-and-drop page editor
  • Free hosting

With a free plan and a 14-day free trial for all paid plans, there’s no reason not to try it out.

FAQs

What does Strikingly do?

Strikingly provides a no-code platform to create and host simple websites and online stores. You can get everything you need from Strikingly, including storage, bandwidth, SSL protection, and custom domains.

Is Strikingly completely free?

Yes, Strikingly offers a completely free plan. However, your features and resources will be limited. You will also need to host your site on a .strikingly.com subdomain and display Strikingly branding.

Is Strikingly a WordPress website builder?

No, Strikingly is its own proprietary platform with its own drag-and-drop page editor, templates, and website management interface. For most beginners, it will be a simpler alternative to WordPress.

How do you use Strikingly?

Once you sign up with Strikingly, you can create a website within just a couple of clicks. Simply pick a template, customize it using the editor, and publish it. You don’t need any prior coding or design skills. Strikingly also takes care of hosting, security, and uptime for you.

How to Fix the “SSL_ERROR_NO_CYPHER_OVERLAP” Error: 5 Easy Fixes

The SSL_ERROR_NO_CYPHER_OVERLAP error occurs only in Firefox, unlike other browser issues.

A similar but somewhat different version is available in Google Chrome, with the warning “ERR_SSL_VERSION_OR_CIPHER_MISMATCH“.

In a word, this error occurs when Firefox is unable to receive security data from a website that you are attempting to visit.

ssl image1

If you see this error message, it means your browser was unable to securely communicate with the server. It’s worth noting that SSL is nearly identical to Transport Layer Security (TLS), which will be discussed later.

As previously stated, this error code happens when the server fails to provide suitable security mechanisms or protocols in response to the browser’s request, resulting in the web page failing to load. There are, however, several more explanations, such as:

  • Firefox has not been updated to the most recent version, which causes problems when accessing the web.
  • The web browser has SSL3 turned off. TLS can also be disabled, which results in an error message.
  • Because RC4 support has been removed from Firefox, if a website uses it as a parameter, this error will appear.

Here are the top 5 fixes for the SSL_ERROR_NO_CYPHER_OVERLAP error.

Fix 1: Updating the Firefox Browser.

The first and most basic solution to this problem is to make sure you’re running the most recent version of Firefox. This is something you should do frequently to make your internet experience as smooth as possible.

To get the latest version of Firefox, open it, and then follow the given steps:

Step 1: Click the hamburger menu button, and then go to Help > About Firefox

ssl image7

Step 2: If there are any updates available, Firefox should start downloading them right away. When the download is finished, go ahead and click the Restart to Update Firefox button.

ssl image1

Alternatively, you can download the most recent version of Firefox from the Mozilla website. Remember to uninstall your existing version from your computer before downloading it. Here is how to do it:

Step 1: On Windows, press the Windows + R keys together

Step 2: type “appwix.cpl” into the search box and press Enter.

Step 3: Locate Firefox in the program manager, right-click it and select Uninstall.

Fix 2: Checking TLS1 and SSL3 Encryption protocols

If the encryption protocols SSL3 and TSL1 are disabled, users may receive the message “secure connection failed” with the error code SSL_ERROR_NO_CYPHER_OVERLAP, as some websites require these protocols for connection.

Although SSL3 and TSL2 settings are no longer available in the current version, you can work around the problem by modifying some security variables.

Step 1: Select Security Options from the menu button.

Step 2: Select the Privacy & Security tab in the pop-up window. Then look for the Security section by scrolling down.

Step 3: Uncheck the box that says “Block hazardous and deceptive content.”

ssl image3

After that, close the browser and reboot your computer. Restart Firefox and see whether you can access the website that was blocked by the SSL_ERROR_NO_CYPHER_OVERLAP error code.

Fix 3: Resetting the SSL3 and TLS Settings.

If the problem persists, the next step is to reset your TLS and SSL3 settings if you are using the most recent Firefox version. To connect to some websites, you’ll need to use the TLS and SSL3 protocols. If you’ve turned them off, that may be why you’re getting the “SSL_ERROR_NO_CYPHER” issue. Here is how to do it:

Step 1: In the address(URL) bar, type “about:config” to reset them.

Step 2: Accept the risk and proceed despite the notification “Proceed with Caution,” which keeps you from making critical changes to your web browser by accident.

ssl image5

Step 3: Firefox’s method of prevention is this caution. To continue, click Accept the Risk and Continue.

Step 4: Type “tls” in the search bar on the next Advanced Preferences screen: This will surely generate a list of all your TLS configurations:

Step 5: Look for any values that are bolded, as these are the ones that have recently changed. Right-click any bolded values and select Reset to return them to their default settings.

SSL_ERROR_NO_CYPHER_OVERLAP

Then, for SSL3, follow the same steps. Type “ssl3” into the search bar, and then reset any recently changed values:

Also, double-check that the following two entries are set to false:

  • security.ssl3.dhe_rsa_aes_128_sha
  • security.ssl3.dhe_rsa_aes_256_sha

Remember that disabling these options is critical for security reasons.

Fix 4: Changing the TLS Version Fallback.

Changing the TLS version to bypass is a fantastic option, however, it should not be used for every website. Here is how to do it:

Step 1: Look for security.tls.version.fallback-limit in Firefox’s about: config section.

Step 2: Set the value to zero.

SSL_ERROR_NO_CYPHER_OVERLAP

Step 3: Set the value of security.tls.version.min to 0 as well.

SSL_ERROR_NO_CYPHER_OVERLAP

Step 4: Check to see if you can get on the webpage.

If you change these values, your browser will become less secure. So, if it’s essential, go ahead and do it. Make a point of resetting it afterward.

Fix 5: Contacting the web host.

If this is just happening on one website, it’s a server-side problem. The issue can only be resolved by the server administrator. This typically occurs when a website still uses the RC4-Only Cypher Suite and the server’s ‘security.tls.unrestricted rc4 fallback’ option is set to false. For such cases, you should directly contact the web host provider or the server administrator and take their assistance in resolving the error.

Conclusion

Even though this error (SSL_ERROR_NO_CYPHER_OVERLAP) seems a lot complicated and trickier, you can resolve it by following the above-mentioned steps. This is not something that stays forever and you cannot resolve it on.

Servers9 Forex VPS Review: Is it Good hosting? Let’s find out…

Today I am going to review Servers9 Forex VPS.

But first, hear me out:

Getting a dedicated server for your company website is costly, especially when it is just a startup.

An alternative to that is VPS. Virtual Private Server is somewhere between a shared hosting and a dedicated one. VPS Hosting is preferred because you can afford it like a shared server and control it like a dedicated server.

Servers9 is one such VPS hosting provider that offers WordPress, VPS and Dedicated Server hosting.

Servers9 Homepage

The servers are located in the cities of North America, Asia, Europe and Australia making a total of 17 data centers.

Ultahost Review – 100% Uptime or Too Good to be True?

Ultahost

Ultahost is a “next-gen” hosting provider, aimed at offering high-performance hosting solutions for any use case. Launched in 2019, they are a relatively new hosting company, based in Delaware, USA.

No matter what you’re hosting needs are, you can probably find a suitable solution with Ultahost. Their catalog includes shared WordPress, Windows, VPS, VDS, and dedicated server hosting.

Ultahost owns and operates their own Tier 3 and 4 data centers and use 100% high-performance NVMe SSDs. With highly redundant, fault-tolerant, secure, and disaster-proof global servers, they promise 99.99% server uptime.

However, we want to give you an unbiased opinion. That’s why we’ve divided this review into the best aspects as well as the possible concerns of using Ultahost.

Ultahost Pros

There is plenty to look forward to if you’re considering using Ultahost Here are its main strengths as a hosting provider:

1. High-Quality Infrastructure & Features

When looking at what Ultahost has to offer, it’s clear that they aim for quality over quantity.

For example, their shared hosting may have limited storage, but it consists of high-speed NVMe SSD hard drives. These are the highest-performance hard drives you can find for shared hosting.

All their shared hosting servers also feature 1 Gbps connectivity which should reduce bottlenecks or the likelihood of throttling.

You also get a free domain for the first year as well as a free SSL certificate for life.

The same goes for their WordPress hosting. It’s a convenient service for managing a WordPress website thanks to managed hosting, cPanel, auto-updates, WP-CLI, etc. Higher-tier customers even get the premium JetPack plugin for free as well as SSH access.

VDS, VPS, Windows, and Dedicated server customers can expect even more advanced features. Just to mention a few:

  • BitNinja security
  • Team management
  • Staging environments
  • SSH and SFTP access
  • Auto healing
  • Dedicated firewalls
  • Advanced caching
  • HTTP/2 Enabled Servers
  • And, frequent security patching

All of their hosting services come with free daily backups, a free domain, and a free SSL certificate. It’s clear that Ultahost can take your hosting experience to the next level.

Utlahosting is very proud of the fact that they operate their own Tier 3 and Tier 4 data centers. This is good news because you can never guarantee quality or accountability from a third-party data center.

2. Extremely Affordable Shared Hosting and VPS Packages

You might think that because of the quality of their hosting and features, Ultahost must be expensive. However, the good news is that they are a very affordable hosting provider, especially for first-time customers.

For example, their shared hosting service starts at just $3.29/month for month-to-month hosting and is discounted slightly to $37/year if you subscribe annually. Even the most expensive plan is only $12.99/month or $139/year. One of the best things about Utlahost’s pricing is how transparent it is. Instead of high renewal rates, you’ll always pay the same rate that you signed up for.

Ultahost

Ultahost’s WordPress packages are convenient because they cater to a wider range of budgets. The prices range from only $2.90/month to $27.50/month with more generous resources than the shared hosting.

Even their VPS packages are very affordable, ranging from $5.50/month to $21.50/month.

The VDS, dedicated server, and Windows packages can be slightly pricey, even compared to other hosts. However, they are still reasonable when you consider what you get in terms of features and resources.

You can also save up somewhat on your hosting fees if you subscribe annually instead of month-to-month. And, the best part is that you can test out any hosting service risk-free thanks to the 30-day money-back guarantee. While this is standard practice for shared and WordPress hosting, that’s usually not the case for VPS, VDS, and dedicated servers.

3. Flawless Uptimes and Reliability

Ultahost talks a big game when it comes to their performance and uptime. In fact, they offer a 99.9% uptime guarantee for all their hosting packages.

This doesn’t seem to be an empty promise or exaggeration. We signed up for an Ultahost account to test out their commitment to uptime and were not disappointed. As you can see, we experienced 100% uptime over the entire span of 90 days:

Ultahost

That’s exceptional, even among the most reliable hosting providers. The uptime of your website plays a huge role in your customer experience and even SEO rankings. Not to mention that you can miss out on important business opportunities when you’re website is down.

There are a few complaints of intermittent downtime, but this seems to be in the minority.

4. Choose Your Own Server Location

Ultahost allows VPS, VDS, and dedicated servers customers to choose which data center to use.

Ultahost manages and provides its own data centers to host customers’ websites. This means that they are accountable for the performance and reliability of their servers. While this isn’t necessarily a guarantee, it means you can trust their infrastructure more than if it was outsourced to an unknown third party.

They operate data centers in multiple locations across the globe, including:

  • Dallas, USA
  • Montreal, Canada
  • Frankfurt, Germany
  • Amsterdam, Netherlands

Their data centers are rated as Tier 3 and 4, the two highest standards for data centers. This means that they are built to be redundant and fault-tolerant with a wide range of security measures, including 24/7 security, raised floors, water detection and suppression systems, and extra UPS and generators.

You can also read more about their server hardware specifications here. However, it’s safe to say that this is a highly secure and reliable infrastructure to bet your hosting on.

5. Outstanding Customer Support

If there’s something that the vast majority of Ultahost customers can agree on, it’s the dedication and quality of its customer support. First of all, one-on-one support is available via a variety of contact methods, including live chat, email, phone, or even Skype. What’s more, Ultahost’s support team is on hand 24/7/365.

You usually receive a response instantly when using live chat, even if you’re not a customer yet. And, they’ll help you migrate your website from another host for free.

The support staff themselves are usually friendly, helpful, and highly knowledgeable. Don’t just take our word for it. You can see Ultahost gets very high ratings on consumer review sites like Trustpilot.

If you want to solve problems yourself, Ultahost provides an extensive knowledge base. It covers all topics, from beginner-level guides to advanced tutorials for technical users.

Ultahost is very active on social media, and you can also reach out to their representatives there.

Ultahost Cons

Like any other hosting provider, Ultahost isn’t perfect. Before you sign up, you should consider how the following cons will impact you:

1. Limited Storage and Traffic Volumes

One of the first concerns you might have about Ultahost is that they don’t offer unlimited storage. This may be concerning as many other shared hosting providers claim to offer limitless hosting.

The first problem with feeling this way is that no hosting provider offers true unlimited hosting. There are always fair usage limitations and guidelines that act as a soft cap on how much storage.

Thirdly, for the most part, the limits are still reasonable considering what type of website the hosting is meant for. Shared hosting is typically for blogs, personal portfolios, or small business websites. Most of these types of users also won’t use up more than 15GB to 45 GB of storage, unless you plan on hosting a lot of media or videos.

Is it nice to have the peace of mind that comes with unlimited storage? Sure. However, if you were to ask us, we’d prefer taking high-performance NVMe SSD as long as the storage limit is acceptable.

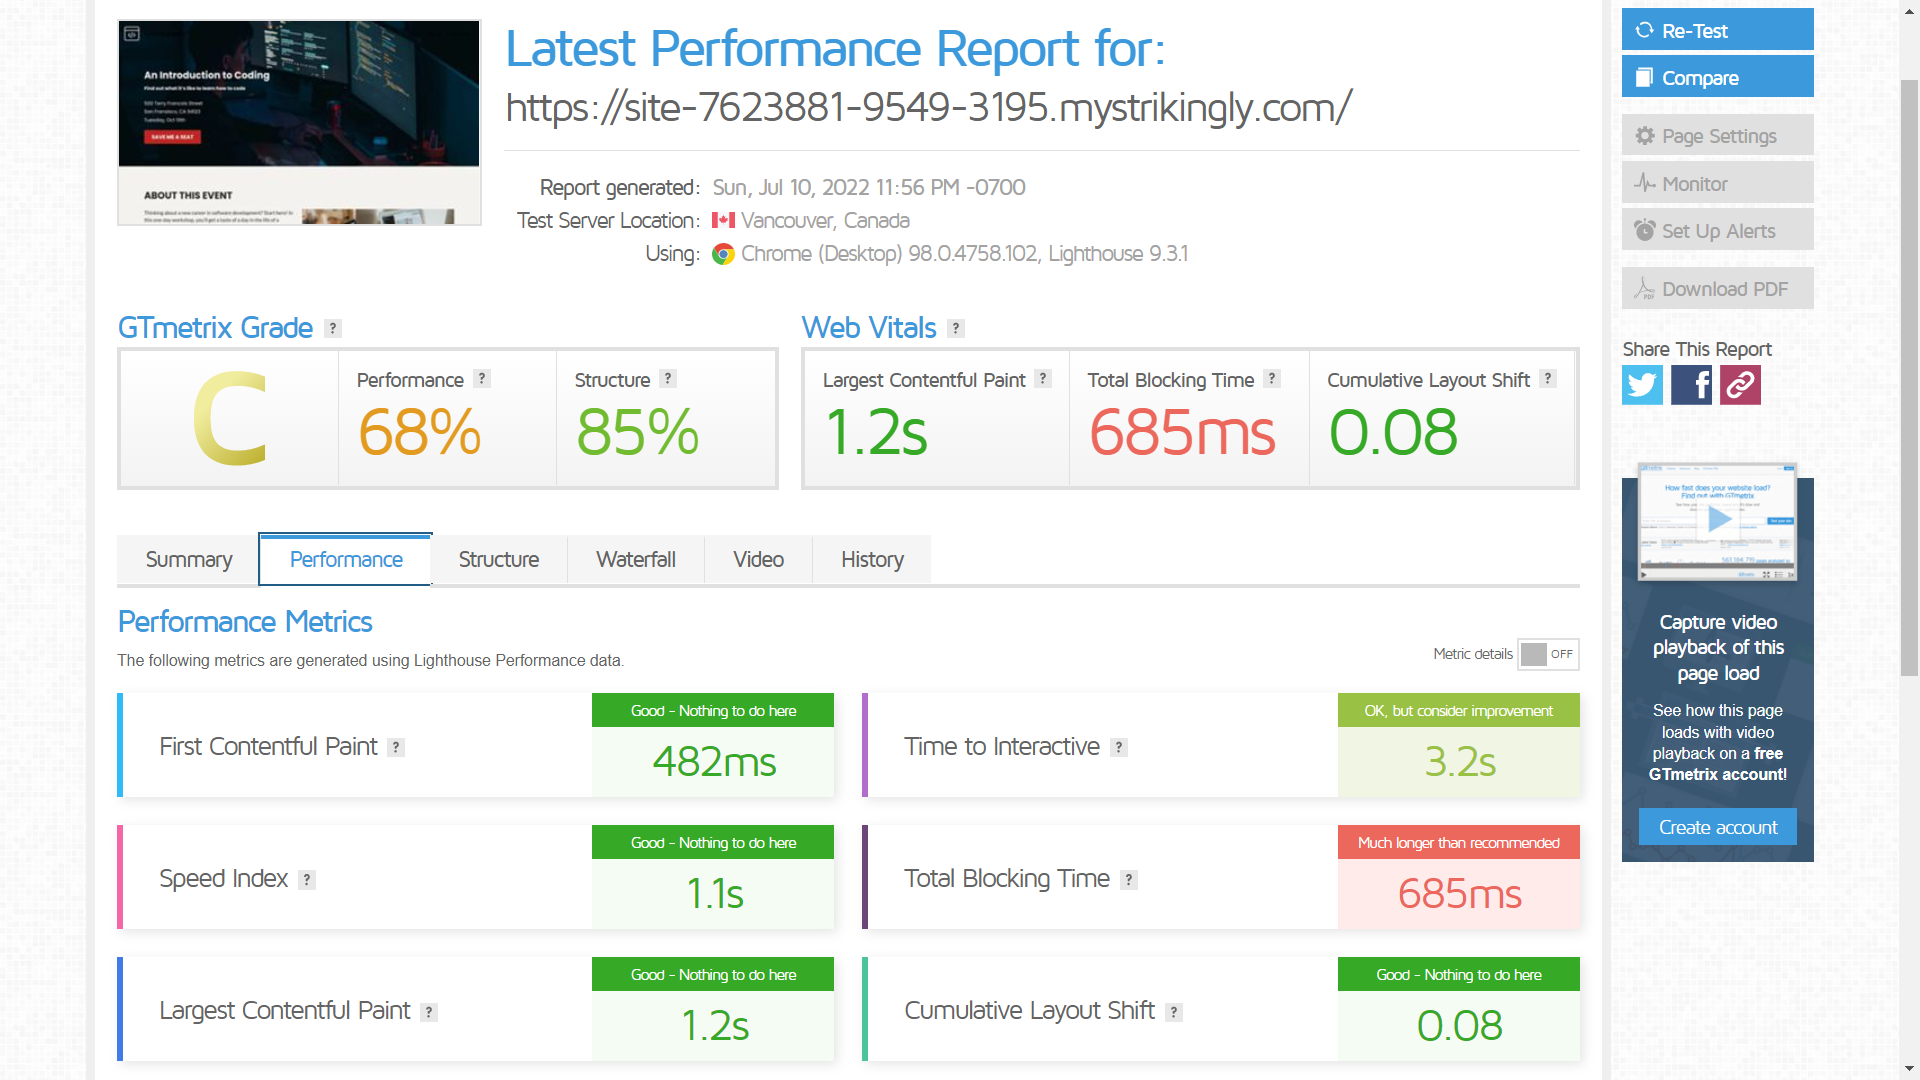
2. Somewhat High Server Latency

The response time of a server is the delay between when a visitor requests a web page and when the server starts to deliver it. So, the lower the response time, the quicker a website begins to load and the faster it feels to the visitor.

A solid server response time is considered to be around the 200ms mark. Unfortunately, over our prolonged speed test, Ultahost had an average response time of 397.17ms. Peak response times were 441ms while the lowest response times were 360ms.

Luckily, the response times are still within an acceptable range and won’t have a significant impact on user experience. It’s also balanced out somewhat by the high-performance hardware. So, while there may be a small initial delay, once your website content starts loading, it should go smoothly.

Conclusion – Superb Reliability and Top-Class Features in an Affordable Package

In the end, we had many more positive things to say about Ultahost than negative. And, we have to say that the pros definitely outweigh the cons.

First of all, the Tier 3/4 data centers are extremely reliable. With close to 100% uptime, you’ll rarely miss out on welcoming visitors, sales, or other business opportunities. You can also expect better-than-average features at reasonably affordable prices.

The only times you might have to be concerned is if you plan to run a website that requires huge amounts of storage and bandwidth. However, you can always upgrade to a VPS plan to solve that problem.


May 03, 2025

Uptime

Performance

Value for money

Customer Service

Overall Rating

Prices are inexpensive but the services are top of the line in terms of VPS hosting. Imagine availing the basic subscription, but having an unlimited access to websites, unlimited data transfer, free domain transfer, full root access, free SSL Certificates, and many more. It doesn't sound like a basic subscription for me. On top of that, if I didn't like the products there is a 30-Days Money Back. Which I didn't need because I loved it, and it will definitely stay with my company. Also, I tried all the services and it's not complicated to understand. The response time is fast and not laggy, which I truly look out for in a VPS.
PAKISTAN
Imran Taj
https://www.upwork.com/


Apr 17, 2025

Uptime

Performance

Value for money

Customer Service

Overall Rating

Ever since I’ve taken up a VPS and Email service from UltaHost, the team has been really helpful in assisting to get my environments setup superfast and talking to each other. The onboarding and payment experience was also seamless, giving me access to my VPS, directly after payment. I would definitely recommend them for your hosting needs.


Mar 29, 2022

Uptime

Performance

Value for money

Customer Service

Overall Rating

The best thing about ultahost is their customer support day and night even in weekends. Quick response to the tickets if there's any issue. They have different payment methods even crypto. personally I love their services.
Kanial Outis
http://hexa.com


Mar 16, 2022

Uptime

Performance

Value for money

Customer Service

Overall Rating

after 4 months everything has been good, the support department has attended my tickets with the request resolved to satisfaction, I recommend their services