How to Fix ERR_TOO_MANY_REDIRECTS (5 Easy Solutions)

The ERR_TOO_MANY_REDIRECTS error mainly occurs when the browser cannot establish a connection between the destination page and the initial page while redirecting.

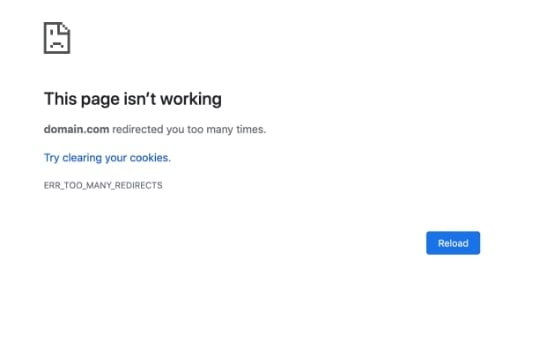
This error message (ERR_TOO_MANY_REDIRECTS ) sometimes gets confusing for the users, but you must only consider it as a warning from the browser. This error statement specifies that it is difficult or impossible to impossible to reach the requested page.

The inability of the browser to connect to the correct server of the website is another definition of the ERR_TOO_MANY_REDIRECTS error.

Therefore, the browser is stuck between a cycle of moving back and forth through the servers and URLs while figuring out the correct location of the redirected webpage.

error

There are various reasons why this error occurs, like misconfigured website settings, wrong browser settings, corrupt plugins, etc. However, it can quickly be resolved after following the more straightforward and smaller rectification measures, as mentioned here.

5 Easy Fixes for ERR_TOO_MANY_REDIRECTS error

Fix 1: Deleting the Website’s Cookies.

The ERR_TOO_MANY_REDIRECTS error might occur due to outdated or corrupted cookies. Therefore, it’s best to start the resolving process by first cleaning your browser stores’ website cookies. You can quickly delete all the cookies, cache, and other data from your browsing history.

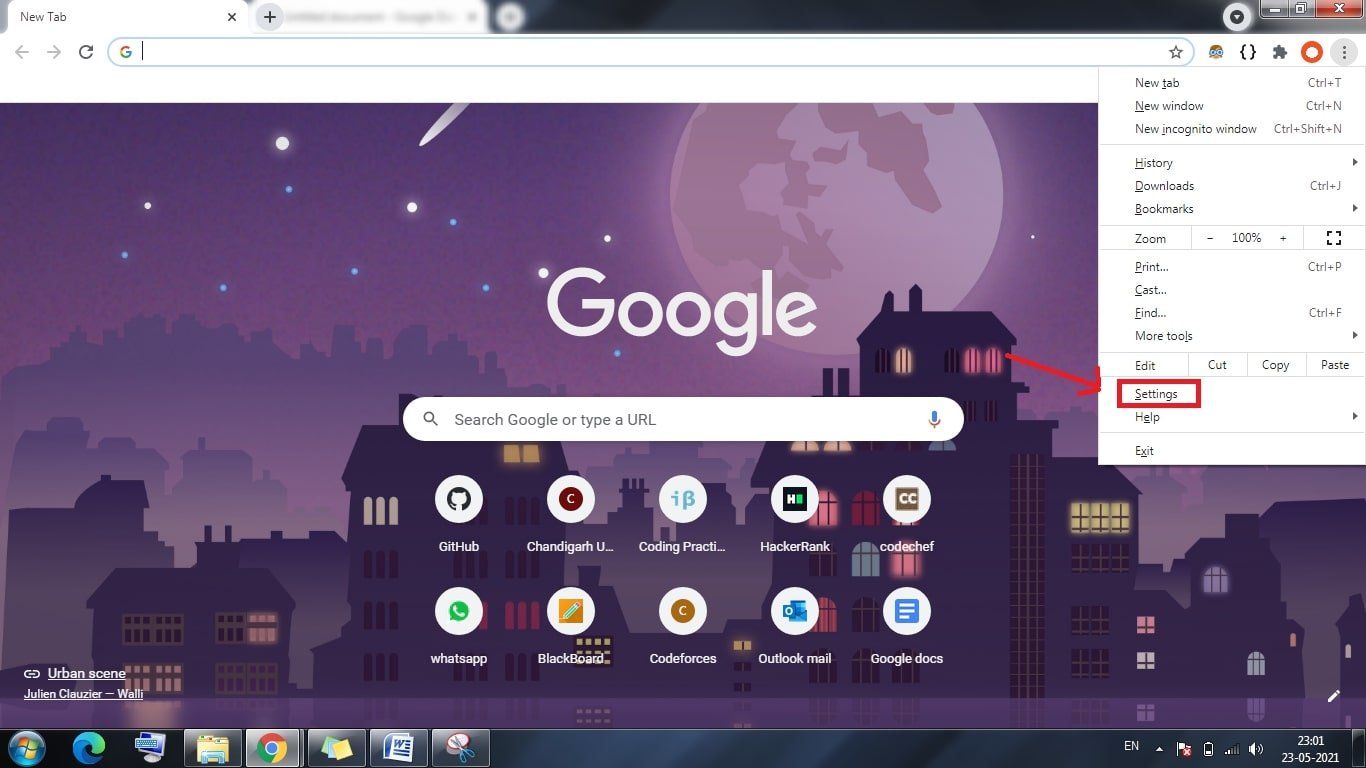
Step 1: Click on the three dots at the top right corner of the browser and then click on “Settings.”

Step 2: Move to “Privacy and Security” and then click on “Clear Browsing Data.”

privacy and security

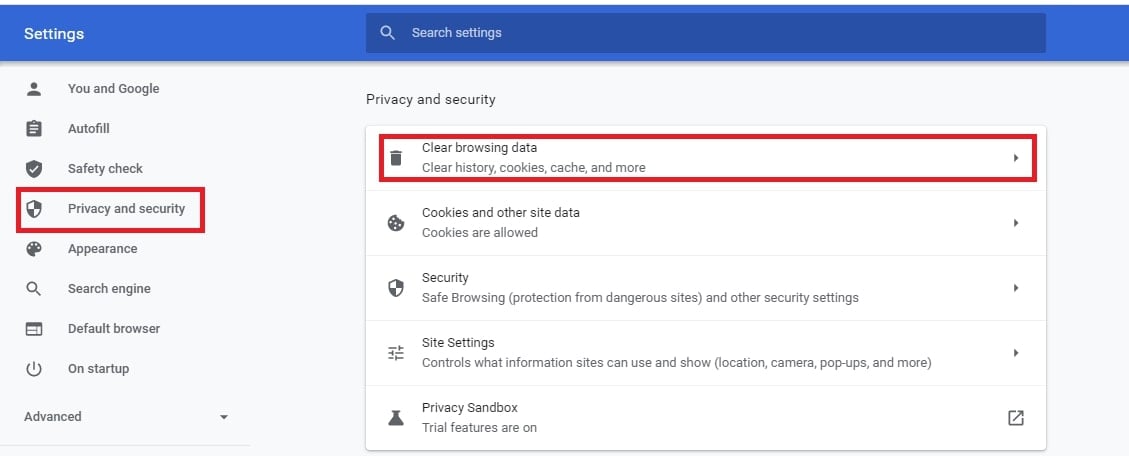
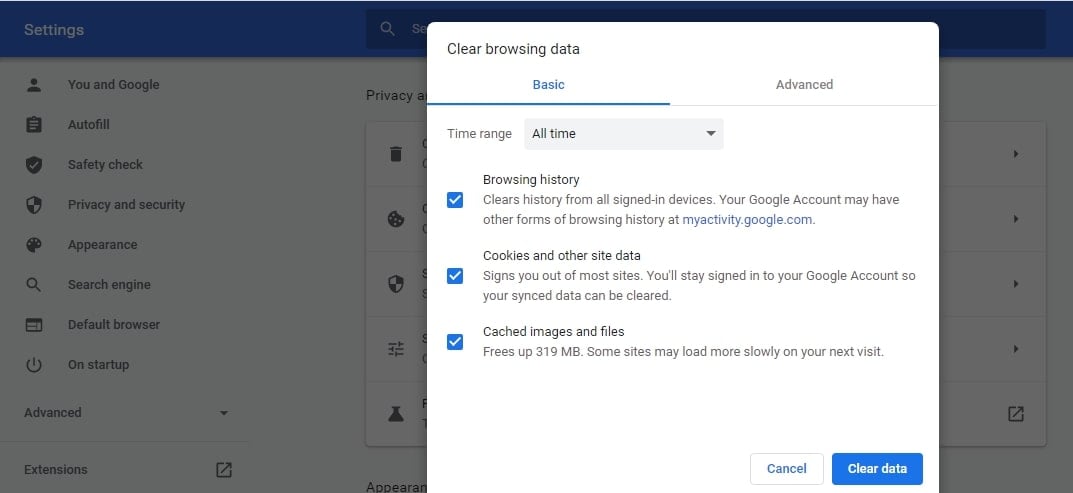
Step 3: Now, select all the checkboxes and set the time as “All time.”

Step 4: Next, click on the option stating “Clear data” to delete all the stored data in the browser.

clear browsing data

However, if you wish to keep all the cookies related to other websites, then you must follow the steps mentioned below and delete the data of only that particular website.

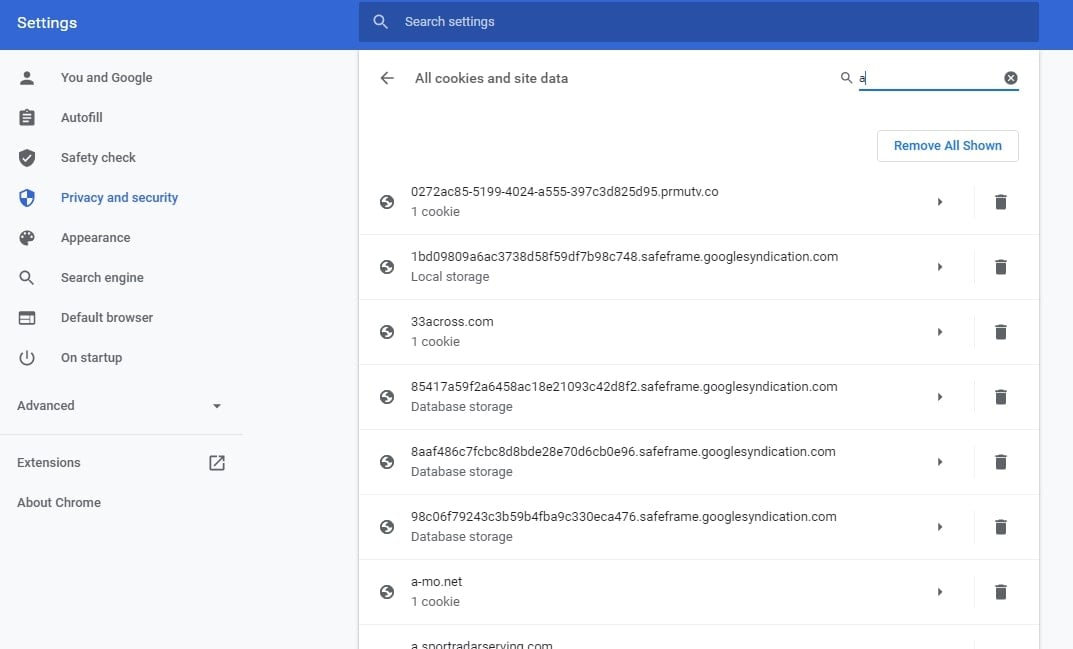
Step a: Click on the three dots at the top right corner of the browser and then click on “Settings.”

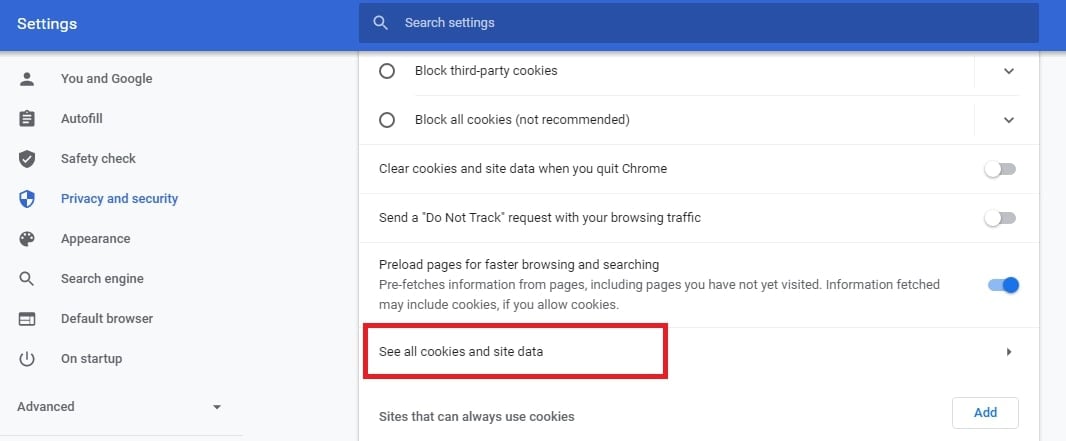
Step b: Move to “Privacy and Security” and then click on “Cookies and other Site data.”

Step c: Now, choose “See all Cookie data” and search for the concerned website in the Cookies Search Bar.

see all cookies

Step d: Next, delete all the cookies related to that website.

remove website cookies

If this doesn’t solve the issue and the ERR_TOO_MANY_REDIRECTS error persists, then follow the other procedures given below.

Fix 2: Clearing the WordPress cache

Sometimes, even when the ERR_TOO_MANY_REDIRECTS error occurs, you will be able to access the WordPress website admin area. Therefore, you must utilize this opportunity to resolve the error. It is easier to delete the WordPress site cache. Here are the steps to do the same.

Step 1: Log in to the WordPress dashboard.

Step 2: Click on “Settings” and then move to “WP Super Cache.”

WP-super cache

Step 3: Next, click on the “Delete Cache” button, and then your site’s cache data will all be deleted.If this isn’t helpful, then you must try the other measures to resolve the ERR_TOO_MANY_REDIRECTS error.

Fix 3: Disable the WordPress Plugins temporarily.

When it is about WordPress, many issues might be resolved just by temporarily disabling the WordPress plugins. Various plugins, including the Redirection or Yoast SEO premium, allow implementing redirects.

Sometimes, the updates or settings of the plugins might also conflict with the redirects set on the website server, and this might force it into a redirect loop, thus causing the ERR_TOO_MANY_REDIRECTS error.

disable plugins

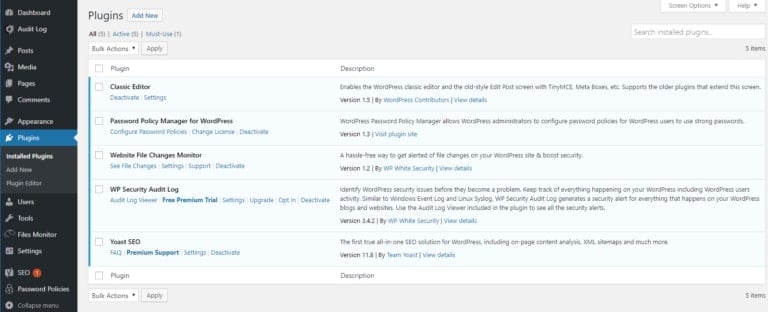
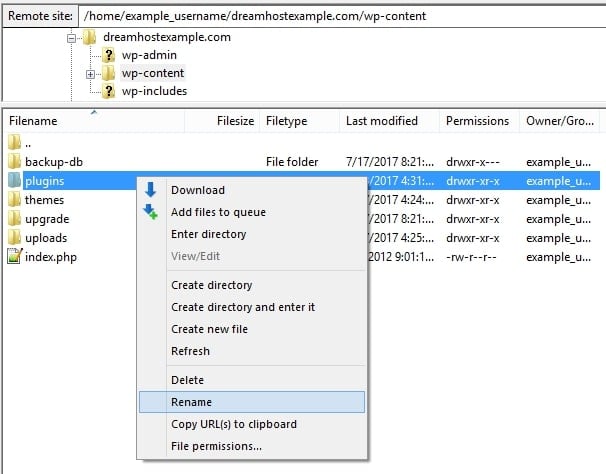
Just disabling the plugin doesn’t cause the loss of any data. If you cannot log in to WordPress directly for doing it, then login via “SFTP” to the server and then rename the entire plugins folder and check back if the site works properly.

If this works, then rename the plugin folder back to the original one and then rename each plugin and check for the website’s working. Most probably, you will find the correct cause of the ERR_TOO_MANY_REDIRECTS error and will be able to resolve the same by this process.

rename plugins

However, if the ERR_TOO_MANY_REDIRECTS error persists, then follow the other steps to resolve the same.

Fix 4: Checking all URL settings to fix ERR_TOO_MANY_REDIRECTS

Checking the URL settings is essential as the misconfiguration might lead to the ERR_TOO_MANY_REDIRECTS error. As you click on the “Settings” on your WordPress dashboard and move on to the “General” tab, you will find two main fields, as follows:

  1. WordPress URL (It specifies where the WP files are)
  2. Site’s URL (It is the homepage address that the users visit)

These two addresses must match in most cases. However, you must precisely check to ensure that the differences do not cause any further issues. Check and ensure that they do not contain the following:

  1. White space at the end
  2. www at the beginning

If any one of the URLs includes www and the other one does not, you must change them to make them the same. Either both of them must have it, or none of them must include it.
You can also alter the URL by editing the wp-config file. Here are the steps to do the same.

Step 1: Visit the “File manager” at the “FTP” client account.

Step 2: Open the folder containing the “WordPress files” and then find the file named “wp-config.php.”

Step 3: Right-click on the option stating “Edit.”

wp-config file

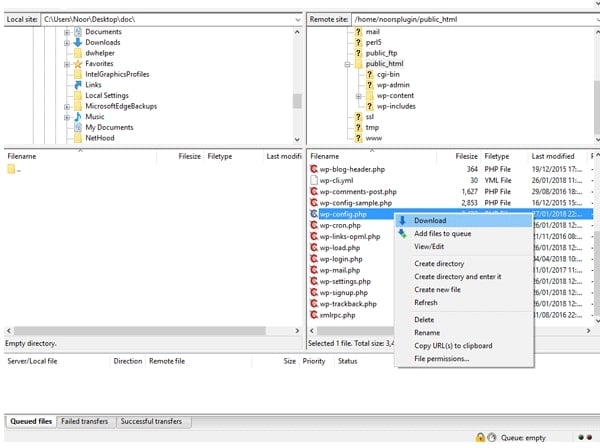
Step 4: Change the URL and add the required lines to the code. Next, redefine the address and make sure that WP_HOME and WP_SITEURL match.

ERR_TOO_MANY_REDIRECTS: wp config url

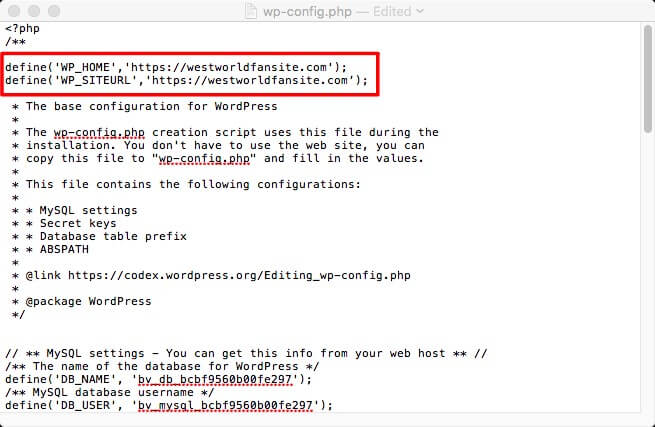
Step 5: Save the file and then click on “Yes” on the visible command prompt for uploading the modified file version.

Furthermore, you can also change the URL address via the database. For that, first, you must log in to the web server through MySQL and then follow the given steps:

Step 1: Find the table named wp_options.

Step 2: Double click on the fields to be edited and modify the address in option_value.

ERR_TOO_MANY_REDIRECTS: mySQL url

Refresh the site and check if the ERR_TOO_MANY_REDIRECTS error is resolved or not.

Fix 5: Redefining the .htaccess to fix ERR_TOO_MANY_REDIRECTS

Whenever an error occurs in the WordPress site, it is essential to check and verify the .htaccess file. It is a part of the Apache server settings and helps in controlling the page redirects. Therefore, any faults or errors in this file might cause the redirect routine, leading to the ERR_TOO_MANY_REDIRECTS error.

Here is how you can check the .htaccess file quickly.

Step 1: Visit the “FTP” client account and then locate the files of your site.

Step 2: Find the folder containing the “WP files” and then locate the “.htaccess” file.

ERR_TOO_MANY_REDIRECTS

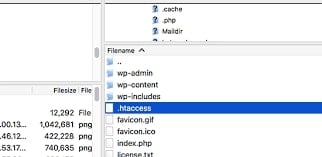
Step 3: Download the file as a backup and then right-click on it to open the file for editing.

Step 4: Clear the data in the .htaccess file and then reset the settings to default.

Step 5: Save and then upload the default file to the web server and refresh the website.

If your site works after that, you can revisit the .htaccess file; if it doesn’t, you’ll need to restore the backup, as that file isn’t the source of the problem.

Conclusion

The ERR_TOO_MANY_REDIRECTS error might be trickier for many people. However, there is nothing to panic about, and you can quickly get it resolved by following the steps mentioned above. After all the measures, the error will surely vanish, and your site will again start working smoothly.

Volusion Review: “3 Cons & 8 Pros” after Using it! (free trial exist ?)

Volusion Review

Volusion is a complete e-commerce website builder that offers web design, marketing and a whole range of other business tools.

I found Volusion to be on par with other leading e-commerce builders such as Shopify, Bigcommerce or Magento.

Before I get into more details about Volusion, let me provide a brief introduction about the company.

Volusion was started in 1999 and currently serves more than 1,80,000 online stores.

Volusion_about

The company has features to incorporate almost any business domain from apparel or health to books or electronics.

How to Fix ‘Oops…a server error occurred, and your email was not sent (#007)’ Error

Are you also stuck with the “Oops…a server error occurred, and your email was not sent (#007)”?

Oops...a server error occurred and your email was not sent. (#007)

Well, you must not have to worry about the same!

This error occurs while sending any messages via an email account. Various causes lead to this error, including the following:

  • It might occur either due to an incorrect arrangement of the framework record or the changes in some settings.
  • If there is a wrong design of the framework, it might lead to a vault error in the PC. According to that, it might lead to the window’s working, and due to that, your PC might not incidentally react. Therefore, this might cause the error.
  • A slower internet connection might also lead to the 007 error. However, once the speed raises, it can automatically be fixed.

But, as every issue in the internet world now comes backed up with various solutions, and so does the “Oops…a server error occurred and your email was not sent. (#007)” error.

This article contains a bunch of highly effective solutions to solve the 007 error. As for this time, let us take an example when we are working with Gmail.

Fixing the Oops…a server error occurred, and your email was not sent (#007) error:

Here are the top and most effective solutions to solve the “Oops…a server error occurred and your email was not sent. (#007)” error.

Fix 1: Erasing browser’s cache and cookies

Here are the steps following, which might help you solve this error in just a few seconds.

Step 1: Go to the three vertical dots present at the top right corner in the Chrome browser.

Oops...a server error occurred and your email was not sent. (#007): browser caching

Step 2: Click on the ‘Settings’ option and then move on to ‘Privacy and Security.’

Step 3: Now click on ‘Clear Browsing data’ and check on ‘Browsing history,’ ‘Cookies and other site data, and ‘Cached images and files.

Step 4: Finally, click on the ‘Clear data’ button.

Oops...a server error occurred and your email was not sent. (#007): clear data fix12

Now after following the steps, check if the issue persists. If the chances are in your favor, the problem will already be solved. However, if you continue facing the issue, then you must follow the other steps in the sequence.

Fix 2: Changing the browser or entering incognito mode

This method might not necessarily seem an ideal solution but is very effective in most cases. Try switching between the available web browsers to avoid the occurrence of the “Oops…a server error occurred and your email was not sent. (#007)” error. Alternatively, you can also log in to your email account using the incognito mode of your preferred browser if you do not have other web browsers or if you do not prefer using any other.

Oops...a server error occurred and your email was not sent. (#007): browser fix2

These solutions are highly effective if you do not wish to delete your browsing data and history along with the cookies and cache or if you do not wish to keep any other web browsers on your PC.

This might solve the “Oops…a server error occurred and your email was not sent. (#007)” error most probably. But, if it is not effective yet, we still have other solutions lined up for you.

Fix 3: Disabling the lab settings:

The lab settings on Gmail, also famous as advanced mail settings, might be the cause of the “Oops…a server error occurred and your email was not sent. (#007)” error if it is not yet solved. Here is a proper sequence of steps to help you with the same.

Step 1: Open your Gmail account from any browser on your PC.

Step 2: On the top right corner of your email account, you will see a gearbox icon. Click on that and go to ‘See on Settings.’

Oops...a server error occurred and your email was not sent. (#007)

Step 3: Now move on to the ‘Lab’ option or the ‘Advanced’ option.

Step 4: Here, disable all the available settings.

Oops...a server error occurred and your email was not sent. (#007)

Step 5: Now you are all set. Close the browser and reopen it.

This option will most probably solve the “Oops…a server error occurred and your email was not sent. (#007)” error. However, there is also one added solution that you might go for if the odds are still not in your favor.

Fix 4: Switch to Gmail’s Basic HTML version

Gmail is full of several features, and thus it might take some time to load it entirely, and this might be the reason for this error. However, the plain HTM version of it is lighter and loads quickly while using the limited resources of your PC than the standard version.

html fix4

The HTML version works well for the slower internet connections and also the unsupported browsers. Here is the link that you can use for switching to Gmail’s HTML version. However, there exist some drawbacks to the use of Gmail’s HTML version. If you go for that version, you might miss out on some features, including Chat, Spell Checker, Keyboard shortcuts, rich formatting, and many more.

Conclusion:

Here are some more added tips that might be helpful if you are stuck with this error:

  • Waiting for some time to let things get back to normal and then trying back sending the mail. This might also be effective because a few of the errors are mostly temporary.
  • Try solving the error by restarting the browser or your PC or the internet router that you are using.
  • Try removing the attachments (if any available) and then check back the sender’s address.

While this error might hinder your needs but it involves some more straightforward solutions. Avoid panicking and follow the steps as mentioned to solve the same.

Windscribe VPN Review: Pros and Cons after 3 Months of using!

DailyBeast calls Windscribe “the online privacy tool you should already be using”. Techradar calls it “one of the best free VPNs around”. Dig around a little more and you’ll see a lot more praise.

Windscribe has only been around since July 2015, but in the last two years it’s become one of the most acclaimed VPNs around.

Clearly there’s a lot of good buzz about Windscribe, and it’s coming in at the right time.

Its summer 2017, and online security has never been more important. From the Snowden leaks in 2013 to the Russia-Trump stories that dominate the news, cyber security has become an increasingly relevant topic to the climax that is right now.

And if you think cyber security is a big deal for nations, you’d better believe it’s a big deal for you—an individual that is not armed with powerful intelligence agencies for protection.

Sure, you may not have a foreign head of state breathing down your neck…but then again you might. There is a host of parties interested in your data, and even if they’re not, there’s a plethora of reasons to keep your information well protected.

Submit review

Submit a short but detailed review and get FREE link to your website.

Review Title

Ratings

Uptime

Performance

Value for money

Customer Service


Overall Rating

Upload image (Optional)


iPage Review: We Found Out Good & Bad Things Using it 32+ Months…

Underdogs are a favorite here at hostingpill, much like iPage which is one of the most underrated services around.

Although, some might disagree with me on whether this company is an underdog.

iPage is one of those hosts that the ordinary person might not know about, but which is pretty reputable to those in the hosting world.

It’s a veteran in the hosting world, being founded in 1998.

And what’s even more impressive?


Mar 15, 2023

Uptime

Performance

Value for money

Customer Service

Overall Rating

OMG This site was supposed to have 99+% uptime... It is not even close. They are terrible. I really wish I didn't host my site here.
Alejandro Carneiro
http://www.caesarposts.com/


Dec 29, 2018

Uptime

Performance

Value for money

Customer Service

Overall Rating

I have no technical knowledge. When I tried to make my first WordPress site, I had many problems but thanks for the timely assistance. They gave me guidance and helped me to solve my issue. I would definitely recommend iPage.

InMotion Hosting Review – We Have Spend 40+ Months Testing InMotion.

If you’re like me, you love underdogs like Inmotion Hosting.

I’m talking about the characters in books and movies who are somehow disadvantaged compared to the big, powerful “top dog.”

But despite their disadvantages and the dominance of the rival, the underdog works hard and manages to make a name for himself sometimes even rivaling or beating the traditional winner.

I LOVE these stories, so I’m gonna tell you one right NOW. Let’s welcome our underdog:

InMotion Hosting was founded in 2001, which puts it on the older side for an internet company.

PAKISTAN
Muhammad Ahmed Raza
https://www.HelpnGuide.com


Feb 13, 2019

Uptime

Performance

Value for money

Customer Service

Overall Rating

We are satisfied with this company and their reseller Ninja Softs. Both are best in all perspectives.
Daveed Xie
http://iskcon.org/


Dec 28, 2018

Uptime

Performance

Value for money

Customer Service

Overall Rating

InMotion Hosting support is prompt and helpful, their services are excellent. I highly recommend them.

How to Fix’ ERR_CONNECTION_REFUSED’ Error (Try these 10 Solutions)

What is ERR_CONNECTION_REFUSED error?

Generally, the ERR_CONNECTION_REFUSED might threaten people, as minimal details are available when it appears on your screen. This makes it a bit complicated to troubleshoot on your own.

ERR_CONNECTION_REFUSED error

For starters, the ERR_CONNECTION_REFUSED error might occur on any browser. It is an issue that is most probably due to your internet connectivity, but there might be several other reasons behind why it appeared. Rarely, it might appear if the website is unavailable.

Here are some common reasons that might cause the ERR_CONNECTION_REFUSED error:

  • The site refuses to connect
  • Internet connection is experiencing a downtime
  • Issues related to DNS Cache
  • Issues related to Cookies
  • The browser is outdated, etc.

Here are some highly effective methods to help fix the ERR_CONNECTION_REFUSED error, despite its cause. This article contains the top 8 solutions that you must try one by one to resolve the issue finally.

10 Fixes for ERR_CONNECTION_REFUSED error

Fix 1: Try to resolve the error by resetting the internet router

In most cases, when an error occurs on your browser, resetting the router is probably the easiest and the most effective solution. Internet connection issues might cause various errors, including the ERR_CONNECTION_REFUSED.

Therefore, to resolve the error, try resetting the router by clicking on its power button or unplugging the electric cable. If you are using a personal Wi-Fi connection, then disconnect it for about 30 seconds. Further, reconnect the internet and then try reloading the website again.

Reset Internet Router

Possibly the issue might have been resolved by then, and if not, then try the other solutions mentioned below.

Fix 2: Check the website’s status

Next, you must check the website’s status that you wish to access. Sometimes, the server-side might also be the reason behind the ERR_CONNECTION_REFUSED error. To check it, try visiting some other web page. If the error message still occurs, then your connection is the cause of it, otherwise not.

Or, to check If the server-side is the cause of the error, visit this link and then enter the non-functioning web page and then click on ‘Check’ Next, you will be able to access whether the page is down or up.

HostingPill Site Down Tool

If the page is down, it’s better to wait for some time for it to be fixed from the server-side. However, if the page is up, here are a few more solutions that you must try to resolve the ERR_CONNECTION_REFUSED error.

Fix 3: Ensure that Chrome is updated

Sometimes, the outdated chrome version might not support the newer websites, leading to the ERR_CONNECTION_REFUSED error. To fix this cause, check if the chrome version is updated or not.

Usually, the browser automatically updates, but it might have been skipped if you disable the automatic updates. Therefore, you must follow the below-mentioned steps to check if Chrome is updated and update it if it’s not.

1. Click on the three dots available at the top right corner and then click on ‘Help’ and move on to the ‘About Google Chrome’ option. You will visit a page where Chrome automatically starts checking for updates.

ERR_CONNECTION_REFUSED: Update Chrome

2. The window will then prompt Chrome to the option stating ‘update automatically.’

3. After updating, relaunch the browser to ensure that the changes are effective.

ERR_CONNECTION_REFUSED: Update Chrome

4. Now try to reload the website and see if the error persists.

If the ERR_CONNECTION_REFUSED error is still there, try to follow the other steps to resolve it.

Fix 4: Stop the Google Account Synchronization

Sometimes the synchronization between Chrome and your Google account might be the reason behind the ERR_CONNECTION_REFUSED error. To solve it, type ‘chrome://settings/people’ in the browser’s search bar, and you will see your name and email appearing on the screen. You will spot a ‘Turn Off’ button near your name, click that, and then check back if the error is still present.

ERR_CONNECTION_REFUSED: Stop Google Account Syncronisation

If the error is still there, try the other solutions available.

Fix 5: Clearing cache and cookies, or going Incognito

Browser cache stores a lot of contents and details, including logins, videos, images, etc. But, as the browser is overloaded with all the stored data, its efficiency and speed will reduce, which might cause the ERR_CONNECTION_REFUSED error.

To solve it, you should try to visit the browser in incognito mode.

ERR_CONNECTION_REFUSED: Open Incognito

Or, you can also delete the cookies and cache to ensure that you will not face the error anytime sooner. To do it, follow the given steps:

1. Open Chrome and then click on three dots on the top right corner and click on ‘Settings.’

2. Go to ‘Tools’ and then click on ‘Clear Browsing Data.’

3. Select the ‘All time’ option and then click on ‘clear data.’

ERR_CONNECTION_REFUSED: Clear Browser Cache

Now try to reload the website again and check for the error. If the error is still occurring, follow the other tricks to fix it.

Fix 6: Try resolving the error by Checking Proxy server settings

Proxy settings allow you to surf the internet with some other IP address which acts as an intermediary between the website and the browser. Check the proxy settings to resolve the ERR_CONNECTION_REFUSED error. Here are the steps for the same:

1. Open the browser and then click on the three dots at the top right corner. Now click on settings and then type proxy in the search bar. Go to ‘Open your computer’s proxy settings.’

ERR_CONNECTION_REFUSED: Open Computer Proxy Settings

2. Click on the button stating ‘LAN settings’ and then ensure that the ‘Automatically detect settings’ option is not enabled.

LAN Settings

3. Under the section ‘Proxy server,’ check to ensure that the ‘Use a proxy server for your LAN’ is disabled.

error fix 63

Now restart your browser and try to revisit the website. The error might have been resolved. But if not, try the other methods in the sequence.

Fix 7: Clearing DNS cache

An outdated DNS might also be the reason behind various errors and issues, including the ERR_CONNECTION_REFUSED error. Here are the steps to help you deal with the same by clearing the DNS cache.

1. Open the Command prompt on your windows or move to Windows PowerShell and move to ‘Run as Administrator.’

2. A new window will open, type ‘ipconfig /flushdns’ there and then press the ‘Enter’ key.

ERR_CONNECTION_REFUSED: Clear DNS Cache

Close the PowerShell window and then check if the error is still occurring.

Fix 8: Switching the DNS address

Switching your DNS server might also act as a quick fix to resolve the ERR_CONNECTION_REFUSED error. Here are the steps to help you change the DNS server to another prominent one that is also faster and a public DNS.

1. Move to the Search bar in your Windows and then type ‘Control panel.’ Click on the option available.

2. Now, move to the option stating ‘Network and Sharing.’ Now, move to the option stating ‘Change Adapter settings.’

Switch the DNS Address

ERR_CONNECTION_REFUSED: Switching the DNS Address

3. Right-click on the connection that you are using and then click on the ‘Properties’ option.

4. Scroll down and click on ‘Internet Protocol version 4 (TCP/IPv4)’ and then again click on the ‘Properties’ button.

ERR_CONNECTION_REFUSED: Switching the DNS Address

5. Now click on ‘Use the following DNS server addresses’ and then type 1.1.1.1 on the first row and then 1.0.0.1 on the second. Further, click on ‘OK’ to apply the changes.

ERR_CONNECTION_REFUSED: Switching the DNS AddressNow open Chrome and then try to revisit the website. Follow the other mentioned solutions if the issue persists.

Fix 9: Disabling the extensions in Chrome

Chrome extensions provide some added browser functionalities to the users. Third-party developers develop several of them, and thus they might not get regularly updated. Sometimes, the outdated browser extensions or the updated ones might cause the ERR_CONNECTION_REFUSED error. Therefore, you must regularly check for which extensions are updated and necessary for you and remove all the unnecessary ones.

Try these steps to resolve the ERR_CONNECTION_REFUSED error:

1.Click on three dots at the top right corner of the chrome and then click on ‘Settings.’

2. Now, visit the ‘Extensions’ option and remove the unnecessary and outdated ones.

ERR_CONNECTION_REFUSED: Disable extensions in Chrome

Check if the error persists.

Fix 10: Running Internet Connection troubleshooter

Here are the steps to try troubleshooting the internet connection issue for resolving the ERR_CONNECTION_REFUSED error.

1. Move to the Search bar in your Windows and then type ‘Control panel.’ Click on the option to open the panel application.

2. Now, move to the option stating ‘Troubleshooting’ and click on the option stating ‘Network and Internet settings.’

ERR_CONNECTION_REFUSED: Run Internet Connection Troubleshooter

ERR_CONNECTION_REFUSED: Run Internet Connection Troubleshooter

3. Windows will start detecting the problem. Run the troubleshooter if there is an issue and then reboot the system.

ERR_CONNECTION_REFUSED: Run Internet Connection Troubleshooter

The error will no longer be displayed. The error will most probably disappear after going through all these steps.

ERR_CONNECTION_REFUSED Conclusion

Several reasons might cause the ERR_CONNECTION_REFUSED error, but any of the above-mentioned solutions will surely solve the problem. Try every solution, and the error will no longer be an issue for you.

LemonStand Review: Pros and Cons Based on my overall Experience

Have you heard the news about LemonStand?

Well, I guess you probably haven’t. I haven’t either. I tried looking and I didn’t really find anything, or at least nothing credible from a major news outlet.

That’s a good thing though! Why? Because it means nothing significantly bad has happened. It means that LemonStand at least does its job, that there haven’t been any major security breaches, that LemonStand isn’t scamming its customers.

But in the world of hosting and e-commerce, you better believe LemonStand is pretty well known. Find just about any article about the top e-commerce options, and chances are a good number of them will have a solid mention of LemonStand.

So what’s the deal with this quiet, yet well-performing hosting option? The option that’s routinely ranked among the big names in the hosting world, Shopify, BigCommerce, and Volusion but without all the big press of those famous heavyweights?

Well, you’ll find out soon enough, but let me just say that LemonStand easily deserves its position as a top e-commerce platform, and in my humble opinion, it may even deserve to be ranked even higher than the norm for quite a few users.

How to Fix the “508 Resource Limit is Reached” Error (4 Easy Fixes)

In this article, we show you how to fix the 508 Resource Limit is Reached error.

A link or resource gets called somewhere on the website, and that resource calls something else, which then calls the original resource. Because the reasoning is recursive and looping in on itself, the server never gets to actually fulfil the request.

The HTTP error 508 is actually quite uncommon. In terms of loop errors, you’re more likely to come across a “too many redirects” error, which occurs when someone has mishandled 301 redirects and 302 redirects to the point where they’re either looping in on themselves or have too many redirects in a chain that prevents the requested resource or URL from rendering.

This issue occurs on the server and can be caused by a variety of circumstances, including high demand for the server’s CPU and RAM resources. It’s also frequently linked to high demand for concurrent processes, which you’ll see if your site gets a lot of visitors.

An attempted DDoS attack could potentially cause an increase in website traffic. Once the available resources have been consumed during the attack, your site will display a “508 Resource Limit Is Reached” problem. However, you may not need to take any action to resolve the problem!

508 Resource Limit is Reached

Whether you think this surge in online traffic is a one-time occurrence, you might want to wait it out and see if it fades.

If you’re on a shared server or have an entry-level hosting package, you’re more likely to get this 508 resource Limit is reached error or the other memory limit exceeded errors, including the WordPress memory limit exceeded error.

If this is the case, you’ll need to temporarily increase the resource restrictions to get your site back up and running.

Primary Causes of 508 Resource Limit is Reached Error

  • Website traffic spikes – If your site encounters high peaks in inbound or outbound traffic, your allocated resources may be exceeded.
  • Issues with the code – A surge in inbound traffic or concurrent page requests can push your site over its resource constraints if there are pages on your site that are slow.
  • Backend operations — high-volume backend processes such as imports and exports can generate significant load, causing resource constraints to be exceeded in addition to typical traffic.
  • Web crawlers that make a lot of requests per second. You can change the rate at which, for example, In Google Webmaster Tools, Google makes requests for pages.

Top 4 fixes for the “508 Resource Limit is Reached” error

When your site receives more traffic than intended, it can quickly outgrow its assigned resources, bringing your server to a halt.

Fix 1: Examine Your Resource Consumption

Checking your resource use is the first step in resolving a resource limit error. Keep an eye on the server’s activity logs as well. This will assist in determining the problem’s primary cause. The Analytics menu shows resource utilization, and the Activity Log menu shows activity logs.

You can check that on your WordPress dashboard by following the given steps:

Step 1: Go to the WordPress dashboard and visit the plugins section.

Step 2: Now search for the ‘Server IP & Memory Usage display’ plugin, and install it.

Add Plugins

This will start reflecting the memory consumption status at the bottom of your WordPress dashboard.

Let’s imagine your website is hosted on a shared server with several other customers’ websites. As the number of visitors to your site increases, the server that hosts all of these websites, including yours, must process more and more requests to keep up with the increased traffic.

If your popularity continues, the server’s resource constraints will be reached for all of the sites it hosts, including yours. To avoid downtime, you can identify this tendency early.

A good hosting company keeps a close eye on the traffic. If your site continues to consume resources at a faster rate than your plan allows, your web host should notify you to alert you that your site will go down.

Fix 2: Examine your site’s internal processes as well as third-party code.

It’s possible that the cause of a “508 Resource Limit Is Reached” issue isn’t necessarily external. One or more rogue processes operating on your site can consume an excessive amount of resources, such as:

  1. Site backups
  2. Cron jobs
  3. Long or complex database queries
  4. A hacked site running a harmful script
  5. Third-party code

This is frequently due to a specific Content Management Solution (CMS) addition in the case of third-party programming. If you’re having a WordPress website setup, and have one or more plugins installed that are constantly demanding more resources than they’re allotted, you’ll eventually get 508 problems.

It’s best to keep your CMS extensions up to date to avoid such a predicament. In the case of WordPress, this entails keeping your themes and plugins up to date.

Whether you haven’t received an update for a theme or plugin in a long time, consider switching to a similar, more recently updated product or contacting the author to see if a new version is coming.

Fix 3: Deactivate all plugins on your site and then enable them one by one.

It’s possible that one of your CMS extensions is using up more server resources than it needs to, in which case you should disable all of them. If the error disappears, your suspicions are correct—an extension is to blame.

Deactivate the site’s extensions first.

Reactivate each extension one at a time after they’ve been disabled, retesting your site each time to find the issue. Here’s how you can do it:

Step 1: Go to the WordPress dashboard and visit the plugins section.

508 error image2

Step 2: Now go to the bulk actions and then select deactivate all options and then check if the error still persists. If the error vanishes, try reactivating them one by one to spot the actual cause of the error.

The next step should be to contact the extension’s author and report the problem. If the extension is well-maintained, the author should be able to provide you with a solution.

Fix 4: Please contact our customer service department.

If none of the methods above were successful in identifying the source of the increased resource utilization, you should contact your web host’s support team and request more information.

Moreover, you may also try to get a better hosting plan from any of the top web hosting service providers to resolve the issue.

Conclusion

Even though this error is a bit annoying and it hinders the entire workflow for your website as it starts gaining popularity, following the steps mentioned above will surely help you resolve the error instantly without any extra effort.

Check them out and try them one by one each to resolve the error and continue with the best experience.

10 Latest Ecommerce Statistics for 2022 (Trends, Insights & More!)

Let’s talk about Ecommerce Statistics for 2022.

But first, think about this:

E-commerce is a big deal nowadays. You already know that, but when you see some of the numbers, you’ll find they’re jaw-dropping.

Understanding the scope of e-commerce is important, as is understanding its many nuances.

Luckily for us, e-commerce is widely studied, so there’s a ton of research about it. The problem?

Some of that research is outdated, and some of it isn’t very good. And, there’s so much, I can sometimes be hard to find the relevant facts.

But hey — don’t worry! I’ve dug deep to find the most reliable ecommerce statistics around!