
If you use Sendinblue, then you’re probably a fan of being efficient in your marketing.
And if you’re a fan of efficiency, then automating parts of your strategies is something to love and look towards.
Today, I’ll take you through automating newsletters with RSS—a way of making automatic newsletter email campaigns based on your blog’s latest content.
Sound good? I think so, too.
Let’s dive in:
What is RSS?
Before I show you how to automate your newsletters with RSS with Sendinblue, let me explain what RSS actually is.
RSS is generally considered to stand for “Really Simple Syndication” or “Rich Site Summary.”
RSS is a web feed that lets users (or software) access updates from websites in a standard format.
Back in the good-old days of the internet, people used RSS feeds to see updates from their favorite blogs and websites in one place, by using an aggregator to put a bunch of RSS feeds in one spot.
You could subscribe to a site’s RSS feed and customize a news-feed to your liking. This has mostly been replaced by social media, though you can still find RSS feed aggregators.
For example, I use an RSS feed aggregator to look at updates from different publications without checking them individually or going on social media to see them.
In this case, I can handily view what The Atlantic has put out in the last few hours, and easily go to an article I want to view by clicking it:

That’s the popular, cultural context of RSS. And if you understand the gist of this so far, then you’ll soon see why it’s relevant to your email campaigns.
Because here, you’re going to use the RSS format in similar, yet different way:
Essentially, you’re using your own site’s RSS feed for your readers. Believe it or not, you do have one!
So instead of using this older tech to stay up-to-date with YOUR publications, you can use it to help YOUR readers stay seamlessly up-to-date with your latest content.
Why am I interested in doing this?
This lets you integrate your latest website/blog content with your email marketing efforts.
The short version of what we’re doing here, is using the RSS format to trigger email campaigns. So just as an RSS feed would “pull” your content when scanning normally, there will be an additional step of an automatic email that brings in your freshly pulled content.
Once it’s set up, you have very little other work to do: it gives you more time to focus on your content or larger business strategies.
No more needing to worry about sending out an email campaign that includes your latest posts—let the integration do it for you as frequently as you want.
How to automate newsletters with RSS
For this article, I will show you how to do this using SendinBlue.
First thing’s first: we need the actual “RSS campaign” integration. This can be found quite easily, by looking at the integrations/Apps page.
You can get to the Apps page by clicking right-most “+” sign on your dashboard’s toolbar:

Then, once you’re in the App Center, click the tab for “Integrations” under “Apps and Integrations.”
You can just scroll down from there to browse the integrations, until you find the RSS campaign integration at the bottom (you can also search for it):

When you add your integration, you’ll need to do a minimal amount of setup. This is mostly just naming your integration (ie., giving a short description of how you’re using it) and adding your site’s RSS link:
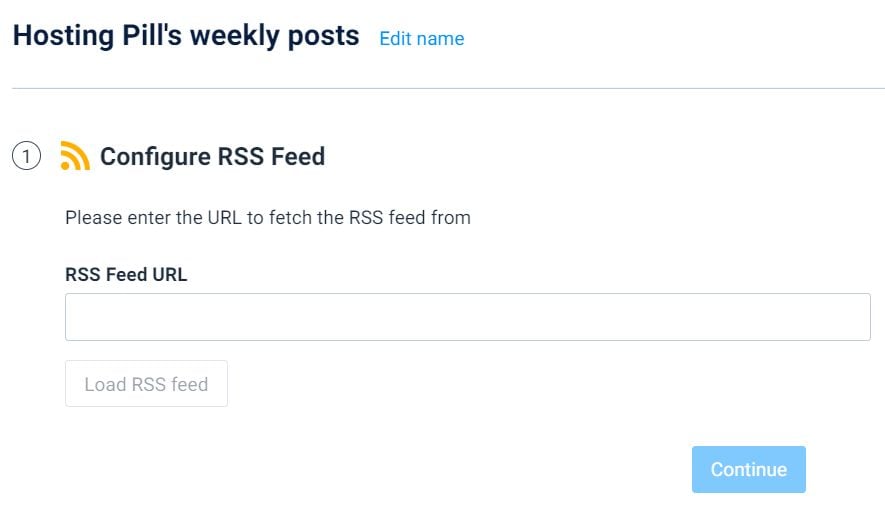
Wait, what is your site’s RSS feed URL?
Don’t worry, it’s not hard to get. The simplest way of getting it is to simply view the page source and search for it.
On Windows, you can usually do this by just right-clicking a web page and clicking “view page source” (or similar):

This will result in a page that looks very complicated, but don’t worry:

All you have to do here is use the page search function—on Windows that’s Ctrl + F—to search the term “RSS.”
This will take you to where the site’s RSS URL is. It’s the URL that lies in-between the href tag in HTML and its quotes:

So from this, we can see that the RSS URL for my site is https://hostingpill.com/feed.
Additionally, there’s another method you can use that’s even simpler, but it’s best for WordPress sites (it MAY work on other sites, but almost always works on WordPress sites):
All you have to do is add /feed to the end of the URL. For example, if my blog used WordPress (we don’t, but just pretend):
As you can see, in this case, it’s the same as my site’s actual RSS URL, even though I don’t use WordPress. So it does SOMETIMES work for non-WordPress sites.
But if your site doesn’t use WordPress, or if you just want to be safe, use the first method I outlined.
Okay, back to the Sendinblue interface:
Once you’ve entered in your site’s RSS URL, you can see if the URL is valid by clicking “load RSS feed.”
If it works, you’ll see a checkmark confirming the feed has been loaded, along with a preview:

Before you continue, take a look at the list of the names of keys:

You don’t need to memorize it, but it will become useful soon.
Anyway, you can click “continue” and then it’ll be time to do email design.
You can choose from an RSS default template, or one of your own email templates:

Note: While you CAN use your existing email templates, there’s a higher chance some glitch will come up from integrating it with RSS. It’s a choice more suited for advanced users.
So it’s probably better to choose an RSS default template, and customize from there:

You can use those name keys I showed you earlier to insert elements from your RSS feed into your email template.
A great thing to do at this stage is to insert loops into your email template.

This basically lets you insert a placeholder into the template that will contain a dynamic list of items—ie., the time and types of items on the list would be automatically generated with each sent campaign.
Don’t worry, it’s easy—this guide can take you through it in no time.
You can also learn more about how to use Sendinblue’s template language to customize even more deeply.
Anyway, once you’re satisfied with your template, click on “continue.”
From here you just need to select a list of contacts to send the RSS campaign to:

Though, a word of caution: it’s probably a good idea to test out your integration by sending first to yourself, or a “safer” contact list, if you have one. (You can also look at a preview of the email in the design section of the set-up process).
From here, it’s time to customize the email campaign. Note that you can create preset campaigns that will automatically figure into new integrations.
But for the sake of example, suppose I’m setting up a new one with this RSS integration:

There are more advanced options, but those are the basics. You also need to set, of course, the timing and frequency of your email campaign:

Like the description says, when your RSS feed is pulled, a new campaign will only be generated when new items have been added.
But, if you would like, you can automatically send emails every time you add new content. To do this, all you have to do is set ALL days of the week.
Anyway, once you’re satisfied with the frequency of your RSS campaign, you just need to choose whether you want to send those campaigns automatically or manually:

Manual is of course safer, and still won’t involve much work on your end—but once you’re comfortable, leaving it to Sendinblue is a breeze.
And lastly, you’ll confirm your integration setup, and choose whether you want it active upon confirmation or inactive (to be activated at a later date of your choosing):

After confirmation, you’ll be taken to the “My Integrations” section.
The newly-set-up RSS campaign integration will be there, along with your other integrations (if you have any), where you can activate or deactivate it, edit it, etc.

And then…you’re all set!
Happy campaigning!


