What is err_connection_reset, and how do we fix it?

People hate it whenever an issue appears all over a website. err_connection_reset is an example of its potential characteristics.

err_connection_reset

It indicates that the host of the desired portal isn’t reachable by web browsers. It often signals a connectivity problem for the end user.

What does err_connection_reset mean?

It suggests it wasn’t able to achieve connectivity. The association, thus, went into “reset” mode.

It states that a host cannot distribute information to the browsing application. It then prevents the page from loading.

Why does err_connection_reset occur?

Instead of an annoyance with some specific portal, it’s an end-user situation. It’s related to network connectivity. Underneath, we will discuss a few of the many potential causes.

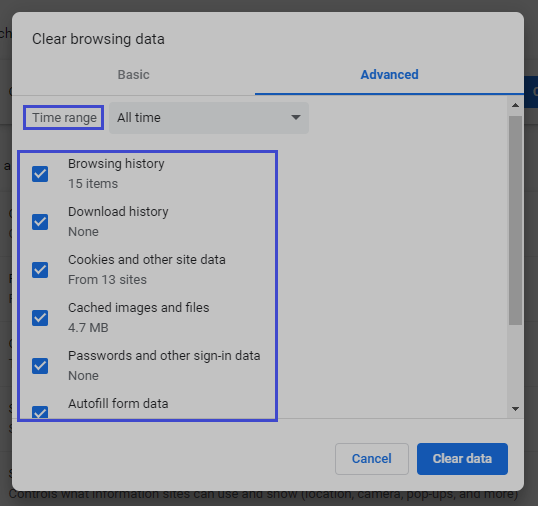
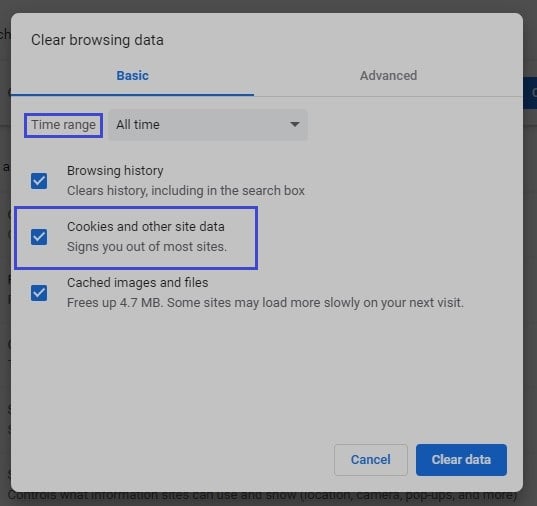
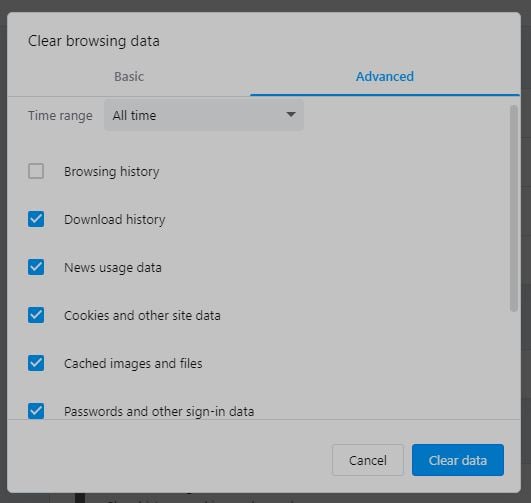
Fix 1: Delete search data.

It could be due to improper cache information. We’ll fix it by deleting most of the web history. Use “Ctrl+Shift+Del” on the keyboard. Then head on to “Advanced.” Set the timescale to “All time.”

Uncheck “Browsing history” since it doesn’t need clearing.

Delete search data

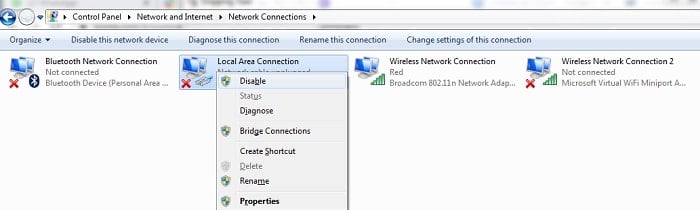
Fix 2: Router toggling.

We could attempt to reboot it by pushing the reset button. When users cannot locate the switch, they should disconnect the device. It should be done for 1 minute and then power it on again.

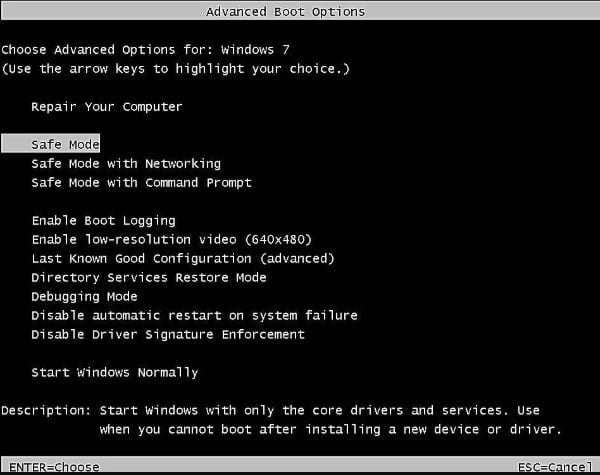
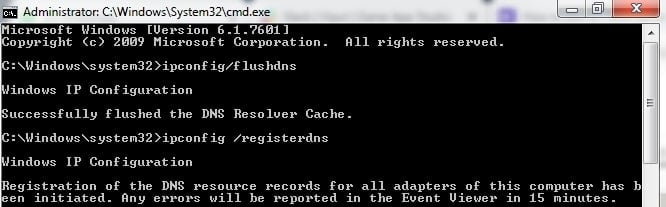
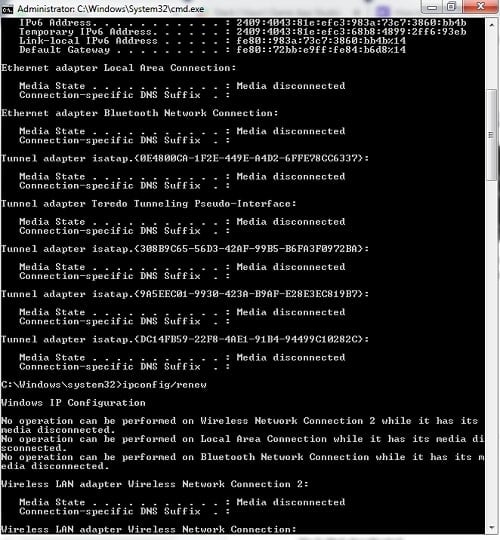
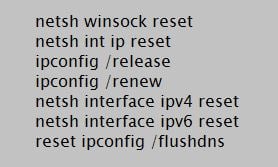
Fix 3: Reload the Internet Protocol setup.

While holding down the “Windows Button,” tap “X.” Then pick “Command prompt” (Admin). Move on to execute beneath instructions at a time. Then reboot the device.

Internet Protocol

Fix 4: Block any firewall as well as anti-virus tools.

Disabling any security tools over a short period may help to resolve. Users must read the tool’s instructions on how to do it. It’s the deactivation procedure that will differ.

Fix 5: Disconnect any proxy host.

So here, we’ll guide you with settings. Move to “Internet Options” via the Panel’s “Network and Internet.” Then head to the “Connections” area. Then pick “LAN” options and deselect “Use a proxy server.”

Network and Internet: err_connection_reset

Fix 6: Verify the VPN.

When we use any web address to visit a portal that is not recognized, it could stop or cancel the session. Renewing or communing to a different VPN host should settle it.

Based on the VPN application, it could attempt to restore on its own, or you’ll be required to do that.

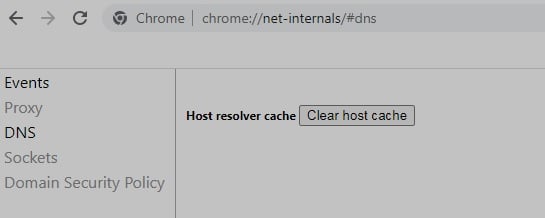
Fix 7: Change to another DNS host.

Head to “Network & Internet” by launching “Settings.” Then head to “Properties” by right-clicking “Connected Network.” Then pick “Change Adapter” under “Network & Sharing Center.”

Then pick “Internet Protocol Version 4 (TCP/IPv4)”, then go on selecting “Properties.” Further, head on to the “General” segment via the “Internet Protocol version 4 (TCP/IPv4)” pop-up screen.

Modifications to the DNS host and network are available herein.

DNS host: err_connection_reset

Further input these DNS host values. It’s within “Use the following DNS server address.” Input 8.8.8.8 for Preferred and also 8.8.4.4 for Alternate. Finally, save and tap “Ok.”

DNS server address: err_connection_reset

To revise these hosts, run the corresponding statement.

IP Config

Fix 8: Verify the portal’s functionality.

In rare illustrations, the portal alone could be the culprit. We must use a host tester via inspecting online. Input the portal’s link into the application.

Further, submit the link to begin. Users must wait before portal admins repair the situation. It’s when any server is unavailable.

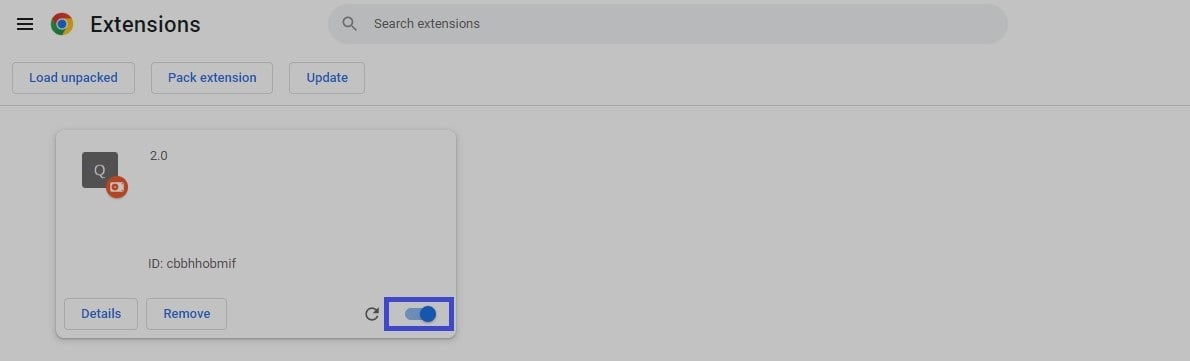
Fix 9: Deactivate plugins.

Deactivate plugins for a brief period. One could try activating back to a default theme. If anyone settles the case, start them one at a time while keeping track of them. It’s due to the trouble that may reappear whenever.

Fix 10: Call your broadband vendor.

A broadband service supplier’s firewall program also considers disabling specific IPs. It’s for their clients.

We may approach the vendor to seek accessibility if this scenario plays out.

How to avoid err_connection_reset?

The viewpoint per company differs depending on its participants. Taking into account the precise measures below, one may avoid the message.

Option 1: Update network tools.

People can avoid this bug by revamping the drivers’ firmware for network interfaces. If it’s outdated, then do it. It also includes updating your respective browser apps to the stable version.

Option 2: Remove Old browsing cache.

The browsing cache may improve the surfing experience by accelerating page load. Yet, it is better to avoid keeping any expired cache content on browsers in the long run.

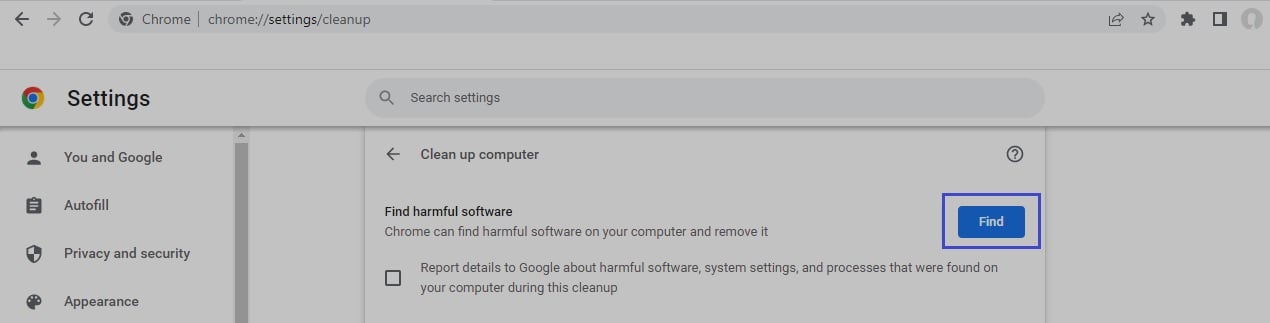
Option 3: Try Chrome Cleanup tool.

The embedded part in Chrome detects malicious add-ons and removes them. It helps avoid this state.

From the device, launch Chrome, and then input “chrome:/settings/cleanup” into the search. Then tap “Find.” It’ll begin screening for malicious applications inside the browser.

Conclusion

The main reason for connectivity blockage is a configuration error in the network. It’s usually a client-end concern.

As you’ve seen, such an issue might make surfing difficult. Moreover, it makes it impossible for you to host a client application.

Here are some top-notch proxy hosts you can check. Following either of our suggestions, we imagine you were able to resolve this issue.

What is HTTP 422 error and how to fix it?

Viewers of websites dislike it whenever an issue appears on screen. HTTP 422 could be one of those elements.

Error Http 422

This state is less frequent than others. It signifies that while the backend recognizes the query. But it cannot be completed since there is an issue on your part that prevents it.

What does HTTP 422 mean?

It indicates that the backend didn’t execute the enclosed instructions. It’s despite knowing the requesting entity’s data type and proper format. It’s also called “Unprocessable Entity.”

If a query is quite good but cannot handle it because of syntactical problems in the query’s body, an HTTP 422 may arise.

For instance, when you attempt to make a new user, the user’s email has already been in the system. Then the host might respond with this message.

What are the common causes of HTTP 422 error?

The message often appears if a request’s data includes a logical fault. There are many potential causes for that, and we will discuss them below.

  • XML requests that include well organized with valid syntax. Yet incorrect logical XML code may get this response message. In other words, there is a bug in the coding.
  • This reply is the consequence of transmitting incorrect or ambiguous information. Moreover, it may happen due to the supply of empty and invalid files.
  • Inefficient design or damaged databases are the frequent sources of this status. They have to be rectified or destroyed and regenerated.
  • Any function attempting to execute might also fail. It’s due to the host not having a privilege with that database section. It can state that the dedicated server’s account needs updated rights.
  • It could also be due to other reasons. The base directory of your website’s PHP system configuration could be invalid.

How to fix HTTP 422?

Here are a few utilized strategies which netizens might prefer. This increases the odds it’ll get resolved.

  • The issue might be a sign of a severe problem with the website, like viruses or other safety issues. We recommend scanning browsing applications and the client system that’s in use.
  • Re-uploading the source code onto the host is also an option. It’s to resolve the “not processable” problem. Individuals can do it using the File transfer protocol (FTP). Moreover, individuals might need help via the cloud vendor.
  • Database entries might sometimes get damaged throughout an upgrade. Records may display problems when upgrading any tool, template, or site. Moreover, the activity gets stopped.Here are the steps to fix this:Step 1: Repair dataset using phpMyAdmin

    You may use the embedded repository repair feature for specific tables. Here’s an illustration.

    From its left part, choose the database after logging in to phpMyAdmin. We can see a list of tables on the right side, and we may select one or more tables.

    Press the “Repair table” inside the “With selected:” dropdown list at the underside.

    phpMyAdmin

    Fix the whole repository and tables. Then, it’ll display a completion page with the tables’ list restored.

    Repair table

    Step 2: Repair dataset via WordPress Plugin

    Anyone may manage, change, and optimize several elements with this simple application.

    We may wish to fix any records. Select all fields, then press “Repair” beneath the panel to restore the entire dataset. If it’s unable to correct some tables, it’ll inform and produce a confirmation message.

    Repair DB

  • One can find the issue via Log File. In these situations, turning on the debug function would provide accessibility to the log. It’s a better decision.
  • Changes to the base configuration “wp-config.php” document may be needed. It’s to activate WordPress’ debugging option. We may do this via site access via any FTP (File Transfer Protocol) tool.Before the block that states, “Happy blogging,” edit the “wp-config.php” document. Then add the below statement script.

    Debugging

    Ensure the first statement reads valid if activated. Otherwise, add the second statement. Refresh the site after saving the modifications.

    Proceed towards the “wp-content” directory within the file system. Then search for the “debug.log” document if you want to see any logs.

    We may use an editor to access it. Moreover, it must specify what segment in the log is affected by the syntactic issue.

How to avoid 422 error?

The viewpoint of any organization differs from that of the users of its applications. By implementing some of the measures listed below, we could avoid HTTP 422.

  • Although the request body is in the proper format, it mustn’t contain syntax mistakes. Make sure to go through information about error parameters inside the response body.
  • Verify the validity of each reference ID in the database to prevent issues. For instance, a sales representative should already be in place before assigning a Salesforce lead.
  • Users must make sure the given input information is accurate to avoid issues. Verify whether the field is necessary. In such a case, they can’t be empty.
  • When creating and updating database tables, ensure if data exists with a “unique key.” It is to avoid any mismatch when creating new ones.
  • You can prevent issues by engaging in development forums like “Stack Overflow.” Thus to check if anyone can help you, you could also submit an illustrative section of the program. Moreover, you can test the platform.
  • It’s better to back up databases regularly when such an issue arises. Moreover, it helps to roll back to previous stages when there’s an issue. You can use plugins and other host management applications for backups.

Conclusion

Owners could use the 400’s category states for many reasons. It’s when a query semantics, messages, or request redirection includes misleading data transfer. It is sent to the user to avoid poor requests or failures.

Understanding every form of response is crucial if you run a portal. Every internet company’s growth requires knowing what every incident means.

Yet, the problem may not state which part of a query it couldn’t handle. Thus, situations like these could prove challenging.

Once you’ve spent the necessary time understanding these techniques, you can get assurance. After this, be sure to hire competent professionals. The portal can remain stable with frequent support and diagnosis, leaving you stress-free.

What is HTTP 304 and how to fix it?

It annoys web users when a problem surfaces online. One of those factors could be HTTP 304.

HTTP 304

Browser’s and a portal’s host connectivity might suggest this message. The message means no change in requested content since the previous session.

What is HTTP 304?

Back-end notifies that certain saved information isn’t changed. It stands for the term “Not Modified.” The case signifies that one or more web page requests have no update. It’s since the reader’s previous session. The held data is nothing but cache.

Upon reaction, a search engine accesses a cached replica. Caching eliminates re-accessing the same data. Thus, it enhances the portal’s service.

Many browsers and bots request the back-end, including specific protocol headers. If there’s no update in the database, a request can’t fulfil itself. Instead, search engines serve the cached interpretation of the database.

Why does HTTP 304 occur?

This state might occur on an individual or the host end. But, when a viewer experiences a 304 state on the owner’s domain, it’s the viewer’s concern.

Following are some reasons wherein an end-user can get this message:

  • A defective application could be a bug. It’s due to using any tool that contains damaged data connected to the end-user browser. It would affect an individual’s capacity to use and edit the portal’s content.
  • Back-end’s wrong configuration likely impacts an incorrect reply. It could be due to 304.”
  • Computer viruses may compromise the URL’s capacity to communicate with hosts. It affects caching of content.
  • The system’s registry may get faulty when visitors recently deleted or installed applications. It happens on their device. This scenario indeed impacts both the transmission and URL’s cache capabilities.

How to fix HTTP 304?

Below are several tested methods that internet users could like. These raise the possibility that it’ll resolve.

  • Delete browser Information and Cache from the site and delete the Cookies.Clearing the dataset may make reaching the target web page more accessible. It happens if the buffer contains expired information. Visitors may be unable to view the portal’s recent content.

    One may get a fresh piece of content from the portal’s server by cleaning it. Visit “History,” then choose “Clear browsing data.” Then move over to the “Advanced” section. Choose “All time” as the timeline, tick all options, and delete them.

    Clear browser data

    Once users remove cookies, they destroy the data their browser maintains. It’s usually logins and site settings. It’s worthwhile to chuck unwanted datasets, thereby enabling site access.

    As earlier, move to the “Basic” tab, and tick all, especially the one with “Cookies and other site data.” Then delete them.

    Clear browser data

  • Corrupt plugins obstructing requests and back-end contact could be the concern. It’s better to deactivate or delete the browser’s add-ons. Here’s a reference for the same.Move towards “Extensions” under “Settings.” Deactivate any necessary plugin. Then choose it to be on or off. Whenever you wish to uninstall any unnecessary or out-of-date add-ons, click “Remove.”

    Extensions

    Restart the browser after deactivating. It’s to achieve some significant effects. It’s OK to enable them once again if it fixes the problem. Visit the portal intended after that.

  • A potential offender may be a damaged browsing app because of the impact of ransomware. So it makes sense to conduct a virus inspection for the device.For this, type the below address without quotes in the search.

    Chrome setting

    Then click “Find.” The detector will work on it and describe its findings.

    Fixing HTTP 304: Chrome setting

    One can use a local anti-virus app to remove suspected computer viruses. Run a brief recommended scan of the entire system. It’s helpful when other browsers can’t provide scanners.

  • A wireless connection detects a web that’s accessible. Sometimes hosting companies won’t take TCP or IP. Restart attempts may help to fix it. Resetting settings in TCP/IP may resolve it.Step 1: Type “Command prompt” in the taskbar’s search. Then right-click and choose “Run as administrator.”

    Fixing HTTP 304: Run as administrator

    Step 2: Execute the following in cmd. Do these in the prescribed sequence. Moving forward, ensure you restart the system.

    Fixing HTTP 304: Reset

  • Individuals can attempt resetting DNS. Web addresses, hosts, and resources are some details on the activity included.A functional DNS cache may respond to every piece of information. It can do without relying on these hosts. But faulty or obsolete caching might produce problems.

    Type the below in the search to reset.

    Fixing HTTP 304: Resetting DNS

    A panel will appear. Then click the “Clear host.”

    Fixing HTTP 304: Clear Host Cache

  • 304 may appear due to host configuration documents. Check these scripts for guidelines on unintended redirection.Search for a “.htaccess” document in the core of the portal’s document module. It might be at “/home/< username >/public_html/.htaccess”.

    For Apache, it’s at /etc/apache2/httpd.conf or /etc/apache2/apache2.conf. Mod_cache function is the probable reason when Apache generates an unusual 304 state. Below is an illustration of this:

    Fixing HTTP 304: htaccess

    Do not remove anything since we would not want to risk any irreparable harm. Instead, comment on cache statements for some time by inserting the # symbol.

    Do it at the opening of each one that needs attention.

    Save the changed document. Finally, reload Apache to review.

How to avoid 304 error?

Any company’s perspective is distinct from its application users. We may prevent the 304 states by following a few options mentioned underneath.

  • Ensure browser, tools, and drivers are compatible with the previous stable version. It includes updating the browsing app and add-ons that are most useful.
  • Almost all apps maintain some back-end log. It includes information on the fitness of every function or the data center. Generally, service logs serve as a reminder of how an application performs. Examining the log data from time to time can avoid these issues.
  • You can avoid this by determining your Code Base for any future problems. Transfer the complete modules to a local development system. Then go through the testing phase stage-by-stage. It helps to test scenarios.
  • You can also avoid this by using Public DNS. It’s quicker, provides more reliable surfing, and increases protection from malicious data.

Conclusion

Sites deploy 300 category ones for efficiency. The HTTP 304 signifies that the demand shouldn’t need retransmission. But would instead point to cached information.

Yet, improper configuration of a host or browsers might cause interaction to fail. Thus, resulting in HTTP 304.

Owners can use error tracking tools offering real-time and automated instance reports. It can complicate users if none of the mentioned fixes resolve the issue. Getting help from a developer throughout this situation helps.

Complete Guide to Plugin Performance Monitor (with screenshots)

Let’s talk about Plugin Performance Monitor from Nexcess.

Usually, performance tends to be one of the most commonly overlooked aspects of building and managing a website. This is especially true for WordPress or CMS users, who prefer to be shielded from the technicalities of running a website.

Performance has never before played such a crucial role in the success of your website. According to a recent update by Google, it now plays a major role in your search engine rankings.

Why? Because Google wants to provide its users with the best experiences possible, not only the most relevant content.

Not to mention the fact that internet users’ expectations are growing by the day for fast and on-demand access. Research shows that up to 53% of visitors abandon a page that takes longer than 3s to load, for example.

In this guide, we’ll introduce you to the Plugin Performance Monitor for WordPress.

What is Plugin Performance Monitor?

performance monitor

Plugin Performance Monitor (PPM) is a plugin for WordPress and Woocommerce by Nexcess. Nexcess is a fully managed, high-performance digital commerce cloud platform for WordPress and WooCommerce.

PPM will run nightly performance audits on your entire WordPress website. These audits log both the performance of your website as well as what changed since the previous audit. It logs plugin and theme changes, such as installing or removing plugins as well as changing configurations.

PPM identifies what changes were made and how they impacted your website’s performance. It then notifies your WordPress website admins so they can investigate and fix any performance issues. Plugin Performance Monitor can show at the file level what’s contributing to the overall request load and delays.

Users can also access the PPM dashboard to see any performance score changes. Instead of just telling admins that their websites are slow, Nexcess directs users to the root of the problem.

This speeds up the process through a level of automation. Website admins no longer have to run manual tests and then go search for potential new performance issues themselves.

How Plugin Performance Monitor Looks Like?

Let’s look at a real-world example of how PPM can help monitor and improve WordPress performance.

Log into your WordPress dashboard with PPM installed. You can access the PPM dashboard just like any other plugin by going to “Nexcess -> Plugin Performance Monitor”

Initially you will have to wait for 24 hours before it can show you any score. After that, you’ll be presented with your current performance score and the average page loading times. You can also see the number of changes since the last performance check as well as the number of active plugins.

Below that, you can easily track the change in your performance thanks to the performance timeline:

Plugin Performance Monitor

(click on the image to enlarge)

So, we can see that we currently have a 98 performance score. While this is great, something must have gone wrong since our score went down from 99 the day before. Plugin Performance Monitor will also indicate the positive or negative change to the right of the score.

Considering that we’ve made 4 changes since the last performance check, it’s reasonable to assume one of them may have impacted the performance.

Under today’s performance, you’ll see “7 insights.” This means Plugin Performance Monitor has 7 suggestions or possible fixes for us to improve our website’s performance.

If we expand this field, we’ll see a list of all the detected issues and possible fixes Plugin Performance Monitor has identified for us:

Plugin Performance Monitor

(click on the image to enlarge)

As you can see, some of the changes we made introduced significantly more CSS which can take up more loading time. It even picked up changes to the responsiveness of the website and indicates whether issues affect a page or post.

If we change the tab to “Site changes,” we can see exactly which changes occurred since the last performance check. For example, in our case, it involved activating three separate plugins as well as updating our WordPress installation:

Plugin Performance Monitor

(click on the image to enlarge)

From here, you can click “Manage Plugins” to deactivate plugins and see if it resolves any of the issues.

The third tab we can use is the “Pages performance” tab. This breaks down the change in performance for each page or post on our WordPress website. For example, we can see that the Category archive page takes 1,811ms to load – a 33% increase.

Because it’s the main contributor to page loading times, Plugin Performance Monitor also shows us the change in page weight. In this case, the single post page’s weight went up by 29% to 82kB. In all likelihood, it’s this increase in weight that lead to the slower loading times:

Performance Monitorn4

(click on the image to enlarge)

You can dig further into each of these elements for more information to help you with your troubleshooting.

You can see just how easy it is to track any changes in your website performance and to identify the potential causes. The best part is that it’s just waiting there for you as soon as you log back into your dashboard.

How to get Plugin Performance Monitor?

Nexcess announced the PPM plugin as a feature on all Managed WooCommerce and WordPress plans.

Nexcess offers a range of managed WordPress hosting plans for websites at different scales and budgets. You can find a complete breakdown of all their plans here.

The good news is that all plans come with all important features. This includes:

  • Updates
  • SSL certificates
  • Daily backups
  • 1-click staging
  • Support
  • And, of course, the Plugin Performance Monitor plugin

The main difference is the resources you get with each plan, such as the bandwidth, storage, and the number of sites you can host. All plans also come with a 30-day money-back guarantee and the option to subscribe monthly or yearly.

Spark Maker Designer Builder Producer Executive
Annual price $190 $790 $1090 $1490 $2990 $5490
Monthly price $19 $79 $109 $149 $299 $549
Number of sites 1 5 10 25 50 100
Storage 15 GB 40 GB 60 GB 100 GB 300 GB 500 GB
Bandwidth 2TB 3TB 4TB 5TB 5TB 10TB

Here are the step-by-step instructions to sign up with Nexcess and start using the Plugin Performance Monitor:

1. Head over to Nexcess’ pricing plans page.

2. Choose the ideal package for you and click “Get Started.”

3. Create an account by entering your email and password and clicking “Sign up.”

nexxes stareted

4. Complete your plan purchase by providing your billing and payment details. Then, review the plan information one last time before committing.

5. You can now log in to your Nexcess portal using the account details you created above.

Plugin Performance Monitor: nexcess login

6. From here, go to Plans -> Your Domain Name -> Environment to see your WordPress installation(s).

7. Find the WordPress site you want to log into. Click the three dots menu to the right and then select “Site dashboard.”

Plugin Performance Monitor

(click on the image to enlarge)

8. The Nexcess plugin should already be installed on your WordPress site. You can then follow the instructions here to install other Nexcess plugins and utilities.

Plugin Performance Monitor

(click on the image to enlarge)

Sales Performance Monitor

As e-commerce stores are more complex and larger than typical websites, they tend to encounter more performance issues. These issues can also directly impact a store’s conversions and revenue.

Merchants need to be kept aware of any issues affecting their website’s performance or services. Instead of simple downtime monitoring, merchants need to know about problems with payment processors and slow loading times.

Sales Performance Monitor does this by monitoring the transaction trends on your website. If it detects that sales have fallen below a certain level, it will alert you that there may be issues with your website. This gives merchants the visibility to respond much faster to incidents and prevent the loss of business.

Sales Performance Monitor will send alerts to your Woocommerce and store admin inboxes. The plugin is also preconfigured to automatically work on all managed Woocommerce hosting plans.

Conclusion

Hopefully, you now understand the importance of having a fast and reliable website. Not only will it help you satisfy visitors and convert them into customers, but it will help you rank higher in search engines as well.

As you can see, you don’t need to be a developer or have a lot of technical expertise to ensure top-notch performance for your WordPress website. Thanks to Nexcess and Plugin Performance Monitor, tracking and monitoring your website’s performance is a breeze. All you need is a bit of time and the willingness to make the most of your WordPress website.

What is the 529 (Site is Overloaded) Status Code, and how do we fix it?

Owners of the web find it frustrating when a bug appears online. 529 Site is overloaded error might be the cause.

529 Site is overloaded error

There are no standards that define the 529 code. When a 529 error arises, it signifies that it has processed all proper inspections. Thus, it can’t do any more evaluations unless more resources arrive.

What does the 529 Site is overloaded status mean?

An overburdened website that cannot accept further requests might send a 529 response. Server evaluations take at least one minute. Never can a very healthy application receive a 529 message.

When you do, it indicates whether the site is submitting fresh evaluations very fast. It can be because of not keeping a count of the number of simultaneous requests the site has permission for.

Why does it occur?

Timeouts are a frequent sign of an overcrowded service when receiving any request. So, it is never processed.

But, it is a rare event. The factors listed may lie at the core of this problem:

  • It may be due to the platform’s dedicated servers experiencing idle time or repair. Yet, individuals often discover that it is operating well for others, which is rare.
  • It is common to believe that broadband connectivity might be a problem. Even faulty program files may be the culprit. It might also be a virus that results in massive traffic. These viruses interfere with regular site functioning.
  • If owners encounter a 529 issue, there may be an issue with the SSL Labs tool. These tools are to test SSL-based backend accessible through the general internet.
  • The network may get overloaded if many users try to access your portal at once. An illustration of this occurs when the portal fails shortly once product deals go on sale.
  • It may be due to the server’s routing requests taking an extra second or above. The website could block or restart TCP transmissions without returning any web pages. As a result, your network returns only a part of the requested data.
  • DDoS (distributed-denial-of-service) and DoS (denial-of-service) may be the cause. These are attempts done by intruders to block entry to a server. They bombard the backend using bogus instructions. They can be forced to reject legitimate requests.

How can we fix the 529 Site is overloaded status?

We’ll go through a list of tried-and-true techniques that users may like. These increase the likelihood of fixing the problem.

  • It includes setting up firewalls to restrict undesired inbound traffic. Allocating separate servers to handle various data proportions may also be helpful.
  • You can use page caching to provide information from other sources. Extensions like WP Super Cache are simple to install. It will buffer the static content of any WordPress portal.

    Using WP Super Cache

    Step 1: Visit “Settings” then “WP Super Cache” to activate the cache. Select the “Caching On” under the “Easy” menu. When finished, select “Update Status” from the control panel.

    Wp super Cache

    Step 2: Configure Dynamic Caching and Compression

    In some circumstances, allowing dynamic buffering might be helpful. It’ll be beneficial if you have a portal with changing information. For instance, enabling it will speed up websites that include advertisements.

    Advance cache

    WP Super Cache may provide loaded resources as compressed files. It reduces load times. Go to the “Miscellaneous” and choose the “Compress pages” checkbox to activate compression.

    Wp super cache

  • You must transfer the information to a disc for storage if a website is short on memory. You end this issue by modifying the main memory and boosting space. Repairing any memory leakages may also help.
  • Restarting your system or server should also take precedence if you’re having issues. For further facts about this, administrators should contact the hosting company.

How to avoid the 529 error?

Your co-worker or developer may avoid this situation. People may solve this issue by using the options provided below.

  • A backend “load balancing” system is the most efficient way to avoid server overload. It applies to all company’s servers. Dispersing the resources throughout the server set helps transit incoming traffic.The Apache server’s load balancing component helps divide communication requests. Here is an illustration below.Step 1: Activate and Deploy Load Balancing components using the Apache server

    a) Make sure the following are active.

    Apache

    b)In case you’ve to activate a component, then restart the backend.

    Apache 529 Site is overloaded error

    c) Configure Apache

    Make changes to a load balancer script by using an editor:

    Apache2 529 Site is overloaded error

    Change the below brief with the snippet mentioned, then add it:

    You can change the “serverpool” syntax and the load balancing method’s chosen name. You must also do for servers’ IP addresses combined with their domain names and port numbers. “sitePass” includes an URL redirecting to the pool hosts.

    Proxy Pass: 529 Site is overloaded error

    d) Reload Apache after saving modifications:

    Reload Apache

  • Server apps change their architecture and environment to thwart hacking attempts. It includes other security flaws. Thus, updating drivers and tools to an updated version is essential to avoid these issues.
  • SSL Labs evaluation APIs provide testing for SSL hosts. It is for those accessible over the online platform. A warning from these APIs indicates if a website can handle requests or not. Testing with these APIs helps you limit the number of evaluations at once.
  • Unnecessary content might take up space on dedicated hosting, making it overload. By eliminating unneeded extensions and designs, you may prevent this.

Conclusion

Inconvenient downtime caused by overloaded websites may cost your company economy and time. Yet, since the databases are often overloaded, the website sometimes goes crazy. It generates problems like 529 status.

Positive client service is an assurance if you perform routine inspections. Obtaining a preliminary analysis and monitoring website traffic may be beneficial. One must be familiar with 500 status server category issues to guarantee stability.

For anyone, predicting how their platform will evolve in the future is difficult. You could have a proper insight into what to expect from this state.

In these cases, hiring someone who resonates on your side could be beneficial. We’ve described the fixes, but you may upgrade your connectivity if they don’t help. As we said, you can contact the server vendor.

What is the HTTP 509 Bandwidth Limit Exceeded Status Code, and how to fix it?

Portal owners find it annoying when an error shows up on the web. The HTTP 509 Bandwidth Limit Exceeded might be the source of such problems.

509 Bandwidth Limit Exceeded

A set number of resources is usually allocated each month. When a web admin has a restricted hosting package with low bandwidth, they often notice this. It’s when there are few hosting subscriptions.

So what is the 509 bandwidth limit exceeded?

The 509 bandwidth limit exceeded error is a server message that appears on the webpage. It is after exceeding its designated traffic quota. The portal stops working if the given bandwidth is in full use. When a month changes, the data traffic value refreshes. Hence, allowing site users to re-access.

Users of web hosting services should be aware of bandwidth. It is the most significant quantity of data transportation over a given period. The data format is kilobytes/sec, megabytes/sec, or gigabytes/sec. Also, the pace of data transmission is “bandwidth.”

509 bandwidth limit exceeded: Typical causes of this response

Depending on the level of traffic your portal receives, its bandwidth gets utilized. Nothing exceptional about it.

Yet, it’s a common occurrence; it could sometimes be simple to pinpoint what caused it. The following elements might be at the root of this issue:

  • When distributing users’ data, the portal with increasing traffic needs greater bandwidth. Users get the 509 bandwidth limit exceeded response notification.
  • It may be due to the limited back-end capacity you have bought. Depending on your back-end needs, hosting firms provide you with cloud storage.
  • Users download the site’s files when they request them via your web page. One of the factors is whether the web server’s input or output source file system is rising in value. This number often climbs when the files kept on a server may be in an overload state.
  • It might be due to a shareable hosting package. Others on a similar server may consume too much bandwidth.
  • File formats may be another typical culprit behind it. For example, your domain may have enormous datasets. Datasets like movies and pictures consume more bandwidth than the hosting package permits.

    Apache Caching Configuration

    Step 1: Ensure the following syntax is in the configuration file. It is to ensure Apache is loading the module.

    apache: 509 Bandwidth Limit Exceeded

    Step 2: Ensure the following syntax is in the configuration file for disk caching.

    apache config: 509 Bandwidth Limit Exceeded

    Step 3: Finally, the file should now include the below script.

    apache: 509 Bandwidth Limit Exceeded

    In the above, “CacheRoot” assigns the cache location. It will house all cached information.

    “CacheDefaultExpire” configures the end date in seconds. It is according to the date in the request. “CacheDisable”: You should add folks to this list who shouldn’t be in caching mode.

  • A server restart may be necessary. Web admins may contact the hosting provider for more information about the 509.

How do we resolve or fix the 509 status?

It may be as easy as boosting the hosting plan from the owner’s mindset. There are workarounds for the portal’s exceeded bandwidth.

  • You may resolve this by increasing the regular maintenance plan. Try upgrading servers to get more bandwidth. Some servers that offer unlimited bandwidth are here.
  • Streamline the files on your portal. To address this, you may attempt to optimize the web application. You can do it by utilizing reduced data size or file compression. You may change and optimize your photos using application solutions like kraken.io.
  • Caching data aids in creating a duplicate of the portal. It fetches from the web directory rather than the back-end whenever someone clicks. It allows the allotted storage capacity to stay in place.

How to avoid the 509 bandwidth limit exceeded?

Your in-house developer may avoid this status. The alternatives listed below allow individuals to overcome this problem.

  • You can start figuring out your transmission capacity. You must understand the daily user count and the portal’s average web page volume. Here is a quick formula to calculate it (“x” represents the multiplication symbol).Formula Bandwidth
  • Turn on CDN caching. Clustering using a “Content Delivery Network” might be a terrific approach to avoid. It keeps static content on these networks and serves users from there. It assists in shortening the response time of your website.Many use HTTP headers to identify cacheable online information and specify end durations. You may manage your caching approach using these headers by creating ideal rules. It guarantees the stability of your data.

    Here is an illustration of implementing HTTP Headers in Web Applications for Caching.

    1) You may provide expiry and revision dates using HTTP Header specifications.

    Cache

    Change the item’s age using the Meta tag. Here we have specified the highest period as one hour and the cache as private. In the above snippet, it’s 4000 seconds. If it’s private, the client browser can only make the request.

    2) In PHP, configure the caching in the document’s header using the Header() method.

    Cache Control

  • Unused items may occupy a dedicated server, causing load time to increase. You can avoid this by removing unwanted plugins, images and templates.
  • Additionally, web admins must be ready for traffic spikes. There should be provision for an extra 50% capacity, which may be helpful in times of increased traffic.

Conclusion

The 509 Bandwidth limit exceeded error message is essential and may result in significant losses for your company. Check your bandwidth consumption to ensure your clients don’t see this. A great customer experience with regular inspection is always a guarantee.

It might be helpful to get a preliminary estimate, reduce the amount, and keep an eye on internet traffic. You may improve your current package by contacting your service provider.

One has to be aware of each status category if they want to assure the survival of an internet business. Workers should pay attention to HTTP 500 errors.

Foreseeing how their site will change over time is challenging for any webmaster. You may better understand what to expect from such an error. Having a professional on your team might be helpful in such circumstances.

How to the Fix “DNS Server Not Responding” Error: 7 Easy Fixes

Without prior access to a domain name server, you cannot view a website (DNS). A message like “DNS server not responding,” could be found in the process. The decentralized naming systems that convert hostname to IP addresses have therefore not reacted.

These types of DNS issues, including dns_probe_finished_nxdomain, might arise for a number of reasons. Luckily, most of them have straightforward decisions. Fixing this problem may be as simple as resuming or changing the web browsers of your PC.

However, even though they are the server errors, these are not like the Server IP Address could not be found or a server error occurred and your email was not sent.

Meaning of DNS Server not Responding Error

A DNS is a system of naming that takes and transforms alphanumeric domain names into numeric IP addresses. DNS servers are essentially translators.

The web address is sent from your router to a DNS server, which is then dissolved and returned as an IP address when you enter a web address into your browser. However, when the DNS server cannot complete this name resolution procedure effectively, the final result usually is a notification that the DNS server does not reply.

dns7

“Not responsive DNS Server” signifies that your browser couldn’t connect to the internet. DNS faults are usually caused by user end issues, whether with a network or an internet connection, misconfigured DNS configurations, or an old browser. You can also attribute them to a momentary server failure which makes the DNS unavailable.

So you may easily fix the problem by changing browsers. It is possible. In other circumstances, connections might be disabled, DNS servers modified or the DNS cache flushed.

Fix 1: Changing to another browser.

The first step is to fix the problem by testing your DNS connections. Correcting this problem could be as easy as changing or updating your web browser.

Try to use a different browser to access the web. For example, you should visit the appropriate Mozilla Firefox website or, instead, Microsoft Edge, if your default browser is Google Chrome.

If the browser switch works, you may need to update or delete and reinstall your default browser. However, you may rule out your browser as the source of the problem if you still see a “DNS server that doesn’t respond.”

Fix 2: Launching the PC in a safe mode.

The “DNS Server Not Responding” error message can happen if your operating system does not work correctly. You might thus try booting your Windows device in Safe Mode to see if that addresses this problem.

This restricts the files and resources that are utilized to operate Windows to solve problems effectively.

Step 1: Select the Windows button first and then hover over the Power Icon to start your Windows 10 machine in safe mode.

Step 2: Next, pick Reset as soon as you hold down the Shift key.

Step 3: Click Troubleshoot > Advanced on the window that displays. Select Start-Up Settings under Advanced Settings, and then Reset. There will be more alternatives. To enable safe mode or to enable the safe mode with networking, you can either press 4 or 5. You will then restart your computer in Safe Mode.

dns4

Step 4: You can restart the program in safe mode by navigating to power > restart if you have Windows 7 or earlier. Then hold down the F8 key while it is booting up.

dns9

Try to browse the website again after your computer is in safe mode. If the network connection does not seem to be an issue, a third-party installation or software, for example, an antivirus application, could be the root of the problem.

Fix 3: Disabling the secondary links

Another alternative option is to deactivate any secondary connections available on your device if your antivirus software or firewall was not disabled. You want to make sure you just have the connection that you are using.

Step 1: Type in the search box on your desktop taskbar in Windows the name of “Network connections.” Next click on the Network Links display.

Step 2: This will take you to the Connections Network page. Any connections that you presently do not use will be accompanied by a red (X). Right-click one and select Disable it.

dns5

Step 3: Repeat for any other links not active at the moment. After you’ve finished your browser restart and again try to visit the site.

Fix 4: Unable the peer to peer functionality in Windows

If you use Windows and the “DNS Server Not Responding” error message is not addressed by removing your firewall or secondary connections then you can try one more alternative: the “Peer-to-Peer” (P2P) option. Note: It’s just something in Windows 10 you’ll find.

This function helps to maintain the bandwidth of your system download. Basically, a Windows update can be downloaded one time, and then your device is used to distribute the latest version on other computers on your local network.

Sadly, sometimes DNS processes might also be interrupted. It is therefore worth noting if this solves your currently confronted error message.

Step 1: For this purpose, click the Windows symbol, then click on the Settings > Security & Update.

Step 2: Select Delivery Optimization in the window on the left side.

Step 3: Touch the switch next to the ‘Allow other PC downloads’ option to turn it on.

dns1

Fix 5: Start your Router again

You will restart your router the next step in troubleshooting. This will flush the cache of your router into the “DNS Server Not Responding” message solution.

Most modems have a power button to power them off quickly. Turn on your modem after a minute or so and wait until a connection has been restored. Once done, check to see if you can use your browser to access the internet.

dns6

Note that it is sometimes not enough just to restart the router. Maybe you want to restart it by completely unplugging it and then wait at least 30 seconds for it to be plugged in and recharged.

Fix 6: Flush the cache of the DNS and reset the IP

It is time to focus your attention on your DNS settings when you have deleted your browser, antivirus, and router, as the problem source. As for the cache of the router, you may need to clear your DNS or your IP may need a reset before the cache is successfully connected to the internet.

Step 1: When you use Windows, start by type “cmd” to the taskbar search area and then select the Prompt application command.

Step 2: Enter “ipconfig/flushdns” in the opened box and click Enter.

DNS Server Not Responding:

Step 3: When the operation is completed, a notification will show that the DNS cache has been flushed successfully. Repeat the following commands for this process:

ipconfig /registerdns

ipconfig /release

ipconfig /renew

DNS Server Not Responding: Command Prompt

Fix 7: IPv6 deactivated

IPv6 is the latest version of the Internet Protocol that supports network-to-internet traffic. Sadly, the “DNS Server Not Responding” notice you are presently viewing may be behind it as well.

So IPv6 on your computer is disabled as another possible solution to attempt.

Step 1: Open your Network Connections control panel in Windows to achieve this, then right-click the link. Select Properties from the drop-down menu:

Step 2: Scroll down to the Internet Protocol Version 6 (TCP/IPv6) on the Networking tab of the panel that opens.

Step 3: Unselect the box, and click on OK if it’s chosen. Renovate your browser and attempt again to connect to the internet.

DNS Server Not Responding: Wireless Network Connection Properties

Conclusion

For the fast loading of the content requested by the users, DNS is responsible. It also guarantees smooth internet content transmission.

You should keep in mind to flush the cache when the network speed increases. However, the server must request an IP again to visit the site and connect the user to the server. Moreover, following the said fixes sequentially will surely help to resolve the error and ensure a happy browsing time for you.

5 Amazing PHP Hosting Providers (No.1 is our Favourite)

Let’s talk about PHP Hosting today.

But first, let’s discuss why it is important.

With no second thoughts, you would agree PHP is a powerful scripting language that can be used to design some of the most appealing websites.

Popular websites such as Facebook, Yahoo, Wikipedia, and some others use PHP. This is one of the reasons why PHP hosting has gained immense popularity in the past few years.

Choosing the right PHP hosting provider is equally important so that your PHP based website can run smoothly with no hiccups.

Technical capabilities, performance, scripting support, ease of usage and certainly the pricing of the hosting plan pays a key role in deciding if the PHP hosting platform is suitable for your requirement.

What is HTTP 507 Insufficient Storage Status Code and How to fix it?

Seeing an error appear on a website or page is something portal owners find frustrating. The HTTP 507 Insufficient Storage, could be those troublesome bugs.

HTTP 507 Insufficient Storage Error

It shows up in the browser when there’s inadequate space on the server or device. The browser is attempting to produce the webpage you’re pushing to get. It’s a typical concern for site administrators.

But, what is the 507 Insufficient Storage status exactly?

The 5xx group responses usually suggest an issue with the server. The web server experienced a problem, and the browser couldn’t meet the submission.

Moreover, the server could not provide help because something went wrong. It may make resolution challenging.

The 507 “low memory” implies that a function couldn’t achieve execution. The back-end server might not have the prototype to finish the portal submission.

This state is usually transient. If the demand for this HTTP message resulted from a single end-user activity, it mustn’t repeat. It must repeat only when there’s a different user activity and request.

Common Causes of 507 Insufficient Storage Error

This issue is often a communication glitch between the owner’s server and the browser. Nothing significant or alarming. But, it may sometimes be easy to determine what led to this since it’s a rare case.

Storage

A person requires certain knowledge-specific things if the portal obtains a 507 level. The factors mentioned below may be the causes of this problem.

  • A 507 state tells an HTTP web server there’s a failure in the end-user browsers. The browser’s POST or PUT caused this since the data was too big to store on the system.
  • Third-party plugins generally produce this error. They may lead to incorrect PHP code or server-side scripting. It may also lead to a lost database connection. Sometimes, WordPress sites use obsolete plugins or templates, which could also be why.
  • The hardware or software drivers for an external memory are obsolete. It may occur if the driver installation is missing.
  • It may be due to inadequate server aids, such as less HDD memory.
  • It may also be due to exhausting physical memory and certain RAM constraints.
  • Server-side functions, such as zombie processes, could also be the reason. These processes’ termination cannot happen in an instant.
  • One factor is the increasing value of the input or output resources on the web-server hard drive. This figure often rises when owners install adjustments to the portal. Owners may add extra modules and upload materials. Enormous site traffic volume can also be the cause.

How can we fix the HTTP 507 Insufficient Storage error ?

An intriguing aspect is now approaching. A 507 state is often as easy to fix as it gets. It may be as simple as extending computing memory from the owner’s perspective.

There are solutions to the portal’s inadequate storage problem.

  • One may resolve this by raising the standard hosting package they usually have.
  • The developer could try optimizing the repositories if there’s excess page traffic. It ensures the repositories have adequate room for transient data. Application scripts that test performance metrics help a long way. It should steer your server.
  • Owners can boost the scope of the server by executing a program. It can help advance the server towards its prior capacity. It helps when the back-end arrives at a 95 percent cap.
  • The portal might have reached the memory limit if it’s a PHP-based server. Try increasing the RAM capacity in the php.ini system file. For example, you can tweak the syntax: memory_limit = 1024M. Php.ini is often at /etc/php/8.0/apache2/php.ini.

PHP 8.0

Using XAMPP Application

Step 1: Click on “Config,” then click “PHP or php.ini”

xamp 507 Insufficient Storage

Step 2: Then open it in an editor. Then click “Ctrl-F” and type “memory_limit.” Finally, delete the previous value and initialize it with the desired one. “M” refers to the size in Megabyte.

1024m

  • Examine the domain logs causing it (a single server may host several sites). Although you are using a hosted portal, you may get a backup of the system log to investigate.
  • Or the server may need to restart. Owners may call the hosting company for extra details on the 507.
  • You could also roll back the recent and new installations till the issue is resolved.

Although this is often a server error, the end-user may be competent to circumvent the issue. The following are some other approaches to resolving the client-side browsing issue.

  • Clear the cache and remove the page’s cookies.

Claer Cache 507 Insufficient Storage

  • Also, delete all the browser data. On the browser toolbar in Chrome, choose “More tools,” then “Clear Browsing Data.”

Clear Data 507 Insufficient Storage

How to avoid the HTTP 507 Insufficient Storage error?

The viewpoint of the developer is different from that of the end-user. As a site manager, one can avoid the 507 messages. Below are a few options for developers to override this error.

  • One could avoid this challenge by updating their dedicated server.
  • One may reduce the web assets and materials on the web pages to free up storage space.
  • Only use web plugins that your portal requires. Delete the ones that are not efficient.
  • Examine the add-ons to see which one is using the utmost capacity. To operate many apps at once, they need memory.      So the server admins allow PHP and other services a certain amount of memory. You may encounter the below error.

8080 507 Insufficient Storage

Let us look at how to boost storage capacity.

1) The root folder is where you may find the document to tweak

Root Folder 507 Insufficient Storage

2) Furthermore, add the below snippet into the wp-config.php document. Do it before the statement, “Stop editing. Happy blogging.”

512M

  • Reduce the size of the graphics like animations, images, and videos on your portal.

Deploy a memory-caching system like “Memcached” to augment the portal’s performance. Memcached is for caching server-side results, sessions, web pages, and APIs. It also caches pictures, documents, and metadata.

These systems allow you to grow to meet increased storage demands. They can offer cached objects in less than a millisecond.

Step 1: Deploy the Memcached extension. For Linux users, type the below module into the terminal. Then restart the server.

Memcached

Step 2: Make a sample.php file and place it in the website’s root to verify the application.

Sample

Next, paste the below script into the file and save it.

Step 3: Then navigate to the file location as illustrated below in your browser. Don’t forget to substitute the IP address of your server with 172.16.0.1.

172.16.0.1/sample.php

sample.php 507 Insufficient Storage

The above illustration shows that Memcached supports.

  • While utilizing 507 responses in REST APIs, you’ll wish to replace an error. It can be when an end-user heads towards insufficient memory. Then we can return a message informing them, “You exceeded the capacity.” Rather than “Our servers are insufficient.”

Conclusion

507 Insufficient storage isn’t the severest of all the problems on a hosting server. Yet, it remains a source of concern. To ensure the longevity of an online company, one must comprehend each status group.

The 500 HTTP ones are important for servers. Boosting the portal’s memory cap and functionality is an effective resolution technique.

Frequent maintenance and inspection guarantee you’ll always provide a fantastic client experience. In such situations, having a developer on your team may benefit website owners.

From this, you may better understand what to expect from a developer.

9 Best Free WordPress Themes for Musicians: Handpicked Collection

If you are looking to Free WordPress themes for Musicians, then you have come at the right place.

WordPress is one of the most preferred platforms for website building. It is popularly known to facilitate the building of intuitive websites.

Creating a musician’s website is equalling simple using WordPress customizations. WordPress provides an extra touch of creativity with its themes.

A musician’s website needs to be creative, appealing, and quick to load. A known fact is, a well-designed website can do magic to your business.

So, you have taken up the task of building a musician based website. That’s amazing!!

Believe me, not all themes are suitable for building a musician’s website.