
What is WordPress HTTP error?
WordPress HTTP error indicates that something went wrong during the file upload process. For example, when you try to add an image or other files to the media library, the WordPress HTTP error usually occurs.

Unfortunately, unlike browser problems, which generally have an HTTP status code, WordPress errors can be a little more challenging to diagnose. However, there’s no need to fear because this post will show you the top 11 strategies to fix the HTTP WordPress issue.
Furthermore, whether you’re uploading an image, a video, a PDF file, or any other file type that WordPress supports, the following methods will work for you.
11 Ways to Fix WordPress HTTP error
Fix 1: Confirming HTTP error.
A WordPress HTTP error can occur due to a momentary server issue. Before you try any of the suggestions in this article, make sure the mistake is always present. Start by waiting a few minutes and then re-uploading the media file. If the second try succeeds, it’s possible that a transient difficulty caused the error.
If the problem persists, continue reading for more solutions.
Fix 2: Clearing the browser cache.
Clear your browser cache before attempting any further options. Here’s how to go about it:
Step 1: Click on the three dots in the browser’s top right corner.
Step 2: Move to the “Settings” option and then go to “Privacy and Security.”
Step 3: Now click on “Clear Browsing data” and tick on all the checkboxes.
Step 4: Now click on “Clear data” and then try re-uploading the files.

If the issue remains, move on to the next step.
Fix 3: Renaming the file and then retrying.
Another simple option is to make sure your file’s name does not have any special characters. A Few examples of punctuation marks are semicolons and apostrophes and they should be removed. Try to upload the file after removing these special characters.
Fix 4: Resizing the file.
Your web host determines the maximum file size you can upload to your WordPress site. The file size that is permitted might range from 2MB to 150MB. This error will occur if the file size exceeds the specified limit. Compress your file before re-uploading it.
There are a plethora of internet applications that can help you reduce the file size. You can also use image optimization plugins like Imagify.
Compressing photos, in general, is a good idea because it reduces website load time and improves SEO. However, it’s recommended to have smaller file sizes unless you’re a photographer or need high-resolution photographs on your site.
Try to upload the files again, and if the WordPress HTTP Error still occurs, try the other options to resolve it.
Fix 5: Switching browsers.
Users occasionally report HTTP issues when using one browser but not the other. Changing browsers may assist you in determining whether or not the problem is due to your website. If you can upload the file in another browser, you should contact your chosen platform’s support to figure out what’s causing the problem.
Fix 6: Checking the PHP version
WordPress requires PHP 5.2.4 or higher to work smoothly since version 3.2. If you don’t do this, you’ll end up with an HTTP error. In addition, some hosts utilize outdated versions of PHP, which means you won’t be able to upload photos to the WordPress media library no matter what you do. So, make sure your host is running PHP version 5.2.4 or higher.
Fix 7: Deactivating the plugins.
Plugins, particularly those linked to image optimization, are sometimes to blame. Deactivate them and try again to submit your image. Then, follow the steps to do it in just a few seconds:
Step 1: Go to the Plugins section from your WordPress Dashboard.
Step 2: Deactivate the Plugins by clicking on them.

If this resolves the problem, contact the plugin’s developer to see if they can assist you in determining the error.
Fix 8: Increasing the PHP memory limit.
If all else fails, your server may be running out of memory. Increase the limit to the recommended 256 MB to fix this. Then, follow the steps for it:
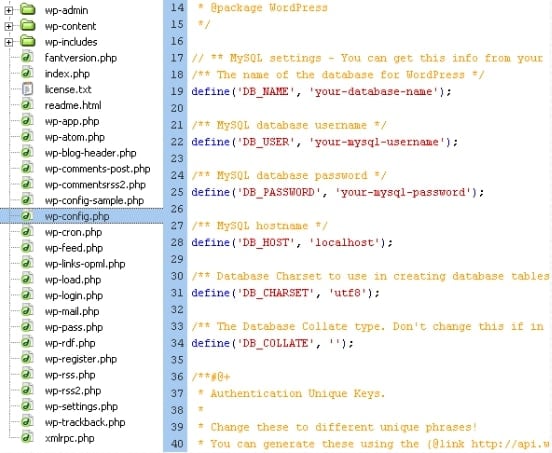
Step 1: open the wp-config.php file.
Step 2: Add the following code to your wp-config.php: define(‘WP MEMORY LIMIT’, ‘256M’);
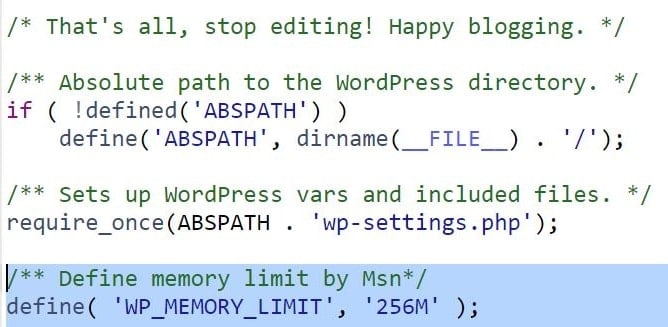
Now try uploading the file again.
Fix 9: Editing the .htaccess file.
The .htaccess file is located in the root folder of your WordPress installation and serves as a gatekeeper for various functions. It manages where requests are sent, among other things. Open .htaccess:
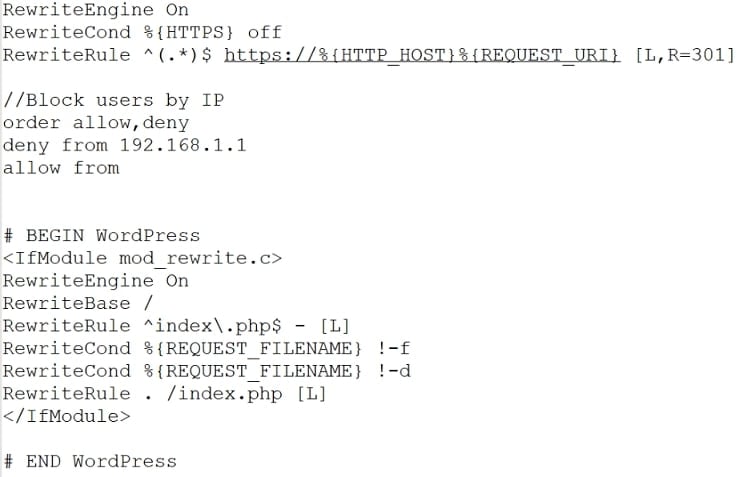
Now, add the following code to fix the HTTP issue in WordPress:
SetEnv MAGICK_THREAD_LIMIT 1
After that, try adding your file again to check if the problem has been resolved. If that doesn’t work, here are some other code snippets to try:
SecFilterEngine Off
SecFilterScanPOST Off


or

<filesmatch "(async-upload\.php|wp-cron\.php|xmlrpc\.php)$"="">
Satisfy Any
Order allow,deny
Allow from all
Deny from none
Try implementing them one at a time, saving your changes before re-uploading your media file.
Fix 10: Changing the library for the image editor
WordPress comes with two image editors by default:
- imagick
- GD Library
Both of these terms will be used interchangeably by WordPress. Imagick, on the other hand, is known to have memory problems and is more likely to throw HTTP errors. The solution is to add a snippet of code to our functions.php file that forces WordPress to use the GD Library.
In wp-content > themes > your-theme, functions.php is located in the theme or child theme folder.
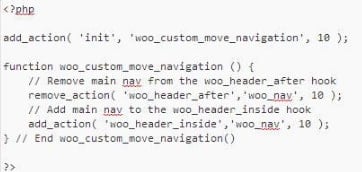
Add the following snippet at the very end, ensuring sure you’re within PHP tags:
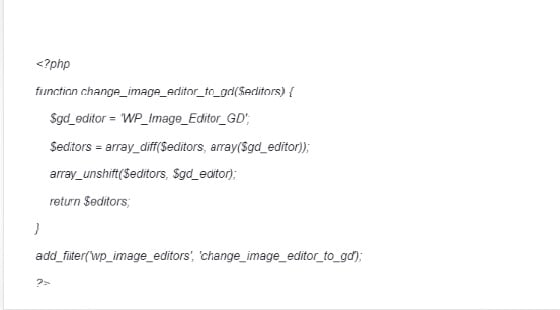
Save your modifications, then upload the file and attempt again to upload an image.
Fix 11: Asking the WordPress host for help to fix WordPress HTTP Error.
If you’ve previously done the instructions above and are still experiencing the WordPress HTTP issue, we suggest contacting your WordPress host for help before continuing. Many of the subsequent troubleshooting tasks are a little more technical, and you can often have your host perform or check these for you.
Conclusion:
When you get an WordPress HTTP error when uploading photographs to WordPress, it’s not the most pleasing feeling in the world. However, one of the remedies listed above will permanently resolve this issue.