
Today I am going to show you how to start a blog from scratch. And you won’t believe how easy it is to do.
So, let’s start your blogging journey!
We will need 4 things:
- Doména – Domain is the name of the blog which you type in the browser address bar. “www.HostingPill.com” is the domain of this site.
- hosting – Hosting is the “home” of your blog where it will “stay”. It is usually a server at a web hosting company.
- WordPress – WordPress is the “software” that will power your new blog.
- Dizajn a témy – To make your blog attractive design-wise you will need to install WordPress themes.
Ďalšie informácie o typy webových stránok môžete vytvárať pomocou WordPress a vedieť, ako môžete protect the blog akonáhle je hore.
Existujú dva spôsoby, ako si môžete kúpiť domény a hosting:
- Domény a hosting kupujete od rovnakého webhostingu
- Alebo si kúpite oboje samostatne
If you ask me, I would recommend going for Option 2 (buying separately) for two reasons:
- Lepšie ponuky získate, keď nakupujete domény a hostíte samostatne.
- Riziko znižujete nákupom od samostatných spoločností.
Odporúčam Namecheap za získanie domén a Bluehost pre webhosting.
Namecheap, pretože názov napovedá o predaji doménových mien za dobrú cenu, nie je preto potrebné kupovať vašu doménu a hosťovať ju od rovnakého dodávateľa, takže som nakupoval.
Bluehost - Som a využitím Bluehost už asi 8 rokov pre niektoré z mojich stránok a zistili, že sú dosť spoľahlivé.
In this step by step guide, I’m going to buy a domain, set up web hosting, install WordPress, configure WordPress and then talk about how you can make money blogging.
 Ako založiť blog
Krok 1. Zaregistrujte svoju doménu
POZNÁMKA: Ak už vlastníte doménu, môžete ju preskočiť a prejsť priamo na stránku
Ako nastaviť hosting pre WordPress Sekcia.
Najprv je na čase kúpiť doménu. Budete chcieť premýšľať o tom, ktorú doménu chcete a čo hovorí o vašom blogu WordPress.
Verte mi, výber správneho názvu domény je v súčasnosti náročná úloha, pretože všetky „dobré sú už preč“.
Možno si ich budete chcieť pozrieť 7 tipov pre doménové meno to get the right name for your site or you can use these tools to generovať nápady na názvy domén.
Once you have listed some of the domain name options, it’s time to check their availability.
A preto postupujte podľa nasledujúcich krokov:
Krok 1. Prejsť www.Namecheap.com a do poľa pre vyhľadávanie domény zadajte požadovanú doménu.

Krok 2. If your domain is available then add it to the cart, consider also purchasing other TLD (Top level domains) of your name, for example, if your domain is ‘mytestdomain.com’ you might also want to pick up ‘mytestdomain.net’ and ‘mytestdomain.org’.
If your domain isn’t available, you’ll have to think of something else!

Krok 3. Click on ‘View Cart’. Make sure everything is as you expect and double-check your domain name is spelled correctly. If you are buying a .com domain, you will notice that you also must pay a small ICANN fee.

Krok 4. Potvrďte objednávku, odporúčame vám nastaviť doménu na automatické obnovenie.

Krok 5. Teraz vás požiada o vytvorenie účtu, vyplnenie všetkých údajov a nezabudnite si zapamätať heslo!

Krok 6. Na nasledujúcej stránke sa vyžaduje, aby ste vyplnili kontaktné informácie svojho účtu. Ak ste sa nezvolili na ochranu súkromia domény, táto informácia je verejná pre kohokoľvek, kto ju môže vidieť. Kliknite na tlačidlo Pokračovať.

Krok 7. Pay for your domain, you can choose from a credit card or PayPal. Click ‘Continue’ and that’s it, you are now the proud owner of your new domain.

Krok 2. Nastavte hosting pre WordPress
Výber right web hosting company is a very important factor in starting a blog.
Trh je zaplavený stovkami spoločností poskytujúcich webhosting a využívajú všetky taktiky na to, aby získali vaše podnikanie.
I have listed & answered few questions that most first-time site owners have about hosting.
Môžete ich vidieť tu.
Teraz, keď ste pripravení, poďme na náš hosting.
We will setup your Bluehost account to start your first blog.
It offer a free domain (on Annual plans) and a 30 day money back guarantee, so you never have to worry about anything.
Krok 1. Prejsť www.Bluehost. S a kliknite na tlačidlo Začíname.

Krok 2. Vyberte plán, ktorý chcete kúpiť. Pre toto ukážku pôjdeme s ich základným plánom.

Krok 3. On this page, depending on whether you have a domain or want to get a new one, you can make your selection.

Krok 4. Once you have the domain, it’s time to enter your contact details.

Krok 5. Teraz vyberte plán, pre ktorý chcete ísť. Čím dlhšie vyberiete termín, tým viac získate zľavu.

Krok 6. Zadajte podrobnosti o svojej kreditnej karte a vykonajte platbu.

Krok 7. Po dokončení vytvorte svoje heslo na tejto obrazovke (nezabudnite si ho niekde uložiť, aby ste ho mohli v budúcnosti použiť)

Krok 8. Now that you have created the password, it’s time to login!

Krok 3. Pripojte svoju doménu k hosťovaniu
Po zakúpení hostiteľa programu WordPress od Bluehost budete musieť nastaviť svoj Namecheap doména, na ktorú odkazuje tento hosting.
Krok 1. Prihláste sa k svojmu BlueHost account
Krok 2. Kliknite na nastavenie domény
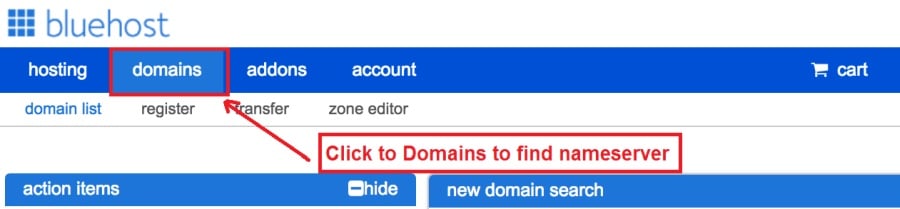
Krok 3. Click on the ‘Nameservers’ tab
Here are the default Nameservers of Bluehost:
NS1.Bluehost. S
NS2.Bluehost. S

Krok 5. Go to Namecheap and Login.
Krok 6. Once you logged in go Domain List ==> Domains ==> Select Domain ==> Select Manage ==> Under NameServers, select Custom and place your Bluehosttam sú mienní správcovia

Krok 7. Kliknite na tlačidlo Uložiť zmeny.
Dokončenie tejto zmeny môže trvať až 24 hodín, takže sa nemusíte báť, že ihneď nefunguje.
Krok 4. Nainštalujte WordPress
Next, we need to install WordPress on the Bluehost Hosting.
BTW, WordPress is a blogging platform for writing blog posts.
Našťastie Bluehost má automatickú inštaláciu, takže vám ukážem, že.
Krok 1. Prihlásiť sa Bluehost

Krok 2. V sekcii webovej stránky kliknite na „Inštalovať WordPress“

Krok 3. Vyberte doménu, ktorú chcete použiť pre túto inštaláciu WordPress, pravdepodobne budete mať iba jednu doménu. Pole adresára nechajte prázdne.

Krok 4. Now enter your blog name (can be changed later), username, email address, and password. Make sure to keep a note of these details. Make sure your password is secure, use an online password randomizer if possible, people will try to breach your WordPress blog.

Krok 5. V hornej časti stránky môžete sledovať postup inštalácie, ale inštalácia zvyčajne trvá 5 minút.


Ako vidíte, inštalácia WordPress je jednoduchá.
Now you can browse to http://yourdomain.com/wp-admin to login.
Step 5. Create a Blog in WordPress
Let’s get logged into the new WordPress blog.
1. Prejdite na adresu http://yourdomain.com/wp-admin a zadajte svoje používateľské meno a heslo.

2. Teraz by ste mali vidieť administračný panel.

Po prihlásení sa oplatí roztriediť niekoľko vecí skôr, ako prejdeme k témam, doplnkom a pridávaniu obsahu.
Prispôsobte titul a nastavte titulnú stránku
Po inštalácii programu WordPress sa vždy snažím nastaviť niekoľko vecí
Settings -> General Settings. Here you can set your blog title, tagline, main email address, time zone, date format & Language. Make sure you set all of these things correctly now, as it may come back to haunt you if you don’t!

Settings -> Reading. Here you can decide what function you want your WordPress blog to take. You can set your front page to take people straight into the blog post or you can set which static page you want to be your home page.

To je všetko, čo teraz potrebujeme. Môžeme prejsť na zaujímavejšie veci!
Ako vytvorím nové stránky a príspevky?
To add new pages, go to Pages -> Add new, fill in your title, add some content and click publish. If you aren’t ready to publish the page, click draft.

To add a new post go to Posts -> Add New, it’s then the same procedure as above.

Ako pridať stránky / príspevky do ponuky
To add these pages to the menu, go to Appearance -> Menu. Select your menu and select ‘add to menu’, you can then drag and drop to arrange it.

Témy a dizajn
With WordPress, it’s really easy to create any design you can imagine without writing a single piece of code. And that is made possible only by WordPress themes.
WordPress has a lot of free theme designs to choose from.
Ako nájsť perfektnú tému WordPress
Ak tu nenájdete, čo hľadáte, môžete si tu vybrať z viacerých možností:
Themeforest – One of the oldest and the largest marketplace for WordPress theme. You get tons of high-quality themes at reasonable prices.

Kreatívny trh – A newer marketplace with quite a variety of WordPress themes. The themes on this site are quite different in terms of design than what you get on Themeforest.

GretaThemes – Another great platform where you can get free and premium beautiful WordPress theme for your site.

Astra – Astra is the most lightweight and fully customizable WordPress theme.

It provides basic and advanced design options for blogs, single blog pages with a dedicated Blog Pro addon. Astra works seamlessly with all popular page builders like Beaver Builder, Elementor, etc.
How do I Install WordPress Theme
To install a new theme for your WordPress blog, follow these steps:
Krok 1. Po prihlásení do správcovského panela vyberte položku „Vzhľad“ a potom motívy z ponuky naľavo.

Krok 2. Kliknite na tlačidlo „Pridať nové“
Krok 3. Search for your WordPress theme using the search bar at the top right. If you have been provided a theme file you can select upload theme from the top of the page.

Krok 4. Kliknite na tlačidlo Inštalovať
Krok 5. After a minute or so the new theme will finish installing. Now you can click customize and see what options you can change. This will vary a lot from theme to theme but usually, you can edit things like your logo, the rough layout of the page and some colors.


Inštalácia doplnkov
Čo je to doplnok?
Plugins – as the name suggests are tools that add functionality to your WordPress blog. The best thing which I like about WordPress is – these plugins.
Plugins can turn your site from a simple blog to a fully-featured e-commerce store, a user forum, a video streaming site, a member’s only site, and much more. Of course, you can combine most of these plugins together to add huge functionality to your blog.
Napríklad, ak používate svoj web WordPress na predaj produktov online, môže byť užitočné pridať fórum na podporu.
Kedykoľvek chcete pridať funkčnosť na web WordPress, pozrite sa na doplnky skôr, ako sa pozriete na vytvorenie niečoho sami / zaplatenie vývojárovi, aby to urobil za vás.
Inštalácia doplnkov je jednoduchá. Rozhodujúcou časťou je rozhodovanie o tom, aké doplnky chcete nainštalovať. Existujú tisíce doplnkov dostupných zadarmo, existuje tiež veľa prémiových doplnkov.
Where I can find more WordPress Plugins?
Dva najlepšie zdroje na internete pre doplnky WordPress sú:
1. WordPress.org – Tons of free plugins! But beware – some of the plugins are demo versions of the paid ones. Still, it’s a good place to find what you are looking for.

2. CodeCanyon – Home to some of the best plugins on the internet. Although they are paid, they offer really good value for money. I usually get my plugins from here.

Existuje len niekoľko výhod, z ktorých sa dá platiť za platené doplnky CodeCanyon:
- You get 6 months of free support from the plugin developer. So, if something is not working, you can approach the plugin developer via CodeCanyon a oni to za vás opravia. Naviac môžete predĺžiť záručnú podporu o 12 mesiacov zaplatením nominálneho poplatku.
- Pluginy sú vysoko kvalitné, dôkladne skontrolované CodeCanyon. So, there are no chances of any malware in them. I had a bad experience in the past when I bought some free plugins from some random site.
Akonáhle ste sa rozhodli pre doplnok, tu je návod, ako ho nainštalovať.
Ako nainštalovať doplnok WordPress
Krok 1. From the Admin Dashboard select Plugins -> Add New
Krok 2. Vyhľadajte požadovaný doplnok alebo ho nahrajte, ak máte súbory

Krok 3. Kliknite na tlačidlo Inštalovať a dajte mu niekoľko minút na inštaláciu. Čím väčší bude doplnok, tým dlhšie bude inštalácia trvať.
Krok 4. From the Plugins -> Plugins page activate your plugin, depending on the plugin you are using you may then be prompted to fill in some additional settings.
Here are some of my favorite Plugins:
Doplnky zadarmo:
- Contact form 7 (Free)– This is a simple free email contact form for your blog. It’s easy to set up, always works, and doesn’t take up much space!
- Askimet (zadarmo) - Ak dokonca uvažujete o povolení komentárov vo svojom blogu WordPress, potrebujete doplnok spamu pre komentáre Askimet. Tento doplnok výrazne znižuje počet spamových komentárov, ktoré dostanete.
- Váš SEO (zadarmo) – Download this plugin before you download any. It’s a MUST HAVE plugin for SEO.
Platené doplnky:
- Vizuálny skladateľ (platené) – It’s THE BEST Page Builder for WordPress. Just drag and drop and you can create stunning page layouts in minutes. Love it!
- Ninja vyskakovacie okná (platené) – If you ever want to have the ability for the user to signup for your email newsletter from your blog, this is the plugin to have. Few clicks and you get a beautiful popup done.
- BackupGuard (Paid) – It’s too easy to accidentally break your WordPress blog when installing a 3rd Party Plugin or theme, make sure you always mať zálohy. And this plugin does just that. It’s a lifesaver!
Ako zarobiť peniaze z vášho blogu
Now that you have your WordPress blog nicely set up, with some content, a úhľadná téma WordPress, and some great functionality added by Plugins it’s time to monetize your blog! There are two core methods to for making money from your blog, and everything boils down to these
Partnerský:
Affiliate marketing is where you promote other company’s products directly and earn a commission from any sales made.
For example, say you have a football blog, you could add affiliate links to football boots in your posts and make a commission off any boots sold, typically this would be 5 – 15%.
Existujú stovky programov affiliate marketingu, mali by ste ich ďalej skúmať v závislosti od vášho výklenku, budete prekvapení, koľko spoločností má systémy. Amazonka offers one of the most popular ones, it’s easy too!
Add special affiliate links to ANY product on the Amazon and make a commission of 4 – 10%. Amazon may not be the best paying site (this will vary wildly depending on the niche of your blog), but they do offer a HUGE range of products.
inzeráty
Adverts are simple, got spare space on your blog, place an advert, often you will find these placed in the sidebar and within the content of any articles. Adverts can generate anything from $0.05 to $5 per click depending on the niche of your blog.
Google AdSense is the de facto online advertising company, simply fill in a 2-page signup form and you can start serving adverts to all your visitors. You don’t have to talk directly to companies to sell your advertising space.
Google’s advertising pay-outs differ massively from niche to niche, a highly competitive niche like credit cards, insurance, loans, etc.. will pay higher than less competitive ones.
Je to kvôli povahe inzerentov, ktorí ponúkajú ceny za umiestnenie svojho inzerátu. Čím viac tým „obľúbenejší“ váš blog, tým viac si môžete zarobiť.
Typically, you might expect something like a 0.5 – 3% click-through rate, i.e. the number of your visitors who actually click on the adverts.
Zvyčajne sa odporúča dobrá kombinácia oboch stratégií.
Ďalšie kroky
Now that your WordPress blog has been set up and you’ve monetized it’s time to start expanding and really pushing your blog.
Here are my top tips going forward:
- Naplánujte pravidelný obsah, you won’t always be in the mood to write content, use the built-in post scheduler so you can write multiple posts when you feel like it while still allowing regular content to flow. Articles every few days are better than 5 on the same day. Here is another Riešenie automatizácie WordPress.
- Dozviete sa všetko o SEO (search engine optimization) that you can, this is a huge topic, you will never fully learn it, but the more you know the more successful blog will be.
- Majte pozitívne, your blog will unlikely blossom overnight, it takes months of hard work, but in the end dedication and good content pays off.
Good luck and start blogging!


