
Today I am going to show you how to start a blog from scratch. And you won’t believe how easy it is to do.
So, let’s start your blogging journey!
We will need 4 things:
- дамен – Domain is the name of the blog which you type in the browser address bar. “www.HostingPill.com” is the domain of this site.
- хостынг – Hosting is the “home” of your blog where it will “stay”. It is usually a server at a web hosting company.
- WordPress – WordPress is the “software” that will power your new blog.
- Дызайн і тэмы – To make your blog attractive design-wise you will need to install WordPress themes.
Больш падрабязна пра тыпы сайтаў вы можаце ствараць з WordPress і ведаць, як вы можаце protect the blog як толькі ён падыме.
Ёсць два спосабы набыць дамены і хостынг:
- Вы купляеце дамены і хостынг у таго ж хостынгу
- Ці вы купляеце абодва асобна
If you ask me, I would recommend going for Option 2 (buying separately) for two reasons:
- Вы атрымліваеце лепшыя прапановы, калі вы робіце пакупкі даменаў і хостынг асобна.
- Вы зніжаеце рызыку, купляючы яго ў асобных кампаній.
я рэкамендую Namecheap для атрымання вашых даменаў і Bluehost для хостынгу.
Namecheap, як вынікае з назвы, прадаецца даменныя імёны па добрай цане, няма неабходнасці купляць ваш дамен і хостынг у таго ж пастаўшчыка, таму я пакупкі.
BlueHost - Я выкарыстанне Bluehost вось ужо каля 8 гадоў для некаторых маіх сайтаў і яны лічаць іх даволі надзейнымі.
In this step by step guide, I’m going to buy a domain, set up web hosting, install WordPress, configure WordPress and then talk about how you can make money blogging.
 Як пачаць блог
Крок 1. Рэгіструйце свой дамен
Заўвага: Калі ў вас ужо ёсць дамен, вы можаце прапусціць яго і адразу перайсці
Як наладзіць хостынг для WordPress падзел.
Перш за ўсё, пара набыць дамен. Вы хочаце падумаць, які дамен вы хочаце і што ён кажа пра ваш блог WordPress.
Паверце, выбраць правільнае даменнае імя сёння складаная задача, бо ўсе "добрыя ўжо пайшлі".
Вы можаце праверыць гэтыя 7 Саветы даменных імёнаў to get the right name for your site or you can use these tools to генераваць ідэі даменных імёнаў.
Once you have listed some of the domain name options, it’s time to check their availability.
Для гэтага выканайце наступныя дзеянні:
Крок 1. Да www.Namecheap.com і ўвядзіце патрэбны дамен у поле пошуку дамена.

Крок 2. If your domain is available then add it to the cart, consider also purchasing other TLD (Top level domains) of your name, for example, if your domain is ‘mytestdomain.com’ you might also want to pick up ‘mytestdomain.net’ and ‘mytestdomain.org’.
If your domain isn’t available, you’ll have to think of something else!

Крок 3. Click on ‘View Cart’. Make sure everything is as you expect and double-check your domain name is spelled correctly. If you are buying a .com domain, you will notice that you also must pay a small ICANN fee.

Крок 4. Пацвердзіце свой заказ, я б рэкамендаваў усталяваць дамен на Auto-Renew.

Крок 5. Цяпер ён будзе прасіць вас стварыць уліковы запіс, запоўніць усе дадзеныя і абавязкова запомніць пароль!

Крок 6. На наступнай старонцы просіць вас запоўніць кантактную інфармацыю вашага ўліковага запісу. Калі вы не выбралі канфідэнцыяльнасць дамена, то гэтая інфармацыя з'яўляецца агульнадаступнай для тых, хто іх можа бачыць. Націсніце "Працягнуць"

Крок 7. Pay for your domain, you can choose from a credit card or PayPal. Click ‘Continue’ and that’s it, you are now the proud owner of your new domain.

Крок 2. Настройка хостынгу для WordPress
Выбар right web hosting company is a very important factor in starting a blog.
Рынак затоплены сотнямі кампаній, якія займаюцца хостынгам, і яны выкарыстоўваюць усе тактыкі, каб атрымаць свой бізнес.
I have listed & answered few questions that most first-time site owners have about hosting.
Вы можаце іх убачыць тут.
Цяпер, калі вы гатовыя, давайце пераходзім на наш хостынг.
We will setup your Bluehost account to start your first blog.
It offer a free domain (on Annual plans) and a 30 day money back guarantee, so you never have to worry about anything.
Крок 1. Да WWW.Bluehost.com і націсніце кнопку "Пачаць".

Крок 2. Абярыце план, які вы хочаце набыць. Для гэтай дэманстрацыі мы пойдзем са сваім Асноўным планам.

Крок 3. On this page, depending on whether you have a domain or want to get a new one, you can make your selection.

Крок 4. Once you have the domain, it’s time to enter your contact details.

Крок 5. Цяпер выберыце план, які вы хочаце пайсці. Чым даўжэй абраны тэрмін, тым больш зніжак вы атрымаеце.

Крок 6. Увядзіце рэквізіты вашай крэдытнай карты і зрабіце плацеж.

Крок 7. Пасля гэтага створыце пароль на гэтым экране (не забудзьцеся захаваць яго дзе-небудзь для далейшай даведкі)

Крок 8. Now that you have created the password, it’s time to login!

Крок 3. Падключыце свой дамен да хостынгу
Такім чынам, пасля набыцця хостынгу WordPress ад Bluehost вам трэба будзе ўсталяваць сваё Namecheap дамен, каб паказаць на гэты хостынг.
Крок 1. Уваход у ваш BlueHost account
Крок 2. Націсніце на налады дамена
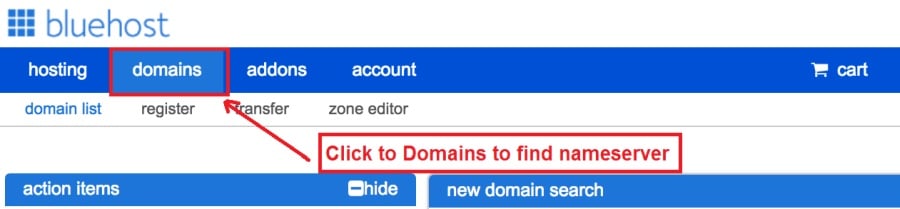
Крок 3. Click on the ‘Nameservers’ tab
Here are the default Nameservers of Bluehost:
NS1.Bluehost.com
NS2.Bluehost.com

Крок 5. Go to Namecheap and Login.
Крок 6. Once you logged in go Domain List ==> Domains ==> Select Domain ==> Select Manage ==> Under NameServers, select Custom and place your BluehostІмёны сервераў там

Крок 7. Націсніце Захаваць змены.
Гэта завяршэнне можа заняць да 24 гадзін, таму не хвалюйцеся, калі яна не працуе адразу.
Крок 4. Усталюйце WordPress
Next, we need to install WordPress on the Bluehost Хостынг.
BTW, WordPress is a blogging platform for writing blog posts.
ўдзячна Bluehost мае аўтаматызаваную ўстаноўку, таму я пакажу вам гэта.
Крок 1. Увайсці, каб Bluehost

Крок 2. У раздзеле вэб-сайта націсніце «Усталяваць WordPress»

Крок 3. Абярыце дамен, які вы хочаце выкарыстоўваць для гэтай ўстаноўкі WordPress, вы, верагодна, будзеце мець толькі адзін дамен. Пакіньце поле каталога пустым.

Крок 4. Now enter your blog name (can be changed later), username, email address, and password. Make sure to keep a note of these details. Make sure your password is secure, use an online password randomizer if possible, people will try to breach your WordPress blog.

Крок 5. Вы можаце адсочваць ход ўстаноўкі ўверсе старонкі, хоць звычайна ўстаноўка займае 5 хвілін.


Як бачыце, усталяваць WordPress проста.
Now you can browse to http://yourdomain.com/wp-admin to login.
Step 5. Create a Blog in WordPress
Let’s get logged into the new WordPress blog.
1. Перайдзіце на старонку http://yourdomain.com/wp-admin і ўвядзіце сваё імя карыстальніка і пароль.

2. Цяпер вы павінны мець магчымасць убачыць прыборную панэль адміністратара.

Пасля ўваходу ў сістэму варта разабрацца ў некалькіх рэчах, перш чым перайсці да тэмы, убудовы і дадання змесціва.
Наладзьце загаловак і ўсталюйце галоўную старонку
Ёсць некалькі рэчаў, якія я заўсёды люблю ўсталяваць адразу пасля ўстаноўкі WordPress
Settings -> General Settings. Here you can set your blog title, tagline, main email address, time zone, date format & Language. Make sure you set all of these things correctly now, as it may come back to haunt you if you don’t!

Settings -> Reading. Here you can decide what function you want your WordPress blog to take. You can set your front page to take people straight into the blog post or you can set which static page you want to be your home page.

Гэта ўсё, што нам сапраўды трэба ўсталяваць. Мы можам перайсці да больш цікавага!
Як ствараць новыя старонкі і паведамленні?
To add new pages, go to Pages -> Add new, fill in your title, add some content and click publish. If you aren’t ready to publish the page, click draft.

To add a new post go to Posts -> Add New, it’s then the same procedure as above.

Як дадаць старонкі / паведамленні ў меню
To add these pages to the menu, go to Appearance -> Menu. Select your menu and select ‘add to menu’, you can then drag and drop to arrange it.

Themes & Design
With WordPress, it’s really easy to create any design you can imagine without writing a single piece of code. And that is made possible only by WordPress themes.
WordPress has a lot of free theme designs to choose from.
Як знайсці ідэальную тэму WordPress
Калі вы не можаце знайсці тое, што шукаеце тут, вы можаце пайсці на большы выбар тут:
ThemeForest – One of the oldest and the largest marketplace for WordPress theme. You get tons of high-quality themes at reasonable prices.

Крэатыўны рынак – A newer marketplace with quite a variety of WordPress themes. The themes on this site are quite different in terms of design than what you get on Themeforest.

GretaThemes – Another great platform where you can get free and premium beautiful WordPress theme for your site.

Astra – Astra is the most lightweight and fully customizable WordPress theme.

It provides basic and advanced design options for blogs, single blog pages with a dedicated Blog Pro addon. Astra works seamlessly with all popular page builders like Beaver Builder, Elementor, etc.
How do I Install WordPress Theme
To install a new theme for your WordPress blog, follow these steps:
Крок 1. Пры ўваходзе ў панэль адміністратара выберыце "Знешні выгляд", а затым тэмы з левага меню.

Крок 2. Націсніце кнопку "Дадаць новую"
Крок 3. Search for your WordPress theme using the search bar at the top right. If you have been provided a theme file you can select upload theme from the top of the page.

Крок 4. Націсніце кнопку Устанавіць
Крок 5. After a minute or so the new theme will finish installing. Now you can click customize and see what options you can change. This will vary a lot from theme to theme but usually, you can edit things like your logo, the rough layout of the page and some colors.


Ўстаноўка убудоў
Што такое убудова?
Plugins – as the name suggests are tools that add functionality to your WordPress blog. The best thing which I like about WordPress is – these plugins.
Plugins can turn your site from a simple blog to a fully-featured e-commerce store, a user forum, a video streaming site, a member’s only site, and much more. Of course, you can combine most of these plugins together to add huge functionality to your blog.
Напрыклад, калі вы выкарыстоўваеце свой сайт WordPress для продажу прадуктаў у Інтэрнэце, можа быць карысным дадаць форум для падтрымкі.
Кожны раз, калі вы хочаце дадаць функцыянальнасць на сайт WordPress, паглядзіце на убудовы, перш чым паглядзець на тое, каб стварыць што-небудзь самастойна / заплаціўшы распрацоўшчыку, каб зрабіць гэта за вас.
Ўстаноўка плагінаў простая, цвёрдая частка вырашае, якія ўбудовы трэба ўсталяваць. Ёсць тысячы убудоў, даступных бясплатна, таксама шмат платных убудоў.
Where I can find more WordPress Plugins?
Два лепшыя рэсурсы ў Інтэрнэце для WordPress убудовы:
1. WordPress.org – Tons of free plugins! But beware – some of the plugins are demo versions of the paid ones. Still, it’s a good place to find what you are looking for.

2. CodeCanyon – Home to some of the best plugins on the internet. Although they are paid, they offer really good value for money. I usually get my plugins from here.

І ёсць некалькі добрых якасцяў для платных убудоў CodeCanyon:
- You get 6 months of free support from the plugin developer. So, if something is not working, you can approach the plugin developer via CodeCanyon і яны выправяць гэта за вас. Больш за тое, вы можаце падоўжыць гарантыйную падтрымку на 12 месяцаў, заплаціўшы намінальную плату.
- Убудовы высокай якасці, старанна правяраецца CodeCanyon. So, there are no chances of any malware in them. I had a bad experience in the past when I bought some free plugins from some random site.
Пасля таго, як вы вызначыліся з убудовам, вось як усталяваць яго.
Як усталяваць убудова для WordPress
Крок 1. From the Admin Dashboard select Plugins -> Add New
Крок 2. Знайдзіце патрэбны убудова альбо загрузіце яго, калі ў вас ёсць файлы

Крок 3. Націсніце Усталяваць, і дайце яму некалькі хвілін, каб усталяваць, чым больш убудова, тым больш часу спатрэбіцца для ўстаноўкі.
Крок 4. From the Plugins -> Plugins page activate your plugin, depending on the plugin you are using you may then be prompted to fill in some additional settings.
Here are some of my favorite Plugins:
Бясплатныя убудовы:
- Contact form 7 (Free)– This is a simple free email contact form for your blog. It’s easy to set up, always works, and doesn’t take up much space!
- Askimet (бясплатна) - Калі вы нават разглядаеце магчымасць дазволу каментарыяў да вашага блогу WordPress, вам патрэбен убудова спам-камента Askimet. Гэты убудова значна памяншае колькасць спам-каментаў, якія вы атрымаеце.
- Yoast SEO (бясплатна) – Download this plugin before you download any. It’s a MUST HAVE plugin for SEO.
Платформы:
- Візуальны кампазітар (платна) – It’s THE BEST Page Builder for WordPress. Just drag and drop and you can create stunning page layouts in minutes. Love it!
- Сплываючыя ніндзя (платна) – If you ever want to have the ability for the user to signup for your email newsletter from your blog, this is the plugin to have. Few clicks and you get a beautiful popup done.
- BackupGuard (Paid) – It’s too easy to accidentally break your WordPress blog when installing a 3rd Party Plugin or theme, make sure you always ёсць рэзервовыя копіі. And this plugin does just that. It’s a lifesaver!
Як зарабіць грошы з вашага блога
Now that you have your WordPress blog nicely set up, with some content, a гладкая тэма WordPress, and some great functionality added by Plugins it’s time to monetize your blog! There are two core methods to for making money from your blog, and everything boils down to these
партнёрская:
Affiliate marketing is where you promote other company’s products directly and earn a commission from any sales made.
For example, say you have a football blog, you could add affiliate links to football boots in your posts and make a commission off any boots sold, typically this would be 5 – 15%.
Ёсць сотні партнёрскіх маркетынгавых схем там, вы павінны вывучыць гэта далей у залежнасці ад вашай нішы, вы былі б здзіўлены, колькі кампаній маюць схемы. амазонка offers one of the most popular ones, it’s easy too!
Add special affiliate links to ANY product on the Amazon and make a commission of 4 – 10%. Amazon may not be the best paying site (this will vary wildly depending on the niche of your blog), but they do offer a HUGE range of products.
аб'явы
Adverts are simple, got spare space on your blog, place an advert, often you will find these placed in the sidebar and within the content of any articles. Adverts can generate anything from $0.05 to $5 per click depending on the niche of your blog.
Google AdSense is the de facto online advertising company, simply fill in a 2-page signup form and you can start serving adverts to all your visitors. You don’t have to talk directly to companies to sell your advertising space.
Google’s advertising pay-outs differ massively from niche to niche, a highly competitive niche like credit cards, insurance, loans, etc.. will pay higher than less competitive ones.
Гэта звязана з характарам рэкламадаўцаў, якія праводзяць таргі, каб размясціць сваю рэкламу, у тым самым больш "папулярным" блогу, тым больш вы можаце зарабіць.
Typically, you might expect something like a 0.5 – 3% click-through rate, i.e. the number of your visitors who actually click on the adverts.
Звычайна рэкамендуецца спалучэнне абедзвюх стратэгій.
Наступныя крокі
Now that your WordPress blog has been set up and you’ve monetized it’s time to start expanding and really pushing your blog.
Here are my top tips going forward:
- Расклад рэгулярнага зместу, you won’t always be in the mood to write content, use the built-in post scheduler so you can write multiple posts when you feel like it while still allowing regular content to flow. Articles every few days are better than 5 on the same day. Here is another Рашэнне аўтаматызацыі WordPress.
- Даведайцеся ўсё пра SEO (search engine optimization) that you can, this is a huge topic, you will never fully learn it, but the more you know the more successful blog will be.
- Захоўвайце пазітыў, your blog will unlikely blossom overnight, it takes months of hard work, but in the end dedication and good content pays off.
Good luck and start blogging!


