
Today I am going to show you how to start a blog from scratch. And you won’t believe how easy it is to do.
So, let’s start your blogging journey!
We will need 4 things:
- domen – Domain is the name of the blog which you type in the browser address bar. “www.HostingPill.com” is the domain of this site.
- hosting – Hosting is the “home” of your blog where it will “stay”. It is usually a server at a web hosting company.
- WordPress – WordPress is the “software” that will power your new blog.
- Dizayn va mavzular – To make your blog attractive design-wise you will need to install WordPress themes.
Haqida ma'lumot oling veb-saytlarning turlari WordPress-da yaratishingiz mumkin va qanday qilishingiz mumkinligini bilishingiz mumkin protect the blog bir marta ishlamoqda.
Domenlarni va xostingni sotib olishning ikkita usuli bor:
- Siz bir xil veb-xostdan domen va xostingni sotib olasiz
- Yoki ikkalasini alohida sotib olasiz
If you ask me, I would recommend going for Option 2 (buying separately) for two reasons:
- Alohida hosting va domenlarni xarid qilsangiz, siz yaxshiroq narxlarga ega bo'lasiz.
- Siz xavfni alohida kompaniyalardan sotib olib kamaytirasiz.
tavsiya qilaman Namecheap domenlaringizni olish uchun va Bluehost veb-xosting uchun.
Namecheap, nomi shundan dalolat beradiki, domen nomlarini yaxshi narxga sotadi, domen va xostingni shu etkazib beruvchidan sotib olishning hojati yo'q, shuning uchun men shunchaki xarid qildim.
BlueHost - Menman foydalanish Bluehost qariyb 8 yil davomida mening ba'zi saytlarim uchun va ularni juda ishonchli deb topdim.
In this step by step guide, I’m going to buy a domain, set up web hosting, install WordPress, configure WordPress and then talk about how you can make money blogging.
 Blogni qanday boshlash kerak
1-qadam. Domeningizni ro'yxatdan o'tkazing
ESLATMA: Agar sizda allaqachon domen bo'lsa, uni o'tkazib yuborishingiz va to'g'ridan-to'g'ri o'tishingiz mumkin
WordPress-ga qanday qilib xostingni sozlash kerak Bo'lim.
Avvalo, avval domenni sotib olish vaqti keldi. Siz qaysi domenni xohlayotganingiz va sizning WordPress blogingiz haqida nima deyishni xohlaysiz.
Menga ishoning, to'g'ri domen nomini tanlash bugungi kunda juda qiyin, chunki "hamma yaxshi bo'lganlar allaqachon yo'qolgan".
Bularni tekshirishni xohlashingiz mumkin 7 Domen nomi bo'yicha maslahatlar to get the right name for your site or you can use these tools to domen nomi g'oyalarini yaratish.
Once you have listed some of the domain name options, it’s time to check their availability.
Buning uchun quyidagi amallarni bajaring:
1 qadam. o'tish www.Namecheap.com va domen qidirish maydoniga o'zingiz xohlagan domenni yozing.

2 qadam. If your domain is available then add it to the cart, consider also purchasing other TLD (Top level domains) of your name, for example, if your domain is ‘mytestdomain.com’ you might also want to pick up ‘mytestdomain.net’ and ‘mytestdomain.org’.
If your domain isn’t available, you’ll have to think of something else!

3 qadam. Click on ‘View Cart’. Make sure everything is as you expect and double-check your domain name is spelled correctly. If you are buying a .com domain, you will notice that you also must pay a small ICANN fee.

4 qadam. Buyurtmani tasdiqlang, men domenni Avtomatik yangilashni sozlashni maslahat beraman.

5 qadam. Endi sizdan hisob yaratishingizni, barcha ma'lumotlarni to'ldirishingizni va parolni eslab qolishingizni so'raydi!

6 qadam. Keyingi sahifada hisob qaydnomangiz bilan bog'lanish ma'lumotlarini to'ldirishingizni so'raydi. Agar siz domen maxfiyligini tanlamagan bo'lsangiz, unda bu ma'lumot hamma uchun ochiq bo'ladi. "Davom etish" ni bosing

7 qadam. Pay for your domain, you can choose from a credit card or PayPal. Click ‘Continue’ and that’s it, you are now the proud owner of your new domain.

2-qadam. WordPress uchun hostingni sozlash
Tanlash right web hosting company is a very important factor in starting a blog.
Bozor yuzlab veb-xosting kompaniyalariga to'lib toshgan va ular sizning biznesingizni boshlash uchun barcha usullardan foydalanadilar.
I have listed & answered few questions that most first-time site owners have about hosting.
Siz ularni ko'rishingiz mumkin Bu yerga.
Endi tayyormiz, xostingga o'taylik.
We will setup your Bluehost account to start your first blog.
It offer a free domain (on Annual plans) and a 30 day money back guarantee, so you never have to worry about anything.
1 qadam. o'tish www.Bluehost.com va Boshlash tugmachasini bosing.

2 qadam. Siz sotib olmoqchi bo'lgan rejani tanlang. Ushbu namoyish uchun biz ularning asosiy rejasi bilan boramiz.

3 qadam. On this page, depending on whether you have a domain or want to get a new one, you can make your selection.

4 qadam. Once you have the domain, it’s time to enter your contact details.

5 qadam. Endi o'zingiz xohlagan rejani tanlang. Siz tanlagan muddat qancha uzoq bo'lsa, shuncha ko'p chegirma olasiz.

6 qadam. Kredit karta ma'lumotlarini kiriting va to'lovni amalga oshiring.

7 qadam. Bu amalga oshirilgandan so'ng, parolingizni ushbu ekranda yarating (parolingizni kelgusida saqlash uchun uni boshqa joyda saqlashni unutmang)

8 qadam. Now that you have created the password, it’s time to login!

3-qadam. Domeningizni xostingga ulang
Shunday qilib, WordPress xostingni sotib olganingizdan so'ng Bluehost siz sozlashingiz kerak bo'ladi Namecheap ushbu xostingni ko'rsatish uchun domen.
1 qadam. Sizning hisobingizga kiring BlueHost account
2 qadam. Domen sozlamalarini bosing
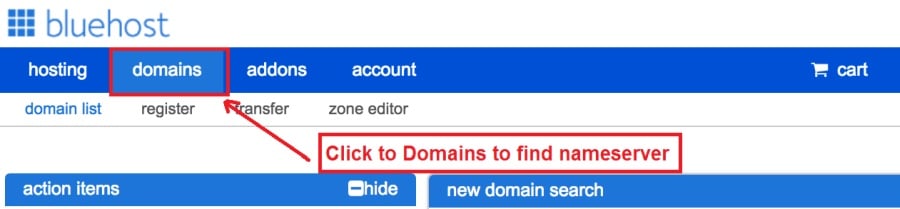
3 qadam. Click on the ‘Nameservers’ tab
Here are the default Nameservers of Bluehost:
NS1.Bluehost.com
NS2.Bluehost.com

5 qadam. Go to Namecheap and Login.
6 qadam. Once you logged in go Domain List ==> Domains ==> Select Domain ==> Select Manage ==> Under NameServers, select Custom and place your Bluehostu erda ism egalari

7 qadam. O'zgarishlarni saqlash-ni bosing.
Ushbu o'zgartirish 24 soatgacha ketishi mumkin, shuning uchun darhol ishlamasangiz, tashvishlanmang.
4-qadam. WordPress-ni o'rnating
Next, we need to install WordPress on the Bluehost hosting.
BTW, WordPress is a blogging platform for writing blog posts.
Yaxshiyamki Bluehost avtomatlashtirilgan o'rnatishga ega, shuning uchun sizga buni ko'rsataman.
1 qadam. Kirish Bluehost

2 qadam. Veb-sayt bo'limida "WordPress-ni o'rnatish" -ni bosing.

3 qadam. Ushbu WordPress o'rnatishda foydalanmoqchi bo'lgan domenni tanlang, ehtimol sizda bitta domen bo'ladi. Katalog maydonini bo'sh qoldiring.

4 qadam. Now enter your blog name (can be changed later), username, email address, and password. Make sure to keep a note of these details. Make sure your password is secure, use an online password randomizer if possible, people will try to breach your WordPress blog.

5 qadam. O'rnatish jarayonini sahifaning yuqori qismida kuzatib borishingiz mumkin, ammo odatda o'rnatish 5 daqiqa davom etadi.


Ko'rib turganingizdek, WordPress-ni o'rnatish juda oson.
Now you can browse to http://yourdomain.com/wp-admin to login.
Step 5. Create a Blog in WordPress
Let’s get logged into the new WordPress blog.
1. http://yourdomain.com/wp-admin saytiga o'ting va foydalanuvchi nomingiz va parolingizni kiriting.

2. Endi siz boshqaruv panelini ko'rishingiz kerak.

Tizimga kirgandan so'ng, mavzularga, plaginlarga va tarkibni qo'shishdan oldin bir nechta narsalarni saralashga arziydi.
Sarlavhani sozlash va old sahifani o'rnatish
WordPress-ni o'rnatgandan so'ng har doim to'g'ri o'rnatishni yaxshi ko'radigan bir nechta narsalar mavjud
Settings -> General Settings. Here you can set your blog title, tagline, main email address, time zone, date format & Language. Make sure you set all of these things correctly now, as it may come back to haunt you if you don’t!

Settings -> Reading. Here you can decide what function you want your WordPress blog to take. You can set your front page to take people straight into the blog post or you can set which static page you want to be your home page.

Bu biz hoziroq belgilashimiz kerak bo'lgan narsadir. Biz yanada qiziqarli narsalarga o'tishimiz mumkin!
Qanday qilib yangi sahifalar va xabarlarni yarataman?
To add new pages, go to Pages -> Add new, fill in your title, add some content and click publish. If you aren’t ready to publish the page, click draft.

To add a new post go to Posts -> Add New, it’s then the same procedure as above.

Sahifalarni / xabarlarni menyuga qanday qo'shish kerak
To add these pages to the menu, go to Appearance -> Menu. Select your menu and select ‘add to menu’, you can then drag and drop to arrange it.

Themes & Design
With WordPress, it’s really easy to create any design you can imagine without writing a single piece of code. And that is made possible only by WordPress themes.
WordPress has a lot of free theme designs to choose from.
Zo'r WordPress mavzusini qanday topish mumkin
Agar bu erda izlayotgan narsangizni topa olmasangiz, ko'proq tanlov uchun bu erga o'tishingiz mumkin:
Themeforest – One of the oldest and the largest marketplace for WordPress theme. You get tons of high-quality themes at reasonable prices.

Ijodiy bozor – A newer marketplace with quite a variety of WordPress themes. The themes on this site are quite different in terms of design than what you get on Themeforest.

Greta Technologies – Another great platform where you can get free and premium beautiful WordPress theme for your site.

Astra – Astra is the most lightweight and fully customizable WordPress theme.

It provides basic and advanced design options for blogs, single blog pages with a dedicated Blog Pro addon. Astra works seamlessly with all popular page builders like Beaver Builder, Elementor, etc.
How do I Install WordPress Theme
To install a new theme for your WordPress blog, follow these steps:
1 qadam. Administrator boshqaruv paneliga kirganingizda "Tashqi ko'rinish" ni tanlang, so'ngra chap tomondagi menyuda mavzular.

2 qadam. "Yangisini qo'shish" tugmasini bosing
3 qadam. Search for your WordPress theme using the search bar at the top right. If you have been provided a theme file you can select upload theme from the top of the page.

4 qadam. O'rnatish-ni bosing
5 qadam. After a minute or so the new theme will finish installing. Now you can click customize and see what options you can change. This will vary a lot from theme to theme but usually, you can edit things like your logo, the rough layout of the page and some colors.


Plaginlarni o'rnatish
Plagin nima?
Plugins – as the name suggests are tools that add functionality to your WordPress blog. The best thing which I like about WordPress is – these plugins.
Plugins can turn your site from a simple blog to a fully-featured e-commerce store, a user forum, a video streaming site, a member’s only site, and much more. Of course, you can combine most of these plugins together to add huge functionality to your blog.
Masalan, agar siz o'zingizning WordPress saytingizdan mahsulotlarni Internetda sotish uchun foydalanayotgan bo'lsangiz, qo'llab-quvvatlash uchun forum qo'shish foydali bo'lishi mumkin.
Agar WordPress saytiga biron-bir funktsiyani qo'shishni xohlasangiz, o'zingiz uchun biror narsa yaratishni / uni ishlab chiqaruvchiga to'lashdan oldin, plaginlarni ko'rib chiqing.
Plaginlarni o'rnatish oson, qattiq qismi siz qanday plaginlarni o'rnatishni hal qiladi. Minglab plaginlar bepul mavjud, shuningdek ko'plab premium plaginlar mavjud.
Where I can find more WordPress Plugins?
WordPress plaginlari uchun Internetdagi ikkita eng yaxshi manbalar:
1. WordPress.org – Tons of free plugins! But beware – some of the plugins are demo versions of the paid ones. Still, it’s a good place to find what you are looking for.

2. CodeCanyon – Home to some of the best plugins on the internet. Although they are paid, they offer really good value for money. I usually get my plugins from here.

Va pullik plaginlarni sotib olishning afzalliklari kam CodeCanyon:
- You get 6 months of free support from the plugin developer. So, if something is not working, you can approach the plugin developer via CodeCanyon va ular siz uchun tuzatadilar. Yana bir narsa, siz nominal to'lovni to'lash orqali kafolat bo'yicha yordamni 12 oyga uzaytirishingiz mumkin.
- Plaginlar yuqori sifatli, yaxshilab tekshiriladi CodeCanyon. So, there are no chances of any malware in them. I had a bad experience in the past when I bought some free plugins from some random site.
Plagin haqida qaror qilganingizdan so'ng, uni qanday o'rnatishingiz haqida.
WordPress plaginini qanday o'rnatish kerak
1 qadam. From the Admin Dashboard select Plugins -> Add New
2 qadam. O'zingiz xohlagan plaginni qidirib toping yoki fayllaringiz bo'lsa uni yuklang

3 qadam. O'rnatish-ni bosing va uni o'rnatishga bir necha daqiqa vaqt bering, plagin qancha katta bo'lsa, uni o'rnatishga shuncha ko'p vaqt ketadi.
4 qadam. From the Plugins -> Plugins page activate your plugin, depending on the plugin you are using you may then be prompted to fill in some additional settings.
Here are some of my favorite Plugins:
Bepul plaginlar:
- Contact form 7 (Free)– This is a simple free email contact form for your blog. It’s easy to set up, always works, and doesn’t take up much space!
- Askimet (Bepul) - Agar siz hatto WordPress blogingizdagi sharhlarga ruxsat berishni o'ylayotgan bo'lsangiz, Askimet comment spam-plagini kerak bo'ladi. Ushbu plagin siz etkazadigan spam-sharhlarning sonini sezilarli darajada kamaytiradi.
- Yoast SEO (Bepul) – Download this plugin before you download any. It’s a MUST HAVE plugin for SEO.
Pulli plaginlar:
- Vizual kompozitor (pullik) – It’s THE BEST Page Builder for WordPress. Just drag and drop and you can create stunning page layouts in minutes. Love it!
- Ninja popups (pullik) – If you ever want to have the ability for the user to signup for your email newsletter from your blog, this is the plugin to have. Few clicks and you get a beautiful popup done.
- BackupGuard (Paid) – It’s too easy to accidentally break your WordPress blog when installing a 3rd Party Plugin or theme, make sure you always zaxira nusxalarini saqlang. And this plugin does just that. It’s a lifesaver!
Blogingizdan qanday qilib pul ishlashingiz mumkin
Now that you have your WordPress blog nicely set up, with some content, a silliq WordPress mavzusi, and some great functionality added by Plugins it’s time to monetize your blog! There are two core methods to for making money from your blog, and everything boils down to these
Hamkor:
Affiliate marketing is where you promote other company’s products directly and earn a commission from any sales made.
For example, say you have a football blog, you could add affiliate links to football boots in your posts and make a commission off any boots sold, typically this would be 5 – 15%.
U erda yuzlab sheriklik marketing sxemalari mavjud, siz o'zingizning uyingizga qarab, ushbu mavzuni batafsilroq o'rganib chiqishingiz kerak, qancha kompaniyaning sxemalari borligiga hayron qolasiz. Amazon offers one of the most popular ones, it’s easy too!
Add special affiliate links to ANY product on the Amazon and make a commission of 4 – 10%. Amazon may not be the best paying site (this will vary wildly depending on the niche of your blog), but they do offer a HUGE range of products.
Reklamalar
Adverts are simple, got spare space on your blog, place an advert, often you will find these placed in the sidebar and within the content of any articles. Adverts can generate anything from $0.05 to $5 per click depending on the niche of your blog.
Google AdSense is the de facto online advertising company, simply fill in a 2-page signup form and you can start serving adverts to all your visitors. You don’t have to talk directly to companies to sell your advertising space.
Google’s advertising pay-outs differ massively from niche to niche, a highly competitive niche like credit cards, insurance, loans, etc.. will pay higher than less competitive ones.
Buning sababi reklama beruvchilarga o'zlarining reklama e'lonlarini joylashtirishni taklif qilish xususiyatiga bog'liq, shu bilan birga sizning blogingiz qancha mashhur bo'lsa, shuncha ko'proq pul topishingiz mumkin.
Typically, you might expect something like a 0.5 – 3% click-through rate, i.e. the number of your visitors who actually click on the adverts.
Odatda ikkala strategiyaning yaxshi kombinatsiyasi tavsiya etiladi.
Keyingi qadamlar
Now that your WordPress blog has been set up and you’ve monetized it’s time to start expanding and really pushing your blog.
Here are my top tips going forward:
- Oddiy tarkibni rejalashtiring, you won’t always be in the mood to write content, use the built-in post scheduler so you can write multiple posts when you feel like it while still allowing regular content to flow. Articles every few days are better than 5 on the same day. Here is another WordPress avtomatlashtirish yechimi.
- SEO haqida hamma narsani bilib oling (search engine optimization) that you can, this is a huge topic, you will never fully learn it, but the more you know the more successful blog will be.
- Ijobiy bo'ling, your blog will unlikely blossom overnight, it takes months of hard work, but in the end dedication and good content pays off.
Good luck and start blogging!


