
Today I am going to show you how to start a blog from scratch. And you won’t believe how easy it is to do.
So, let’s start your blogging journey!
We will need 4 things:
- Դոմեյն – Domain is the name of the blog which you type in the browser address bar. “www.HostingPill.com” is the domain of this site.
- հոսթինգ – Hosting is the “home” of your blog where it will “stay”. It is usually a server at a web hosting company.
- WordPress – WordPress is the “software” that will power your new blog.
- Դիզայն և թեմաներ – To make your blog attractive design-wise you will need to install WordPress themes.
Իմացեք այդ մասին կայքերի տեսակները կարող եք ստեղծել WordPress- ով և իմանալ, թե ինչպես կարող եք protect the blog երբ այն վերանա:
Դոմեյններ և հոստինգ գնելու երկու եղանակ կա.
- Դուք տիրույթներ և հոստինգ եք գնում նույն վեբ հոստից
- Կամ երկուսն էլ առանձին եք գնում
If you ask me, I would recommend going for Option 2 (buying separately) for two reasons:
- Դոմեյններ ձեռք բերելու և առանձին հյուրընկալելու դեպքում ավելի լավ գործարքներ եք ստանում:
- Դուք կրճատում եք ռիսկը `այն առանձին ընկերություններից գնելով:
Ես խորհուրդ եմ տալիս Namecheap ձեր տիրույթները ստանալու համար և Bluehost վեբ հոստինգի համար:
Namecheap, քանի որ անունը ենթադրում է, որ լավ գին է վաճառում տիրույթի անունները, կարիք չկա նույն մատակարարից ձեր դոմեյնն ու հոստինգը գնել, այնպես որ ես կտրել եմ շուրջը:
BlueHost - Ես եմ օգտագործելով Bluehost շուրջ 8 տարի է, ինչ իմ որոշ կայքերի համար և գտել է, որ դրանք բավականին հուսալի են:
In this step by step guide, I’m going to buy a domain, set up web hosting, install WordPress, configure WordPress and then talk about how you can make money blogging.
 Ինչպես սկսել բլոգ
Քայլ 1. Գրանցեք ձեր տիրույթը
ՆՇՈՒՄ: Եթե դուք արդեն տիրույթ ունեք, կարող եք բաց թողնել դա և ուղղակիորեն դիմել
Ինչպես կարգավորել հոստինգ WordPress- ի համար բաժնում:
Առաջին բաները նախ, ժամանակն է տիրույթը ձեռք բերել: Դուք կցանկանաք մտածել այն մասին, թե որ տիրույթն եք ուզում և ինչ է ասվում ձեր WordPress բլոգի վերաբերյալ:
Հավատացեք ինձ, ճիշտ տիրույթի անունը ընտրելը դժվար խնդիր է, քանի որ բոլոր «լավերն արդեն անցել են»:
Դուք կարող եք ստուգել դրանք 7 դոմենի անվան հուշում to get the right name for your site or you can use these tools to առաջացնում են դոմենի անվան գաղափարներ.
Once you have listed some of the domain name options, it’s time to check their availability.
Եվ դրա համար հետևեք հետևյալ քայլերին.
Քայլ 1. Գնալ www.Namecheap.com և մուտքագրեք ձեր ուզած տիրույթը դոմենի որոնման վանդակում:

Քայլ 2. If your domain is available then add it to the cart, consider also purchasing other TLD (Top level domains) of your name, for example, if your domain is ‘mytestdomain.com’ you might also want to pick up ‘mytestdomain.net’ and ‘mytestdomain.org’.
If your domain isn’t available, you’ll have to think of something else!

Քայլ 3. Click on ‘View Cart’. Make sure everything is as you expect and double-check your domain name is spelled correctly. If you are buying a .com domain, you will notice that you also must pay a small ICANN fee.

Քայլ 4. Հաստատեք ձեր պատվերը, ես կառաջարկեի դոմենը տեղադրել Auto- ի նորացման վրա:

Քայլ 5. Այժմ այն կխնդրի ձեզ ստեղծել հաշիվ, լրացնել բոլոր մանրամասները և համոզվել, որ հիշում եք գաղտնաբառը:

Քայլ 6. Հաջորդ էջում այն խնդրում է լրացնել ձեր հաշվի կոնտակտային տվյալները: Եթե դուք չեք ընտրել դոմենի գաղտնիությունը, ապա այս տեղեկատվությունը հրապարակային է յուրաքանչյուրի համար: Կտտացրեք «Շարունակել»

Քայլ 7. Pay for your domain, you can choose from a credit card or PayPal. Click ‘Continue’ and that’s it, you are now the proud owner of your new domain.

Քայլ 2. Ստեղծեք հոստինգ WordPress- ի համար
Ընտրելով right web hosting company is a very important factor in starting a blog.
Շուկան ողողված է հարյուրավոր վեբ հոստինգի ընկերություններով, և նրանք օգտագործում են բոլոր մարտավարությունները ՝ ձեր բիզնեսը ստանալու համար:
I have listed & answered few questions that most first-time site owners have about hosting.
Դուք կարող եք տեսնել դրանք այստեղ.
Հիմա, որ դուք պատրաստ եք, եկեք հասնենք մեր հոստինգին:
We will setup your Bluehost account to start your first blog.
It offer a free domain (on Annual plans) and a 30 day money back guarantee, so you never have to worry about anything.
Քայլ 1. Գնալ www.Bluehost.com և կտտացրեք Սկսել կոճակը:

Քայլ 2. Ընտրեք այն պլանը, որը ցանկանում եք ձեռք բերել: Այս ցուցադրության համար մենք կգնանք նրանց Հիմնական ծրագրով:

Քայլ 3. On this page, depending on whether you have a domain or want to get a new one, you can make your selection.

Քայլ 4. Once you have the domain, it’s time to enter your contact details.

Քայլ 5. Այժմ ընտրեք այն պլանը, որի համար ցանկանում եք գնալ: Որքան երկար ընտրեք ժամկետը, այնքան ավելի մեծ զեղչ կստանաք:

Քայլ 6. Մուտքագրեք ձեր վարկային քարտի տվյալները և կատարեք վճարումը:

Քայլ 7. Դա ավարտվելուց հետո ստեղծեք ձեր գաղտնաբառն այս էկրանին (մի մոռացեք, որ ձեր գաղտնաբառն ինչ-որ տեղ պահեք ապագա հղման համար)

Քայլ 8. Now that you have created the password, it’s time to login!

Քայլ 3. Միացրեք ձեր տիրույթը հոստինգին
Այսպիսով, ձեր WordPress- ի հոստինգը գնելուց հետո Bluehost դուք պետք է սահմանեք ձերը Namecheap տիրույթ ՝ մատնանշելու այս հոստինգը:
Քայլ 1. Մուտք գործեք ձեր BlueHost account
Քայլ 2. Կտտացրեք տիրույթի կարգավորումները
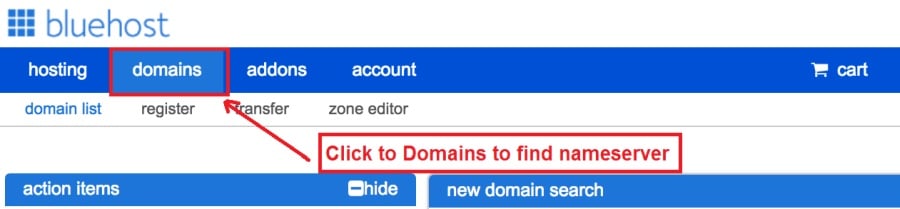
Քայլ 3. Click on the ‘Nameservers’ tab
Here are the default Nameservers of Bluehost:
NS1:Bluehost.com
NS2:Bluehost.com

Քայլ 5. Go to Namecheap and Login.
Քայլ 6. Once you logged in go Domain List ==> Domains ==> Select Domain ==> Select Manage ==> Under NameServers, select Custom and place your Bluehostայնտեղ կան անունների սերվերներ

Քայլ 7. Կտտացրեք Պահել փոփոխությունները:
Այս փոփոխությունն ավարտելու համար կարող է տևել մինչև 24 ժամ, այնպես որ մի անհանգստացեք, եթե այն անմիջապես չի գործում:
Քայլ 4. Տեղադրեք WordPress- ը
Next, we need to install WordPress on the Bluehost hosting.
BTW, WordPress is a blogging platform for writing blog posts.
Բարեբախտաբար Bluehost ունի ավտոմատ տեղադրում, այնպես որ ես դա ձեզ ցույց կտամ:
Քայլ 1. Մուտք գործել Bluehost

Քայլ 2. Վեբ կայքի բաժնում կտտացրեք «Տեղադրեք WordPress» - ը

Քայլ 3. Ընտրեք այն տիրույթը, որը ցանկանում եք օգտագործել WordPress- ի այս տեղադրման համար, ամենայն հավանականությամբ, դուք կունենաք միայն մեկ տիրույթ: Գրացուցակի դաշտը թողեք դատարկ:

Քայլ 4. Now enter your blog name (can be changed later), username, email address, and password. Make sure to keep a note of these details. Make sure your password is secure, use an online password randomizer if possible, people will try to breach your WordPress blog.

Քայլ 5. Կարող եք հետևել տեղադրման առաջընթացին էջի վերևում, չնայած սովորաբար տեղադրումը տևում է 5 րոպե:


Ինչպես տեսնում եք, WordPress- ի տեղադրումը պարզ է:
Now you can browse to http://yourdomain.com/wp-admin to login.
Step 5. Create a Blog in WordPress
Let’s get logged into the new WordPress blog.
1. Գնացեք http://yourdomain.com/wp-admin և մուտքագրեք ձեր օգտվողի անունը և գաղտնաբառը:

2. Այժմ պետք է կարողանաք տեսնել ադմինիստրատորի վահանակը:

Մուտք գործելուց հետո արժե դասավորել մի քանի իրեր, որոնք դասավորվել են `նախքան թեմաները, պլագինները տեղափոխելը և բովանդակությունը ավելացնելը:
Անհատականացրեք վերնագիրը և նախնական էջը
Կան մի քանի բաներ, որոնք ես միշտ ցանկանում եմ սահմանել WordPress- ը տեղադրելուց անմիջապես հետո
Settings -> General Settings. Here you can set your blog title, tagline, main email address, time zone, date format & Language. Make sure you set all of these things correctly now, as it may come back to haunt you if you don’t!

Settings -> Reading. Here you can decide what function you want your WordPress blog to take. You can set your front page to take people straight into the blog post or you can set which static page you want to be your home page.

Դա այն է, ինչ մենք իրականում պետք է հիմա սահմանենք: Մենք կարող ենք տեղափոխվել ավելի հետաքրքիր իրեր:
Ինչպե՞ս ստեղծել նոր էջեր և հաղորդագրություններ:
To add new pages, go to Pages -> Add new, fill in your title, add some content and click publish. If you aren’t ready to publish the page, click draft.

To add a new post go to Posts -> Add New, it’s then the same procedure as above.

Ինչպե՞ս էջեր / գրառումներ ավելացնել ցանկի մեջ
To add these pages to the menu, go to Appearance -> Menu. Select your menu and select ‘add to menu’, you can then drag and drop to arrange it.

Themes & Design
With WordPress, it’s really easy to create any design you can imagine without writing a single piece of code. And that is made possible only by WordPress themes.
WordPress has a lot of free theme designs to choose from.
Ինչպես գտնել WordPress- ի կատարյալ թեման
Եթե չկարողանաք գտնել այն, ինչ փնտրում եք այստեղ, կարող եք ավելի շատ ընտրություններ կատարել այստեղ ՝
themeforest – One of the oldest and the largest marketplace for WordPress theme. You get tons of high-quality themes at reasonable prices.

Ստեղծագործական շուկա – A newer marketplace with quite a variety of WordPress themes. The themes on this site are quite different in terms of design than what you get on Themeforest.

ԳրետաԹեմզ – Another great platform where you can get free and premium beautiful WordPress theme for your site.

Astra – Astra is the most lightweight and fully customizable WordPress theme.

It provides basic and advanced design options for blogs, single blog pages with a dedicated Blog Pro addon. Astra works seamlessly with all popular page builders like Beaver Builder, Elementor, etc.
How do I Install WordPress Theme
To install a new theme for your WordPress blog, follow these steps:
Քայլ 1. Երբ մուտք եք գործել կառավարման վահանակ, ընտրեք «Արտաքին տեսքը», ապա թեմաները `ձախ ձեռքի ընտրացանկից:

Քայլ 2. Կտտացրեք «Ավելացնել նոր» կոճակը
Քայլ 3. Search for your WordPress theme using the search bar at the top right. If you have been provided a theme file you can select upload theme from the top of the page.

Քայլ 4. Տեղադրեք Տեղադրեք
Քայլ 5. After a minute or so the new theme will finish installing. Now you can click customize and see what options you can change. This will vary a lot from theme to theme but usually, you can edit things like your logo, the rough layout of the page and some colors.


Տեղադրեք Plugins
Ինչ է plugin- ը:
Plugins – as the name suggests are tools that add functionality to your WordPress blog. The best thing which I like about WordPress is – these plugins.
Plugins can turn your site from a simple blog to a fully-featured e-commerce store, a user forum, a video streaming site, a member’s only site, and much more. Of course, you can combine most of these plugins together to add huge functionality to your blog.
Օրինակ, եթե դուք օգտագործում եք ձեր WordPress կայքը `արտադրանքն առցանց վաճառելու համար, գուցե ձեռնտու է ֆորում ավելացնել աջակցության համար:
Երբ ցանկանում եք WordPress- ի կայք ավելացնել ֆունկցիոնալությունը, նախքան plugins փնտրեք ինքներդ ձեզ ինչ-որ բան ստեղծելը / ծրագրավորողին վճարելը, որպեսզի դա անի ձեզ համար:
Plugin- ների տեղադրումը շատ հեշտ է, ծանր մասը որոշում է, թե ինչ plugin- ներ եք ուզում տեղադրել: Կան անվճար հազարավոր plugins անվճար, կան նաև շատ պրեմիում հավելվածներ:
Where I can find more WordPress Plugins?
WordPress Plugins- ի համար ինտերնետում երկու լավագույն ռեսուրսներն են.
1. WordPress.org – Tons of free plugins! But beware – some of the plugins are demo versions of the paid ones. Still, it’s a good place to find what you are looking for.

2. CodeCanyon – Home to some of the best plugins on the internet. Although they are paid, they offer really good value for money. I usually get my plugins from here.

Եվ վճարովի plugin- երից օգտվելու շատ քիչ առավելություններ կան CodeCanyon:
- You get 6 months of free support from the plugin developer. So, if something is not working, you can approach the plugin developer via CodeCanyon և նրանք դա շտկելու են ձեզ համար: Ավելին, դուք կարող եք 12 ամսով երկարացնել երաշխիքային աջակցությունը `վճարելով անվանական վճար:
- Պլանշետները բարձրորակ են, մանրակրկիտ ստուգված CodeCanyon. So, there are no chances of any malware in them. I had a bad experience in the past when I bought some free plugins from some random site.
Երբ plugin- ով որոշեք, ահա թե ինչպես եք այն տեղադրում:
Ինչպե՞ս տեղադրել WordPress plugin
Քայլ 1. From the Admin Dashboard select Plugins -> Add New
Քայլ 2. Փնտրեք ձեր ուզած հավելվածը կամ վերբեռնեք այն, եթե ունեք ֆայլեր

Քայլ 3. Կտտացրեք Տեղադրեք և տեղադրեք մի քանի րոպե, այնքան մեծ է plugin- ը, որ ավելի երկար կտևի տեղադրումը:
Քայլ 4. From the Plugins -> Plugins page activate your plugin, depending on the plugin you are using you may then be prompted to fill in some additional settings.
Here are some of my favorite Plugins:
Անվճար Plugins:
- Contact form 7 (Free)– This is a simple free email contact form for your blog. It’s easy to set up, always works, and doesn’t take up much space!
- Askimet (անվճար) - Եթե նույնիսկ մտածում եք թույլատրել մեկնաբանություններ ձեր WordPress բլոգում, ձեզ հարկավոր է Askimet մեկնաբանության սպամի հավելվածը: Այս plugin- ը զանգվածաբար նվազեցնում է ձեր կողմից ստացվող սպամի մեկնաբանությունների քանակը:
- Yoast SEO (անվճար) – Download this plugin before you download any. It’s a MUST HAVE plugin for SEO.
Վճարովի Plugins:
- Visual Composer (վճարովի) – It’s THE BEST Page Builder for WordPress. Just drag and drop and you can create stunning page layouts in minutes. Love it!
- Ninja թռուցիկներ (վճարովի) – If you ever want to have the ability for the user to signup for your email newsletter from your blog, this is the plugin to have. Few clicks and you get a beautiful popup done.
- BackupGuard (Paid) – It’s too easy to accidentally break your WordPress blog when installing a 3rd Party Plugin or theme, make sure you always ունեն կրկնօրինակում. And this plugin does just that. It’s a lifesaver!
Ինչպես գումար վաստակել ձեր բլոգից
Now that you have your WordPress blog nicely set up, with some content, a WordPress- ի թեք թեման, and some great functionality added by Plugins it’s time to monetize your blog! There are two core methods to for making money from your blog, and everything boils down to these
Գործընկեր:
Affiliate marketing is where you promote other company’s products directly and earn a commission from any sales made.
For example, say you have a football blog, you could add affiliate links to football boots in your posts and make a commission off any boots sold, typically this would be 5 – 15%.
Կան այնտեղ հարյուրավոր դուստր ձեռնարկությունների շուկայավարման սխեմաներ, դուք պետք է հետագա ուսումնասիրեք դա ՝ կախված ձեր նիշից, կզարմանաք, թե քանի ընկերություններ ունեն սխեմաներ: Amazon offers one of the most popular ones, it’s easy too!
Add special affiliate links to ANY product on the Amazon and make a commission of 4 – 10%. Amazon may not be the best paying site (this will vary wildly depending on the niche of your blog), but they do offer a HUGE range of products.
Հայտարարություններ
Adverts are simple, got spare space on your blog, place an advert, often you will find these placed in the sidebar and within the content of any articles. Adverts can generate anything from $0.05 to $5 per click depending on the niche of your blog.
Google AdSense is the de facto online advertising company, simply fill in a 2-page signup form and you can start serving adverts to all your visitors. You don’t have to talk directly to companies to sell your advertising space.
Google’s advertising pay-outs differ massively from niche to niche, a highly competitive niche like credit cards, insurance, loans, etc.. will pay higher than less competitive ones.
Դա պայմանավորված է այն գովազդատուների բնույթով, որոնք մրցակցում են գովազդը տեղադրելու համար, այս նույնքան «հանրաճանաչ» ձեր բլոգը, այնքան ավելի շատ կկարողանաք վաստակել:
Typically, you might expect something like a 0.5 – 3% click-through rate, i.e. the number of your visitors who actually click on the adverts.
Սովորաբար առաջարկվում է երկու ռազմավարությունների լավ համադրություն:
Հաջորդ քայլերը
Now that your WordPress blog has been set up and you’ve monetized it’s time to start expanding and really pushing your blog.
Here are my top tips going forward:
- Պարբերաբար կանոնավոր բովանդակություն, you won’t always be in the mood to write content, use the built-in post scheduler so you can write multiple posts when you feel like it while still allowing regular content to flow. Articles every few days are better than 5 on the same day. Here is another WordPress ավտոմատացման լուծում.
- Իմացեք ամեն ինչ SEO- ի մասին (search engine optimization) that you can, this is a huge topic, you will never fully learn it, but the more you know the more successful blog will be.
- Դրական պահեք, your blog will unlikely blossom overnight, it takes months of hard work, but in the end dedication and good content pays off.
Good luck and start blogging!


