
Today I am going to show you how to start a blog from scratch. And you won’t believe how easy it is to do.
So, let’s start your blogging journey!
We will need 4 things:
- Dominio – Domain is the name of the blog which you type in the browser address bar. “www.HostingPill.com” is the domain of this site.
- Aloxamento – Hosting is the “home” of your blog where it will “stay”. It is usually a server at a web hosting company.
- WordPress – WordPress is the “software” that will power your new blog.
- Design & Themes – To make your blog attractive design-wise you will need to install WordPress themes.
Aprende sobre o tipos de sitios web podes crear con WordPress e saber como podes protect the blog unha vez rematado.
Hai dúas formas de comprar dominios e hospedaxe:
- Vostede compra dominios e hospedaxe desde o mesmo servidor web
- Ou compras os dous por separado
If you ask me, I would recommend going for Option 2 (buying separately) for two reasons:
- Ten mellores ofertas cando compras dominios e aloxas por separado.
- Reduce o risco mercándoo en compañías separadas.
eu recomendo Namecheap por obter os seus dominios e Bluehost para aloxamento web.
NamecheapComo o nome indica vende nomes de dominio a un bo prezo, non é necesario mercar o seu dominio e aloxar ao mesmo provedor polo que teño comprado.
BlueHost - Eu son uso Bluehost hai uns 8 anos e hai algúns dos meus sitios e creo que fosen bastante fiables.
In this step by step guide, I’m going to buy a domain, set up web hosting, install WordPress, configure WordPress and then talk about how you can make money blogging.
 Como iniciar un blog
Paso 1. Rexistra o teu dominio
NOTA: Se xa tes un dominio, pode pasar por alto e directamente
Como configurar Hosting para WordPress sección.
Primeiras cousas primeiro, é hora de mercar o dominio. Vai querer pensar en que dominio quere e que di sobre o seu blog WordPress.
Créeme, escoller o nome de dominio correcto é unha tarefa difícil hoxe en día xa que todos os "bos xa están desaparecidos".
Quizais queiras comprobar estes 7 Consellos sobre nomes de dominio to get the right name for your site or you can use these tools to xerar ideas de nomes de dominio.
Once you have listed some of the domain name options, it’s time to check their availability.
E por iso, siga os pasos seguintes:
Paso 1. Ir a www.Namecheap.com e escriba o dominio que desexa na caixa de busca de dominio.

Paso 2. If your domain is available then add it to the cart, consider also purchasing other TLD (Top level domains) of your name, for example, if your domain is ‘mytestdomain.com’ you might also want to pick up ‘mytestdomain.net’ and ‘mytestdomain.org’.
If your domain isn’t available, you’ll have to think of something else!

Paso 3. Click on ‘View Cart’. Make sure everything is as you expect and double-check your domain name is spelled correctly. If you are buying a .com domain, you will notice that you also must pay a small ICANN fee.

Paso 4. Confirma o teu pedido, recomendaría que estableza o dominio en Renovar automaticamente.

Paso 5. Agora pedirache que crees unha conta, enche todos os detalles e asegúrate de recordar o contrasinal.

Paso 6. Na páxina seguinte, pídelle que complete a información de contacto da súa conta. Se non optou pola privacidade do dominio, entón esta información é pública para que calquera poida ver. Fai clic en "Continuar"

Paso 7. Pay for your domain, you can choose from a credit card or PayPal. Click ‘Continue’ and that’s it, you are now the proud owner of your new domain.

Paso 2. Configura o Hosting para WordPress
Escolla o right web hosting company is a very important factor in starting a blog.
O mercado está inundado con centos de empresas de hospedaxe web e empregan todas as tácticas para conseguir o teu negocio.
I have listed & answered few questions that most first-time site owners have about hosting.
Podes velos aquí.
Agora, xa estás preparado, imos ao noso aloxamento.
We will setup your Bluehost account to start your first blog.
It offer a free domain (on Annual plans) and a 30 day money back guarantee, so you never have to worry about anything.
Paso 1. Ir a www.Bluehost.com e faga clic en Botón de inicio.

Paso 2. Seleccione o plan que desexa mercar. Para esta demostración, imos co seu Plan básico.

Paso 3. On this page, depending on whether you have a domain or want to get a new one, you can make your selection.

Paso 4. Once you have the domain, it’s time to enter your contact details.

Paso 5. Agora seleccione o plan para o que desexa ir. Canto máis tempo seleccione, máis desconto obterás.

Paso 6. Insira os datos da súa tarxeta de crédito e efectúe o pago.

Paso 7. Despois de facelo, crea o seu contrasinal nesta pantalla (non o esqueza almacenar o seu contrasinal nalgún lugar para futuras referencias)

Paso 8. Now that you have created the password, it’s time to login!

Paso 3. Conecte o teu dominio a Aloxamento
Entón, unha vez que mercou o seu hosting de WordPress Bluehost terás que configurar o teu Namecheap dominio para apuntar a este aloxamento.
Paso 1. Inicia sesión no teu correo BlueHost account
Paso 2. Faga clic na configuración de dominio
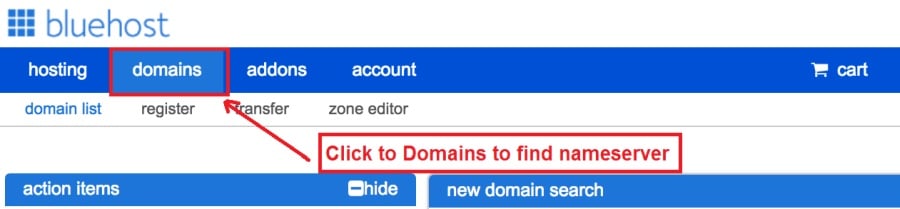
Paso 3. Click on the ‘Nameservers’ tab
Here are the default Nameservers of Bluehost:
NS1Bluehost.com
NS2Bluehost.com

Paso 5. Go to Namecheap and Login.
Paso 6. Once you logged in go Domain List ==> Domains ==> Select Domain ==> Select Manage ==> Under NameServers, select Custom and place your Bluehosthai nomeadores alí

Paso 7. Fai clic en Gardar cambios.
Pode levar ata 24 horas para completar este cambio. Non te preocupes se non funciona de inmediato.
Paso 4. Instala WordPress
Next, we need to install WordPress on the Bluehost Aloxamento.
BTW, WordPress is a blogging platform for writing blog posts.
Por sorte Bluehost ten unha instalación automatizada, así que eu vou amosar iso.
Paso 1. Iniciar sesión Bluehost

Paso 2. Na sección web fai clic en 'Instalar WordPress'

Paso 3. Seleccione o dominio que desexa usar para esta instalación de WordPress, probablemente só teña un dominio. Deixa o campo do directorio en branco.

Paso 4. Now enter your blog name (can be changed later), username, email address, and password. Make sure to keep a note of these details. Make sure your password is secure, use an online password randomizer if possible, people will try to breach your WordPress blog.

Paso 5. Pode manter un control do progreso da instalación na parte superior da páxina, aínda que normalmente a instalación leva 5 minutos.


Como vedes, é sinxelo instalar WordPress.
Now you can browse to http://yourdomain.com/wp-admin to login.
Step 5. Create a Blog in WordPress
Let’s get logged into the new WordPress blog.
1. Vai a http://yourdomain.com/wp-admin e introduce o seu nome de usuario e contrasinal.

2. Agora debería ser capaz de ver o panel de administración.

Unha vez iniciado o sesión, paga a pena obter algunhas cousas antes de pasar aos temas, complementos e engadir contido.
Personaliza o título e establece a páxina principal
Hai sempre algunhas cousas que sempre me gustan despois de instalar WordPress
Settings -> General Settings. Here you can set your blog title, tagline, main email address, time zone, date format & Language. Make sure you set all of these things correctly now, as it may come back to haunt you if you don’t!

Settings -> Reading. Here you can decide what function you want your WordPress blog to take. You can set your front page to take people straight into the blog post or you can set which static page you want to be your home page.

Isto é todo o que realmente necesitamos para agora. Podemos pasar ás cousas máis interesantes!
Como creo novas páxinas e publicacións?
To add new pages, go to Pages -> Add new, fill in your title, add some content and click publish. If you aren’t ready to publish the page, click draft.

To add a new post go to Posts -> Add New, it’s then the same procedure as above.

Como engadir páxinas / publicacións ao menú
To add these pages to the menu, go to Appearance -> Menu. Select your menu and select ‘add to menu’, you can then drag and drop to arrange it.

Themes & Design
With WordPress, it’s really easy to create any design you can imagine without writing a single piece of code. And that is made possible only by WordPress themes.
WordPress has a lot of free theme designs to choose from.
Como atopar o tema perfecto de WordPress
Se non atopas o que buscas aquí, podes buscar máis opcións aquí:
O máis antigo – One of the oldest and the largest marketplace for WordPress theme. You get tons of high-quality themes at reasonable prices.

Mercado creativo – A newer marketplace with quite a variety of WordPress themes. The themes on this site are quite different in terms of design than what you get on Themeforest.

GretaThemes – Another great platform where you can get free and premium beautiful WordPress theme for your site.

Astra – Astra is the most lightweight and fully customizable WordPress theme.

It provides basic and advanced design options for blogs, single blog pages with a dedicated Blog Pro addon. Astra works seamlessly with all popular page builders like Beaver Builder, Elementor, etc.
How do I Install WordPress Theme
To install a new theme for your WordPress blog, follow these steps:
Paso 1. Ao iniciar sesión no panel de administración selecciona "Aparencia" e logo os temas do menú esquerdo.

Paso 2. Fai clic no botón Engadir novo
Paso 3. Search for your WordPress theme using the search bar at the top right. If you have been provided a theme file you can select upload theme from the top of the page.

Paso 4. Faga clic en Instalar
Paso 5. After a minute or so the new theme will finish installing. Now you can click customize and see what options you can change. This will vary a lot from theme to theme but usually, you can edit things like your logo, the rough layout of the page and some colors.


Install Extensións
Que é un complemento?
Plugins – as the name suggests are tools that add functionality to your WordPress blog. The best thing which I like about WordPress is – these plugins.
Plugins can turn your site from a simple blog to a fully-featured e-commerce store, a user forum, a video streaming site, a member’s only site, and much more. Of course, you can combine most of these plugins together to add huge functionality to your blog.
Por exemplo, se está a usar o seu sitio WordPress para vender produtos en liña, pode ser beneficioso engadir un foro de apoio.
Sempre que queiras engadir funcionalidade a un sitio de WordPress, busque os complementos antes de mirar para crear algo mesmo / paga a un desenvolvedor para facelo por vostede.
A instalación de complementos é fácil, a parte dura é decidir que complementos desexa instalar. Hai miles de complementos dispoñibles de balde, tamén hai moitos complementos premium dispoñibles.
Where I can find more WordPress Plugins?
Os dous mellores recursos en internet para complementos de WordPress son:
1. WordPress.org – Tons of free plugins! But beware – some of the plugins are demo versions of the paid ones. Still, it’s a good place to find what you are looking for.

2. CodeCanyon – Home to some of the best plugins on the internet. Although they are paid, they offer really good value for money. I usually get my plugins from here.

E hai poucas vantaxes de ir para os complementos de pago CodeCanyon:
- You get 6 months of free support from the plugin developer. So, if something is not working, you can approach the plugin developer via CodeCanyon e arranxarán para ti. É máis, pode ampliar a asistencia de garantía durante 12 meses pagando unha taxa nominal.
- Os complementos son de alta calidade, comprobados coidadosamente CodeCanyon. So, there are no chances of any malware in them. I had a bad experience in the past when I bought some free plugins from some random site.
Unha vez que decidiches un complemento, aquí tes como instalalo.
Como instalar un complemento de WordPress
Paso 1. From the Admin Dashboard select Plugins -> Add New
Paso 2. Busca o complemento que queiras ou cargalo se tes os ficheiros

Paso 3. Fai clic en Instalar e dálle uns minutos para instalalo, canto máis grande sexa o complemento canto máis tardará en instalar.
Paso 4. From the Plugins -> Plugins page activate your plugin, depending on the plugin you are using you may then be prompted to fill in some additional settings.
Here are some of my favorite Plugins:
Complementos gratuítos:
- Contact form 7 (Free)– This is a simple free email contact form for your blog. It’s easy to set up, always works, and doesn’t take up much space!
- Askimet (gratis) - Se incluso estás pensando en permitir comentarios no teu blog de WordPress, necesitas o complemento de spam de comentarios Askimet. Este complemento reduce masivamente o número de comentarios spam que recibirá.
- SEO Yoast (gratis) – Download this plugin before you download any. It’s a MUST HAVE plugin for SEO.
Complementos pagados:
- Compositor visual (pagado) – It’s THE BEST Page Builder for WordPress. Just drag and drop and you can create stunning page layouts in minutes. Love it!
- Popups Ninja (de pago) – If you ever want to have the ability for the user to signup for your email newsletter from your blog, this is the plugin to have. Few clicks and you get a beautiful popup done.
- BackupGuard (Paid) – It’s too easy to accidentally break your WordPress blog when installing a 3rd Party Plugin or theme, make sure you always ten copias de seguridade. And this plugin does just that. It’s a lifesaver!
Como gañar cartos co teu blog
Now that you have your WordPress blog nicely set up, with some content, a tema de WordPress, and some great functionality added by Plugins it’s time to monetize your blog! There are two core methods to for making money from your blog, and everything boils down to these
Afiliado:
Affiliate marketing is where you promote other company’s products directly and earn a commission from any sales made.
For example, say you have a football blog, you could add affiliate links to football boots in your posts and make a commission off any boots sold, typically this would be 5 – 15%.
Hai centos de esquemas de mercadotecnia afiliada por aí, debes investigar isto en función do teu nicho, quedaría sorprendido de cantas empresas teñen esquemas. Amazonas offers one of the most popular ones, it’s easy too!
Add special affiliate links to ANY product on the Amazon and make a commission of 4 – 10%. Amazon may not be the best paying site (this will vary wildly depending on the niche of your blog), but they do offer a HUGE range of products.
Anuncios
Adverts are simple, got spare space on your blog, place an advert, often you will find these placed in the sidebar and within the content of any articles. Adverts can generate anything from $0.05 to $5 per click depending on the niche of your blog.
Google AdSense is the de facto online advertising company, simply fill in a 2-page signup form and you can start serving adverts to all your visitors. You don’t have to talk directly to companies to sell your advertising space.
Google’s advertising pay-outs differ massively from niche to niche, a highly competitive niche like credit cards, insurance, loans, etc.. will pay higher than less competitive ones.
Isto débese á natureza dos anunciantes que liciten para facer o seu anuncio, nese mesmo canto máis "popular" sexa o seu blog, máis se pode gañar.
Typically, you might expect something like a 0.5 – 3% click-through rate, i.e. the number of your visitors who actually click on the adverts.
Normalmente recoméndase unha boa combinación de ambas as dúas estratexias.
Próximos Pasos
Now that your WordPress blog has been set up and you’ve monetized it’s time to start expanding and really pushing your blog.
Here are my top tips going forward:
- Programa contido regular, you won’t always be in the mood to write content, use the built-in post scheduler so you can write multiple posts when you feel like it while still allowing regular content to flow. Articles every few days are better than 5 on the same day. Here is another Solución de automatización de WordPress.
- Aprende todo sobre SEO (search engine optimization) that you can, this is a huge topic, you will never fully learn it, but the more you know the more successful blog will be.
- Manter positivo, your blog will unlikely blossom overnight, it takes months of hard work, but in the end dedication and good content pays off.
Good luck and start blogging!


