
Today I am going to show you how to start a blog from scratch. And you won’t believe how easy it is to do.
So, let’s start your blogging journey!
We will need 4 things:
- domeinu – Domain is the name of the blog which you type in the browser address bar. “www.HostingPill.com” is the domain of this site.
- Ostatua – Hosting is the “home” of your blog where it will “stay”. It is usually a server at a web hosting company.
- WordPress – WordPress is the “software” that will power your new blog.
- Design & Themes – To make your blog attractive design-wise you will need to install WordPress themes.
Ikasi buruz webgune motak WordPress-ekin sor dezakezu eta nola jakin dezakezu protect the blog behin gora eginda.
Domeinuak eta ostatua erosteko bi modu daude:
- Web ostalari beraren domeinuak eta ostatuak erosten dituzu
- Edo biak bereizita erosten dituzu
If you ask me, I would recommend going for Option 2 (buying separately) for two reasons:
- Eskaintza hobeak lortzen dituzu domeinuak eta ostatuak bereizten dituzunean erosiz gero.
- Arriskuak murrizten dituzu konpainia desberdinetatik erosiz.
gomendatzen dut NameCheap zure domeinuak eskuratzeko eta Bluehost web ostatuetarako.
NameCheap, izenak domeinu izenak prezio onean saltzen dituenez, ez da zure domeinua eta hornitzaile berarengandik erosi beharrik erosi.
BlueHost - Ni naiz erabiliz Bluehost orain dela 8 urte inguru nire guneetako batzuentzat eta nahiko fidagarriak direla iruditu zait.
In this step by step guide, I’m going to buy a domain, set up web hosting, install WordPress, configure WordPress and then talk about how you can make money blogging.
 Nola hasi Blog bat
1. urratsa. Eman izena zure domeinua
OHARRA: Domeinu bat baduzu jada, hau salta dezakezu eta zuzenean joan
Nola konfiguratu WordPress-erako ostatua atala.
Lehenik eta behin, domeinua erosteko unea da. Zer domeinu nahi duzun eta zer esaten duen zure WordPress blogari buruz pentsatu nahi izango duzu.
Sinets iezadazu, domeinu izen egokia aukeratzea lan zaila da gaur egun "onak dagoeneko desagertuta" daudelako.
Baliteke hauek ikusi nahi izatea 7 domeinu izenetarako aholkuak to get the right name for your site or you can use these tools to domeinuaren izenak sortu.
Once you have listed some of the domain name options, it’s time to check their availability.
Eta, jarraitu pauso hauek:
Urratsera 1. Joan www.Namecheap.com eta idatzi nahi duzun domeinua domeinu bilaketa koadroan.

Urratsera 2. If your domain is available then add it to the cart, consider also purchasing other TLD (Top level domains) of your name, for example, if your domain is ‘mytestdomain.com’ you might also want to pick up ‘mytestdomain.net’ and ‘mytestdomain.org’.
If your domain isn’t available, you’ll have to think of something else!

Urratsera 3. Click on ‘View Cart’. Make sure everything is as you expect and double-check your domain name is spelled correctly. If you are buying a .com domain, you will notice that you also must pay a small ICANN fee.

Urratsera 4. Zure eskaera baieztatu, domeinua automatikoki berriztatzea gomendatuko nuke.

Urratsera 5. Orain kontu bat sortzeko eskatuko dizu, xehetasun guztiak bete eta ziurtatu pasahitza gogoratzen duzula!

Urratsera 6. Hurrengo orrialdean, kontuko harremanetarako datuak betetzeko eskatzen dizu. Domeinuaren pribatutasuna aukeratu ez baduzu, informazio hori publikoa da edonork ikusteko. Egin klik 'Jarraitu'

Urratsera 7. Pay for your domain, you can choose from a credit card or PayPal. Click ‘Continue’ and that’s it, you are now the proud owner of your new domain.

2. urratsa. Konfiguratu WordPress-erako ostalaritza
Aukeratzea right web hosting company is a very important factor in starting a blog.
Merkatua garatutako ehunka web hosting enpresekin gainezka dago eta taktika guztiak erabiltzen dituzte zure negozioa lortzeko.
I have listed & answered few questions that most first-time site owners have about hosting.
Ikus ditzakezu hemen.
Orain prest zaudela, goazen gure ostatura.
We will setup your Bluehost account to start your first blog.
It offer a free domain (on Annual plans) and a 30 day money back guarantee, so you never have to worry about anything.
Urratsera 1. Joan www.Bluehost.com eta egin klik Hasi botoian.

Urratsera 2. Hautatu erosi nahi duzun plana. Demo honetarako, Oinarrizko Planarekin joango gara.

Urratsera 3. On this page, depending on whether you have a domain or want to get a new one, you can make your selection.

Urratsera 4. Once you have the domain, it’s time to enter your contact details.

Urratsera 5. Orain hautatu nahi duzun plana. Zenbat eta denbora gehiago hautatu, orduan eta beherapen handiagoa lortuko duzu.

Urratsera 6. Sartu zure kreditu txartelaren xehetasunak eta egin ordainketa.

Urratsera 7. Hori eginda, sortu zure pasahitza pantailan (ez ahaztu pasahitza nonbait gorde ezazu etorkizuneko erreferentziarako)

Urratsera 8. Now that you have created the password, it’s time to login!

3. urratsa. Lotu zure domeinua ostalaritzara
Beraz, zure WordPress hostinga erosi ondoren Bluehost zurea ezarri beharko duzu NameCheap ostalaritza seinalatzeko domeinua
Urratsera 1. Hasi saioa BlueHost account
Urratsera 2. Egin klik domeinuaren ezarpenetan
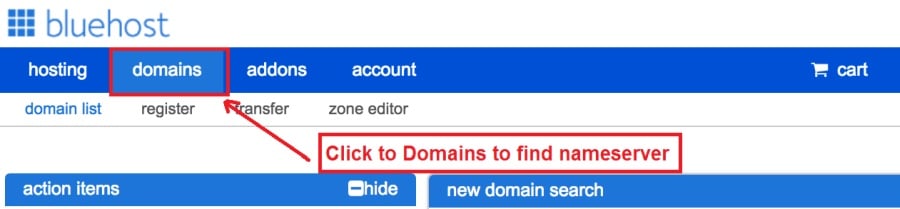
Urratsera 3. Click on the ‘Nameservers’ tab
Here are the default Nameservers of Bluehost:
NS1.Bluehost.com
NS2.Bluehost.com

Urratsera 5. Go to Namecheap and Login.
Urratsera 6. Once you logged in go Domain List ==> Domains ==> Select Domain ==> Select Manage ==> Under NameServers, select Custom and place your Bluehostizenak daude han

Urratsera 7. Egin klik Gorde aldaketak.
24 ordu iraun dezakegu aldaketa hori osatzeko, beraz ez kezkatu berehala lan egiten ez baduzu.
4. urratsa. Instalatu WordPress
Next, we need to install WordPress on the Bluehost hosting.
BTW, WordPress is a blogging platform for writing blog posts.
zorionez Bluehost instalazio automatikoa du, beraz, hori erakutsiko dizut.
Urratsera 1. Hasi saioa Bluehost

Urratsera 2. Webgunearen atalean egin klik 'Instalatu WordPress' botoian

Urratsera 3. Hautatu WordPress-en instalazio honetarako erabili nahi duzun domeinua, litekeena da domeinu bakarra edukitzea. Utzi direktorioaren eremua hutsik.

Urratsera 4. Now enter your blog name (can be changed later), username, email address, and password. Make sure to keep a note of these details. Make sure your password is secure, use an online password randomizer if possible, people will try to breach your WordPress blog.

Urratsera 5. Instalazioaren aurrerabidea orriaren goiko aldean jarrai dezakezu, nahiz eta normalean instalazioak 5 minutu behar izan.


Ikusten duzuen bezala erraza da WordPress instalatzea.
Now you can browse to http://yourdomain.com/wp-admin to login.
Step 5. Create a Blog in WordPress
Let’s get logged into the new WordPress blog.
1. Joan http://yourdomain.com/wp-admin webgunera eta sartu zure erabiltzaile izena eta pasahitza.

2. Orain administratzaileen arbola ikusteko gai izan beharko zenuke.

Saioa hasi ondoren merezi du zenbait gai ordenatzea, gaiak, pluginak eta edukia gehitzen hasi aurretik.
Pertsonalizatu Izenburua eta ezarri lehen orria
Beti gustatzen zaizkidan zenbait gauza daude WordPress-en instalatu ondoren
Settings -> General Settings. Here you can set your blog title, tagline, main email address, time zone, date format & Language. Make sure you set all of these things correctly now, as it may come back to haunt you if you don’t!

Settings -> Reading. Here you can decide what function you want your WordPress blog to take. You can set your front page to take people straight into the blog post or you can set which static page you want to be your home page.

Hori da oraingoz ezarri behar duguna. Gauza interesgarrienetara joan gaitezke!
Nola sortzen ditut Orrialde eta Mezu berriak?
To add new pages, go to Pages -> Add new, fill in your title, add some content and click publish. If you aren’t ready to publish the page, click draft.

To add a new post go to Posts -> Add New, it’s then the same procedure as above.

Nola Gehitu Orrialdeak / Mezuak Menuan
To add these pages to the menu, go to Appearance -> Menu. Select your menu and select ‘add to menu’, you can then drag and drop to arrange it.

Themes & Design
With WordPress, it’s really easy to create any design you can imagine without writing a single piece of code. And that is made possible only by WordPress themes.
WordPress has a lot of free theme designs to choose from.
Nola aurkitu WordPress-eko gai perfektua
Hemen bilatzen ari zaren hori aurkitzen ez baduzu, aukera gehiago egitera joan zaitezke hemen:
Themeforest – One of the oldest and the largest marketplace for WordPress theme. You get tons of high-quality themes at reasonable prices.

Sormen merkatua – A newer marketplace with quite a variety of WordPress themes. The themes on this site are quite different in terms of design than what you get on Themeforest.

GretaGaiak – Another great platform where you can get free and premium beautiful WordPress theme for your site.

Astra – Astra is the most lightweight and fully customizable WordPress theme.

It provides basic and advanced design options for blogs, single blog pages with a dedicated Blog Pro addon. Astra works seamlessly with all popular page builders like Beaver Builder, Elementor, etc.
How do I Install WordPress Theme
To install a new theme for your WordPress blog, follow these steps:
Urratsera 1. Admin kudeatzailean saioa hastean hautatu 'Itxura' eta gero ezkerreko menuko gaiak.

Urratsera 2. Egin klik 'Gehitu berria' botoian
Urratsera 3. Search for your WordPress theme using the search bar at the top right. If you have been provided a theme file you can select upload theme from the top of the page.

Urratsera 4. Egin klik Instalatu botoian
Urratsera 5. After a minute or so the new theme will finish installing. Now you can click customize and see what options you can change. This will vary a lot from theme to theme but usually, you can edit things like your logo, the rough layout of the page and some colors.


instalatu Plugins
Zer da plugin bat?
Plugins – as the name suggests are tools that add functionality to your WordPress blog. The best thing which I like about WordPress is – these plugins.
Plugins can turn your site from a simple blog to a fully-featured e-commerce store, a user forum, a video streaming site, a member’s only site, and much more. Of course, you can combine most of these plugins together to add huge functionality to your blog.
Adibidez, zure WordPress gunea produktuak linean saltzeko erabiltzen baduzu, onuragarria izan daiteke laguntza foro bat gehitzea.
WordPress gune bati funtzionaltasuna gehitu nahi duzunean, bilatu pluginak zure buruari zerbait sortzen hasi aurretik / garatzaile bati zuregatik egin dezan.
Pluginak instalatzea erraza da, zati gogorra zein pluginak instalatu nahi dituzun erabakitzen ari da. Doako plugin ugari daude eskuragarri, premium plugin ugari ere eskuragarri daude.
Where I can find more WordPress Plugins?
WordPress-en pluginentzako Interneteko bi baliabide onenak hauek dira:
1. WordPress.org – Tons of free plugins! But beware – some of the plugins are demo versions of the paid ones. Still, it’s a good place to find what you are looking for.

2. CodeCanyon – Home to some of the best plugins on the internet. Although they are paid, they offer really good value for money. I usually get my plugins from here.

Gainera, ordaindutako pluginak erabiltzearen abantaila gutxi daude CodeCanyon:
- You get 6 months of free support from the plugin developer. So, if something is not working, you can approach the plugin developer via CodeCanyon eta konponduko dute zuretzako. Are gehiago, berme laguntza 12 hilabetez luza dezakezu tarifa nominala ordainduta.
- Pluginak kalitate handikoak dira eta ondo egiaztatu dira CodeCanyon. So, there are no chances of any malware in them. I had a bad experience in the past when I bought some free plugins from some random site.
Plugin bat erabaki ondoren, hona nola instalatzen duzun.
Nola instalatu WordPress plugina
Urratsera 1. From the Admin Dashboard select Plugins -> Add New
Urratsera 2. Bilatu nahi duzun plugin-a edo igo itzazu fitxategiak baldin badituzu

Urratsera 3. Egin klik Instalatu eta eman minutu batzuk instalatzeko, orduan eta handiagoa izango da plugin-a zenbat eta denbora gehiago beharko duen instalatzeko.
Urratsera 4. From the Plugins -> Plugins page activate your plugin, depending on the plugin you are using you may then be prompted to fill in some additional settings.
Here are some of my favorite Plugins:
Doako Pluginak:
- Contact form 7 (Free)– This is a simple free email contact form for your blog. It’s easy to set up, always works, and doesn’t take up much space!
- Askimetroa (Doakoa) - Zure WordPress blogean iruzkinak baimentzen ari bazara ere, Askimet iruzkinen plugin-a behar duzu. Plugin honek masiboki murriztuko duzu lortuko duzun spam iruzkin kopurua.
- Yoast SEO (Doakoa) – Download this plugin before you download any. It’s a MUST HAVE plugin for SEO.
Ordaindutako pluginak:
- Visual Composer (ordaindua) – It’s THE BEST Page Builder for WordPress. Just drag and drop and you can create stunning page layouts in minutes. Love it!
- Ninja Popups (ordaindua) – If you ever want to have the ability for the user to signup for your email newsletter from your blog, this is the plugin to have. Few clicks and you get a beautiful popup done.
- BackupGuard (Paid) – It’s too easy to accidentally break your WordPress blog when installing a 3rd Party Plugin or theme, make sure you always babeskopiak izan. And this plugin does just that. It’s a lifesaver!
Nola irabazi dirua zure Blogetik
Now that you have your WordPress blog nicely set up, with some content, a soineko WordPress gaia, and some great functionality added by Plugins it’s time to monetize your blog! There are two core methods to for making money from your blog, and everything boils down to these
Affiliate:
Affiliate marketing is where you promote other company’s products directly and earn a commission from any sales made.
For example, say you have a football blog, you could add affiliate links to football boots in your posts and make a commission off any boots sold, typically this would be 5 – 15%.
Badira ehunka kidea marketin eskemak hor, zure ikerketa nitxo arabera gehiago aztertu beharko zenuke, harrituta geratuko zara zenbat enpresek dituzten eskemak. Amazon offers one of the most popular ones, it’s easy too!
Add special affiliate links to ANY product on the Amazon and make a commission of 4 – 10%. Amazon may not be the best paying site (this will vary wildly depending on the niche of your blog), but they do offer a HUGE range of products.
iragarkiak
Adverts are simple, got spare space on your blog, place an advert, often you will find these placed in the sidebar and within the content of any articles. Adverts can generate anything from $0.05 to $5 per click depending on the niche of your blog.
Google AdSense is the de facto online advertising company, simply fill in a 2-page signup form and you can start serving adverts to all your visitors. You don’t have to talk directly to companies to sell your advertising space.
Google’s advertising pay-outs differ massively from niche to niche, a highly competitive niche like credit cards, insurance, loans, etc.. will pay higher than less competitive ones.
Iragarkien iragarkiak lizitatu nahi dituzten iragarleen izaeragatik da, blog honetan zenbat eta ezagunagoa izan, orduan eta etekin handiagoa ateratzeko.
Typically, you might expect something like a 0.5 – 3% click-through rate, i.e. the number of your visitors who actually click on the adverts.
Bi estrategien konbinazio ona gomendatzen da normalean.
Hurrengo Urratsak
Now that your WordPress blog has been set up and you’ve monetized it’s time to start expanding and really pushing your blog.
Here are my top tips going forward:
- Antolatu ohiko edukia, you won’t always be in the mood to write content, use the built-in post scheduler so you can write multiple posts when you feel like it while still allowing regular content to flow. Articles every few days are better than 5 on the same day. Here is another WordPress automatizazio irtenbidea.
- Ikasi SEO-ri buruz dena (search engine optimization) that you can, this is a huge topic, you will never fully learn it, but the more you know the more successful blog will be.
- Mantendu positiboa, your blog will unlikely blossom overnight, it takes months of hard work, but in the end dedication and good content pays off.
Good luck and start blogging!


