
Today I am going to show you how to start a blog from scratch. And you won’t believe how easy it is to do.
So, let’s start your blogging journey!
We will need 4 things:
- Domain – Domain is the name of the blog which you type in the browser address bar. “www.HostingPill.com” is the domain of this site.
- pediatria – Hosting is the “home” of your blog where it will “stay”. It is usually a server at a web hosting company.
- WordPress – WordPress is the “software” that will power your new blog.
- Design & Themes – To make your blog attractive design-wise you will need to install WordPress themes.
Amparà circa tippi di siti web pudete creà cù WordPress è sapè cumu si pò protect the blog una volta hè.
Ci hè dui modi per pudè cumprà duminii è hosting:
- Cumprate duminii è hosting da u listessu web host
- O cumprà i dui separatamente
If you ask me, I would recommend going for Option 2 (buying separately) for two reasons:
- Hè uttene megliu offerte quandu cumprate duminii è hosting da separatamente.
- Pudete riduzzione di u risicu da cumprendu in cumpagnie separate.
Vi ricu Namecheap per uttene u vostru duminiu è Bluehost per hosting web.
Namecheap, cum'è u nome implica vende nomi di duminiu per un prezzu bonu, ùn ci hè bisognu di cumprà u vostru duminiu è l'alloghju da u stessu fornitore per chì aghju compru.
BlueHost - Eiu socu usannu Bluehost dapoi circa 8 anni per alcuni di i mo siti è l'anu trovu abbastanza affidabili.
In this step by step guide, I’m going to buy a domain, set up web hosting, install WordPress, configure WordPress and then talk about how you can make money blogging.
 Cumu Cumincià un Blog
Passu 1. Registrate U vostru Dominiu
DA: Sè avete digià un duminiu, pudete scurdate questu è direttamente à andà
Cumu Configurare Hosting per WordPress rùbbrica.
Per prima cosa, hè ora di cumprà u duminiu. Vulete pensà à ciò chì duminiu vulete è ciò chì dice di u vostru blog WordPress.
Cridimi, sceglite u nome di duminiu ghjustu hè un compitu difficiule avà postu chì tutti i "boni sò digià andati".
Puderete vulete verificà questi 7 Cunsiglii di Domain Name to get the right name for your site or you can use these tools to generà idee di duminiu.
Once you have listed some of the domain name options, it’s time to check their availability.
È per quessa, seguitate i seguenti passi:
Step 1. andate à www.Namecheap.com è scrivite u duminiu chì vulete in a casella di ricerca di duminiu.

Step 2. If your domain is available then add it to the cart, consider also purchasing other TLD (Top level domains) of your name, for example, if your domain is ‘mytestdomain.com’ you might also want to pick up ‘mytestdomain.net’ and ‘mytestdomain.org’.
If your domain isn’t available, you’ll have to think of something else!

Step 3. Click on ‘View Cart’. Make sure everything is as you expect and double-check your domain name is spelled correctly. If you are buying a .com domain, you will notice that you also must pay a small ICANN fee.

Step 4. Confirmate u vostru ordine, cunsigliu per stabilisce u duminiu in Auto-Rinnova.

Step 5. Avà vi dumandarà di creà un contu, riempite tutti i dettagli è assicuratevi di ricurdà a password!

Step 6. Nantu a pagina prossima, vi dumanda di riempie u vostru infurmazione di cuntattu di u vostru contu. Se ùn avete micca optatu per a privacy di u duminiu, allora questa informazione hè publicu per qualsiasi vede. Cliccate "Continuà"

Step 7. Pay for your domain, you can choose from a credit card or PayPal. Click ‘Continue’ and that’s it, you are now the proud owner of your new domain.

Passu 2. Stabilisce Hosting Per WordPress
A sceglie di u right web hosting company is a very important factor in starting a blog.
U mercatu hè inundatu cù centinaie di cumpagnie di ospiti web è impieganu tutte e tattiche per uttene u vostru affari.
I have listed & answered few questions that most first-time site owners have about hosting.
Pudete vede li ccà.
Avà, chì site pronta, andemu à u nostru hosting.
We will setup your Bluehost account to start your first blog.
It offer a free domain (on Annual plans) and a 30 day money back guarantee, so you never have to worry about anything.
Step 1. andate à FE.Bluehost.net è cliccate nantu à Iniziale Pulsà.

Step 2. Selezziunate u pianu chì vulete acquistà. Per sta demo, anderemu cù u so Pianu Basicu.

Step 3. On this page, depending on whether you have a domain or want to get a new one, you can make your selection.

Step 4. Once you have the domain, it’s time to enter your contact details.

Step 5. Avà selezziunate u pianu chì vulete andà. Più hè u tempu chì selezziunate, più scontu ottenevi.

Step 6. Intra i dettagli di a vostra carta di creditu è fate u pagamentu.

Step 7. Una volta chì hè fatta, crea a vostra password in questa schermu (ùn vi scurdate micca di guardà a password in qualchì locu per a futura riferenza)

Step 8. Now that you have created the password, it’s time to login!

Step 3. Cunnette u vostru Dominiu à Hosting
Cusì, una volta avete acquistatu u vostru hosting di WordPress da Bluehost vi tuccherà à mette u vostru Namecheap duminiu per puntuà à questu hosting.
Step 1. Scrive à u vostru BlueHost account
Step 2. Cliccate nantu à i paràmetri di duminiu
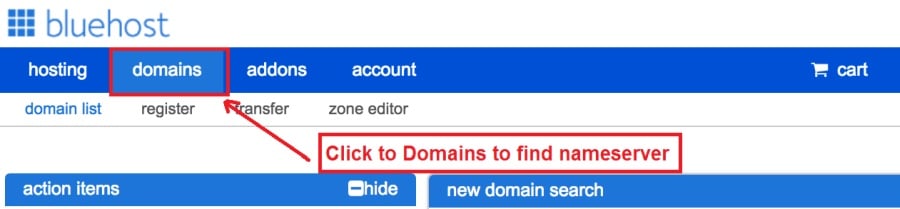
Step 3. Click on the ‘Nameservers’ tab
Here are the default Nameservers of Bluehost:
NS1Bluehost.net
NS2Bluehost.net

Step 5. Go to Namecheap and Login.
Step 6. Once you logged in go Domain List ==> Domains ==> Select Domain ==> Select Manage ==> Under NameServers, select Custom and place your Bluehost'U noms deveru quì

Step 7. Cliccate Salvà cambiamenti.
U passu pò piglià sin'à 24 ore per esse mudificatu cusì ùn preoccupate micca s'ellu ùn funziona subitu.
Passu 4. Installa WordPress
Next, we need to install WordPress on the Bluehost pediatria.
BTW, WordPress is a blogging platform for writing blog posts.
Thankfully Bluehost hà una stallazione automatizata cusì vi mostrarà chì.
Step 1. Login per Bluehost

Step 2. In a sezione di u situ web cliccate nantu à "Installa WordPress".

Step 3. Sceglite u duminiu chì vulete usà per questa installazione WordPress, probabilmente averà solu un duminiu. Lascià u campu di repertoriu in biancu.

Step 4. Now enter your blog name (can be changed later), username, email address, and password. Make sure to keep a note of these details. Make sure your password is secure, use an online password randomizer if possible, people will try to breach your WordPress blog.

Step 5. Pudete guardà a traccia di u prugressu di l'installazione in u cima di a pagina, anche se a stallazione dura tipicamente 5 minuti.


Comu pudete vede hè semplice per uttene installazione di WordPress.
Now you can browse to http://yourdomain.com/wp-admin to login.
Step 5. Create a Blog in WordPress
Let’s get logged into the new WordPress blog.
1. Vai à http://yourdomain.com/wp-admin è inserisci u vostru nome d'utilizatore è a vostra password.

2. Ora puderebbe esse capace di vede u dminboard.

Una volta cunnessu, vale a pena acquistà uni pochi di cose prima di trascinà à temi, plugins è aghjustendu cuntenutu.
Personalizà Titulu è Set Pagina iniziale
Ci hè uni pochi cose chì mi piace sempre à stallà ghjustu dopu à stallà WordPress
Settings -> General Settings. Here you can set your blog title, tagline, main email address, time zone, date format & Language. Make sure you set all of these things correctly now, as it may come back to haunt you if you don’t!

Settings -> Reading. Here you can decide what function you want your WordPress blog to take. You can set your front page to take people straight into the blog post or you can set which static page you want to be your home page.

Hè tuttu ciò chì avemu daveru bisognu di stabilisce per ora. Pudemu passà à e cose più interessanti!
Cumu creu novi Pagine è Posts?
To add new pages, go to Pages -> Add new, fill in your title, add some content and click publish. If you aren’t ready to publish the page, click draft.

To add a new post go to Posts -> Add New, it’s then the same procedure as above.

Cumu aghjunghje Pagine / Posts à u Menu
To add these pages to the menu, go to Appearance -> Menu. Select your menu and select ‘add to menu’, you can then drag and drop to arrange it.

Themes & Design
With WordPress, it’s really easy to create any design you can imagine without writing a single piece of code. And that is made possible only by WordPress themes.
WordPress has a lot of free theme designs to choose from.
Cumu truvà u tema di WordPress perfettu
Se ùn pudete micca truvà ciò chì cercate quì, pudete andà per più scelte quì:
Themeforest – One of the oldest and the largest marketplace for WordPress theme. You get tons of high-quality themes at reasonable prices.

Mercatu creativo – A newer marketplace with quite a variety of WordPress themes. The themes on this site are quite different in terms of design than what you get on Themeforest.

GretaTemi – Another great platform where you can get free and premium beautiful WordPress theme for your site.

Astra – Astra is the most lightweight and fully customizable WordPress theme.

It provides basic and advanced design options for blogs, single blog pages with a dedicated Blog Pro addon. Astra works seamlessly with all popular page builders like Beaver Builder, Elementor, etc.
How do I Install WordPress Theme
To install a new theme for your WordPress blog, follow these steps:
Step 1. Quandu si accede in u dashboard admin sceglite 'Apparenza' è poi temi da u menù di manca.

Step 2. Cliccate nantu à u buttone "Add New"
Step 3. Search for your WordPress theme using the search bar at the top right. If you have been provided a theme file you can select upload theme from the top of the page.

Step 4. Cliccate Instalà
Step 5. After a minute or so the new theme will finish installing. Now you can click customize and see what options you can change. This will vary a lot from theme to theme but usually, you can edit things like your logo, the rough layout of the page and some colors.


Install plugins
Cosa hè un plugin?
Plugins – as the name suggests are tools that add functionality to your WordPress blog. The best thing which I like about WordPress is – these plugins.
Plugins can turn your site from a simple blog to a fully-featured e-commerce store, a user forum, a video streaming site, a member’s only site, and much more. Of course, you can combine most of these plugins together to add huge functionality to your blog.
Per esempiu, se site aduprendu u vostru situ di WordPress per vende i prudutti in linea, pò esse benefiziu per aghjunà un foru di supportu.
Sempre chì vulete aghjunghje una funziunalità à un situ WordPress, cercate i plugins prima di vede qualcosa di creà / pagà un sviluppatore per fà per voi.
L'installazione di i plugins hè faciule, a parte dura hè di decide quale plugins chì vulete stallà. Ci hè millaie di plugins dispunibili per liberu, ci sò ancu parechji plugins premium dispunibili.
Where I can find more WordPress Plugins?
I dui migliori risorse in Internet per i WordPress Plugins sò:
1. WordPress.org – Tons of free plugins! But beware – some of the plugins are demo versions of the paid ones. Still, it’s a good place to find what you are looking for.

2. CodeCanyon – Home to some of the best plugins on the internet. Although they are paid, they offer really good value for money. I usually get my plugins from here.

È ci sò pochi avantaghji per andà per plugins pagati da CodeCanyon:
- You get 6 months of free support from the plugin developer. So, if something is not working, you can approach the plugin developer via CodeCanyon è l'andaranu per voi. In più, pudete estenderà u sustegnu di garanzia per 12 mesi paghendu una tarifa nominale.
- I plugins sò di alta qualità, currettamente verificati CodeCanyon. So, there are no chances of any malware in them. I had a bad experience in the past when I bought some free plugins from some random site.
Una volta avete decisu nantu à un plugin quì hè cumu installà.
Cumu Installa un Plugin di WordPress
Step 1. From the Admin Dashboard select Plugins -> Add New
Step 2. Ricerca u plugin chì vulete, o carricami si avete i fugliali

Step 3. Cliccate su Install, è dà uni pochi di minuti per stallà, u più grande u plugin, più duverà per installà.
Step 4. From the Plugins -> Plugins page activate your plugin, depending on the plugin you are using you may then be prompted to fill in some additional settings.
Here are some of my favorite Plugins:
Plugins Gratuiti:
- Contact form 7 (Free)– This is a simple free email contact form for your blog. It’s easy to set up, always works, and doesn’t take up much space!
- Askimet (Gratuitu) - Se siate ancu cunzidendu chì permettenu i cummenti nantu à u vostru blog di WordPress avete bisognu di u plugin di spuntami Askimet. Questu plugin reduce enormamente u numeru di cumenti spami chì uttene.
- Yoast SEO (Gratuitu) – Download this plugin before you download any. It’s a MUST HAVE plugin for SEO.
Plugins Pagati:
- Compositore Visual (Pagatu) – It’s THE BEST Page Builder for WordPress. Just drag and drop and you can create stunning page layouts in minutes. Love it!
- Popup Ninja (Pagate) – If you ever want to have the ability for the user to signup for your email newsletter from your blog, this is the plugin to have. Few clicks and you get a beautiful popup done.
- BackupGuard (Paid) – It’s too easy to accidentally break your WordPress blog when installing a 3rd Party Plugin or theme, make sure you always avè backups. And this plugin does just that. It’s a lifesaver!
Cume Fare soldi da u vostru Blog
Now that you have your WordPress blog nicely set up, with some content, a tema di WordPress, and some great functionality added by Plugins it’s time to monetize your blog! There are two core methods to for making money from your blog, and everything boils down to these
Affiliate:
Affiliate marketing is where you promote other company’s products directly and earn a commission from any sales made.
For example, say you have a football blog, you could add affiliate links to football boots in your posts and make a commission off any boots sold, typically this would be 5 – 15%.
Ci hè centinaie di schemi di marketing di affiliazione fora quì, duvete investigà ancu questu sicondu u vostru nichu, serebbe stupitu chì parechje cumpagnie anu scemi. Amazon offers one of the most popular ones, it’s easy too!
Add special affiliate links to ANY product on the Amazon and make a commission of 4 – 10%. Amazon may not be the best paying site (this will vary wildly depending on the niche of your blog), but they do offer a HUGE range of products.
Adverts
Adverts are simple, got spare space on your blog, place an advert, often you will find these placed in the sidebar and within the content of any articles. Adverts can generate anything from $0.05 to $5 per click depending on the niche of your blog.
Google AdSense is the de facto online advertising company, simply fill in a 2-page signup form and you can start serving adverts to all your visitors. You don’t have to talk directly to companies to sell your advertising space.
Google’s advertising pay-outs differ massively from niche to niche, a highly competitive niche like credit cards, insurance, loans, etc.. will pay higher than less competitive ones.
Questu hè dovutu à a natura di l'annunziatori chì licitanu per uttene u so annunziu pusatu, in questu stissu u più "populari" blogu u vostru più pudete stà à guadagnà.
Typically, you might expect something like a 0.5 – 3% click-through rate, i.e. the number of your visitors who actually click on the adverts.
Una bona cumminazione di e duie strategie hè generalmente cunsigliata.
Next Steps
Now that your WordPress blog has been set up and you’ve monetized it’s time to start expanding and really pushing your blog.
Here are my top tips going forward:
- Pianificà un cuntenutu rigulari, you won’t always be in the mood to write content, use the built-in post scheduler so you can write multiple posts when you feel like it while still allowing regular content to flow. Articles every few days are better than 5 on the same day. Here is another Soluzione d'automatizazione WordPress.
- Amparate tuttu nantu à u SEO (search engine optimization) that you can, this is a huge topic, you will never fully learn it, but the more you know the more successful blog will be.
- Mantene pusitivu, your blog will unlikely blossom overnight, it takes months of hard work, but in the end dedication and good content pays off.
Good luck and start blogging!


