
Today I am going to show you how to start a blog from scratch. And you won’t believe how easy it is to do.
So, let’s start your blogging journey!
We will need 4 things:
- Domän – Domain is the name of the blog which you type in the browser address bar. “www.HostingPill.com” is the domain of this site.
- värd – Hosting is the “home” of your blog where it will “stay”. It is usually a server at a web hosting company.
- hood.discount – WordPress is the “software” that will power your new blog.
- Design och teman – To make your blog attractive design-wise you will need to install WordPress themes.
Lär dig om typer av webbplatser du kan skapa med WordPress och vet hur du kan protect the blog när det är uppe.
Det finns två sätt att köpa domäner och värd:
- Du köper domäner och värd från samma webbhotell
- Eller så köper du båda separat
If you ask me, I would recommend going for Option 2 (buying separately) for two reasons:
- Du får bättre erbjudanden när du handlar domäner och värd separat.
- Du minskar risken genom att köpa den från separata företag.
Jag rekomenderar Namecheap för att få dina domäner och Bluehost för webbhotell.
Namecheap, som namnet antyder säljer domännamn till ett bra pris, det finns inget behov av att köpa din domän och hosting från samma leverantör så jag har handlat runt.
Bluehost - Jag är med hjälp av Bluehost i cirka åtta år nu för några av mina webbplatser och har funnit dem vara ganska tillförlitliga.
In this step by step guide, I’m going to buy a domain, set up web hosting, install WordPress, configure WordPress and then talk about how you can make money blogging.
 Hur man startar en blogg
Steg 1. Registrera ditt domän
OBS: Om du redan äger en domän kan du hoppa över den här och gå direkt till
Hur man installerar värd för WordPress sektion.
Första saker först, det är dags att köpa domänen. Du vill tänka på vilken domän du vill och vad den säger om din WordPress-blogg.
Tro mig, att välja rätt domännamn är en svår uppgift för närvarande eftersom alla "bra är redan borta".
Du kanske vill kolla in dessa 7 tips om domännamn to get the right name for your site or you can use these tools to generera idéer för domännamn.
Once you have listed some of the domain name options, it’s time to check their availability.
Och för det följer du stegen nedan:
Steg 1. Gå till www.Namecheap.com och skriv den domän du vill ha i domänens sökruta.

Steg 2. If your domain is available then add it to the cart, consider also purchasing other TLD (Top level domains) of your name, for example, if your domain is ‘mytestdomain.com’ you might also want to pick up ‘mytestdomain.net’ and ‘mytestdomain.org’.
If your domain isn’t available, you’ll have to think of something else!

Steg 3. Click on ‘View Cart’. Make sure everything is as you expect and double-check your domain name is spelled correctly. If you are buying a .com domain, you will notice that you also must pay a small ICANN fee.

Steg 4. Bekräfta din beställning, jag rekommenderar att du ställer in domänen till Auto-Renew.

Steg 5. Den kommer nu att be dig att skapa ett konto, fylla i alla detaljer och se till att du kommer ihåg lösenordet!

Steg 6. På nästa sida ber den dig fylla i din kontaktinformation. Om du inte har valt domänskydd är denna information offentlig för alla att se. Klicka på "Fortsätt"

Steg 7. Pay for your domain, you can choose from a credit card or PayPal. Click ‘Continue’ and that’s it, you are now the proud owner of your new domain.

Steg 2. Ställ in värd för WordPress
Välja right web hosting company is a very important factor in starting a blog.
Marknaden är översvämmad av hundratals webbhotellföretag och de använder alla taktiker för att få ditt företag.
I have listed & answered few questions that most first-time site owners have about hosting.
Du kan se dem här..
Nu när du är redo, låt oss komma till vår värd.
We will setup your Bluehost account to start your first blog.
It offer a free domain (on Annual plans) and a 30 day money back guarantee, so you never have to worry about anything.
Steg 1. Gå till www.Bluehost.com och klicka på knappen Komma igång.

Steg 2. Välj planen du vill köpa. För den här demonstrationen kommer vi att gå med deras grundläggande plan.

Steg 3. On this page, depending on whether you have a domain or want to get a new one, you can make your selection.

Steg 4. Once you have the domain, it’s time to enter your contact details.

Steg 5. Välj nu den plan du vill gå efter. Ju längre du väljer, desto mer rabatt får du.

Steg 6. Ange dina kreditkortsuppgifter och gör betalningen.

Steg 7. När det är gjort skapar du ditt lösenord på den här skärmen (glöm inte att det lagrar ditt lösenord någonstans för framtida referens)

Steg 8. Now that you have created the password, it’s time to login!

Steg 3. Anslut din domän till webbhotell
Så när du har köpt din WordPress-värd från Bluehost du måste ställa in din Namecheap domän för att peka på denna värd.
Steg 1. Logga in på ditt BlueHost account
Steg 2. Klicka på domäninställningar
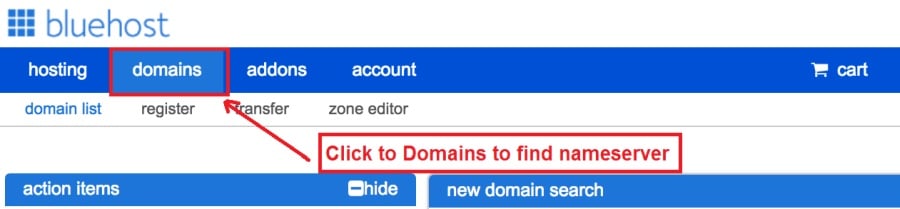
Steg 3. Click on the ‘Nameservers’ tab
Here are the default Nameservers of Bluehost:
NS1.Bluehost.com
NS2.Bluehost.com

Steg 5. Go to Namecheap and Login.
Steg 6. Once you logged in go Domain List ==> Domains ==> Select Domain ==> Select Manage ==> Under NameServers, select Custom and place your Bluehostär namnservrarna där

Steg 7. Klicka på Spara ändringar.
Det kan ta upp till 24 timmar innan denna ändring är klar så oroa dig inte om den inte fungerar direkt.
Steg 4. Installera WordPress
Next, we need to install WordPress on the Bluehost värd.
BTW, WordPress is a blogging platform for writing blog posts.
Tack och lov Bluehost har en automatiserad installation så jag ska visa er det.
Steg 1. Logga in till Bluehost

Steg 2. Klicka på 'Installera WordPress' i webbplatsavsnittet

Steg 3. Välj den domän du vill använda för den här WordPress-installationen, du kommer troligtvis bara att ha en domän. Lämna katalogfältet tomt.

Steg 4. Now enter your blog name (can be changed later), username, email address, and password. Make sure to keep a note of these details. Make sure your password is secure, use an online password randomizer if possible, people will try to breach your WordPress blog.

Steg 5. Du kan hålla reda på installationsprocessen högst upp på sidan, men installationen tar vanligtvis 5 minuter.


Som du ser är det enkelt att få WordPress installerat.
Now you can browse to http://yourdomain.com/wp-admin to login.
Step 5. Create a Blog in WordPress
Let’s get logged into the new WordPress blog.
1. Gå till http://yourdomain.com/wp-admin och ange ditt användarnamn och lösenord.

2. Du bör nu kunna se admin-instrumentpanelen.

När du är inloggad är det värt att få några saker sorterade innan vi går över till teman, plugins och lägger till innehåll.
Anpassa titel och ställa in framsidan
Det finns några saker jag alltid gillar att ställa in direkt efter installation av WordPress
Settings -> General Settings. Here you can set your blog title, tagline, main email address, time zone, date format & Language. Make sure you set all of these things correctly now, as it may come back to haunt you if you don’t!

Settings -> Reading. Here you can decide what function you want your WordPress blog to take. You can set your front page to take people straight into the blog post or you can set which static page you want to be your home page.

Det är allt vi verkligen behöver för nu. Vi kan gå vidare till de mer intressanta sakerna!
Hur skapar jag nya sidor och inlägg?
To add new pages, go to Pages -> Add new, fill in your title, add some content and click publish. If you aren’t ready to publish the page, click draft.

To add a new post go to Posts -> Add New, it’s then the same procedure as above.

Hur man lägger till sidor / inlägg i menyn
To add these pages to the menu, go to Appearance -> Menu. Select your menu and select ‘add to menu’, you can then drag and drop to arrange it.

Teman & Design
With WordPress, it’s really easy to create any design you can imagine without writing a single piece of code. And that is made possible only by WordPress themes.
hood.discount has a lot of free theme designs to choose from.
Hur man hittar det perfekta WordPress-temat
Om du inte hittar det du söker här kan du ta fler val här:
Themeforest – One of the oldest and the largest marketplace for WordPress theme. You get tons of high-quality themes at reasonable prices.

Kreativmarknad – A newer marketplace with quite a variety of WordPress themes. The themes on this site are quite different in terms of design than what you get on Themeforest.

Greta-teman – Another great platform where you can get free and premium beautiful WordPress theme for your site.

Astra – Astra is the most lightweight and fully customizable WordPress theme.

It provides basic and advanced design options for blogs, single blog pages with a dedicated Blog Pro addon. Astra works seamlessly with all popular page builders like Beaver Builder, Elementor, etc.
How do I Install WordPress Theme
To install a new theme for your WordPress blog, follow these steps:
Steg 1. När du är inloggad på admin-instrumentpanelen väljer du 'Utseende' och sedan teman från den vänstra menyn.

Steg 2. Klicka på knappen "Lägg till ny"
Steg 3. Search for your WordPress theme using the search bar at the top right. If you have been provided a theme file you can select upload theme from the top of the page.

Steg 4. Klicka på Installera
Steg 5. After a minute or so the new theme will finish installing. Now you can click customize and see what options you can change. This will vary a lot from theme to theme but usually, you can edit things like your logo, the rough layout of the page and some colors.


Installera insticksprogram
Vad är en plugin?
Plugins – as the name suggests are tools that add functionality to your WordPress blog. The best thing which I like about WordPress is – these plugins.
Plugins can turn your site from a simple blog to a fully-featured e-commerce store, a user forum, a video streaming site, a member’s only site, and much more. Of course, you can combine most of these plugins together to add huge functionality to your blog.
Om du till exempel använder din WordPress-webbplats för att sälja produkter online kan det vara fördelaktigt att lägga till ett forum för support.
När du vill lägga till funktionalitet på en WordPress-webbplats, se till plugins innan du tittar på att skapa något själv / betala en utvecklare för att göra det åt dig.
Det är enkelt att installera plugins, den hårda delen bestämmer vilka plugins du vill installera. Det finns tusentals plugins tillgängliga gratis, det finns också många premium plugins tillgängliga.
Where I can find more WordPress Plugins?
De två bästa resurserna på internet för WordPress Plugins är:
1. WordPress.org – Tons of free plugins! But beware – some of the plugins are demo versions of the paid ones. Still, it’s a good place to find what you are looking for.

2. CodeCanyon – Home to some of the best plugins on the internet. Although they are paid, they offer really good value for money. I usually get my plugins from here.

Och det finns få fördelar med att gå för betalda plugins från CodeCanyon:
- You get 6 months of free support from the plugin developer. So, if something is not working, you can approach the plugin developer via CodeCanyon och de kommer att fixa det åt dig. Dessutom kan du utöka garantisupporten i 12 månader genom att betala en nominell avgift.
- Plugins är av hög kvalitet och kontrolleras noggrant av CodeCanyon. So, there are no chances of any malware in them. I had a bad experience in the past when I bought some free plugins from some random site.
När du har bestämt dig för ett plugin så här installerar du det.
Hur man installerar ett WordPress-plugin
Steg 1. From the Admin Dashboard select Plugins -> Add New
Steg 2. Sök efter det plugin du vill ha eller ladda upp det om du har filerna

Steg 3. Klicka på Installera och ge det några minuter att installera, desto större plugin desto längre tid tar det att installera.
Steg 4. From the Plugins -> Plugins page activate your plugin, depending on the plugin you are using you may then be prompted to fill in some additional settings.
Here are some of my favorite Plugins:
Gratis plugins:
- Contact form 7 (Free)– This is a simple free email contact form for your blog. It’s easy to set up, always works, and doesn’t take up much space!
- Askimet (gratis) - Om du till och med överväger att tillåta kommentarer på din WordPress-blogg behöver du Askimet-kommentaren spam-plugin. Denna plugin minskar antalet spam-kommentarer du får.
- Yoast SEO (gratis) – Download this plugin before you download any. It’s a MUST HAVE plugin for SEO.
Betalda plugins:
- Visuell kompositör (betald) – It’s THE BEST Page Builder for WordPress. Just drag and drop and you can create stunning page layouts in minutes. Love it!
- Ninja Popups (betald) – If you ever want to have the ability for the user to signup for your email newsletter from your blog, this is the plugin to have. Few clicks and you get a beautiful popup done.
- BackupGuard (Paid) – It’s too easy to accidentally break your WordPress blog when installing a 3rd Party Plugin or theme, make sure you always har säkerhetskopior. And this plugin does just that. It’s a lifesaver!
Hur man tjänar pengar på din blogg
Now that you have your WordPress blog nicely set up, with some content, a slick WordPress-tema, and some great functionality added by Plugins it’s time to monetize your blog! There are two core methods to for making money from your blog, and everything boils down to these
Dotterbolag:
Affiliate marketing is where you promote other company’s products directly and earn a commission from any sales made.
For example, say you have a football blog, you could add affiliate links to football boots in your posts and make a commission off any boots sold, typically this would be 5 – 15%.
Det finns hundratals affiliate-marknadsföringsprogram där ute, du bör undersöka detta ytterligare beroende på din nisch. Du skulle bli förvånad över hur många företag som har system. Amazon offers one of the most popular ones, it’s easy too!
Add special affiliate links to ANY product on the Amazon and make a commission of 4 – 10%. Amazon may not be the best paying site (this will vary wildly depending on the niche of your blog), but they do offer a HUGE range of products.
annonser
Adverts are simple, got spare space on your blog, place an advert, often you will find these placed in the sidebar and within the content of any articles. Adverts can generate anything from $0.05 to $5 per click depending on the niche of your blog.
Google AdSense is the de facto online advertising company, simply fill in a 2-page signup form and you can start serving adverts to all your visitors. You don’t have to talk directly to companies to sell your advertising space.
Google’s advertising pay-outs differ massively from niche to niche, a highly competitive niche like credit cards, insurance, loans, etc.. will pay higher than less competitive ones.
Detta beror på arten av annonsörer som bjuder på att få sin annons placerad, i det samma ju mer "populär" din blogg desto mer kan du stå för att tjäna.
Typically, you might expect something like a 0.5 – 3% click-through rate, i.e. the number of your visitors who actually click on the adverts.
En bra kombination av båda strategierna rekommenderas vanligtvis.
Nästa steg
Now that your WordPress blog has been set up and you’ve monetized it’s time to start expanding and really pushing your blog.
Here are my top tips going forward:
- Planera vanligt innehåll, you won’t always be in the mood to write content, use the built-in post scheduler so you can write multiple posts when you feel like it while still allowing regular content to flow. Articles every few days are better than 5 on the same day. Here is another WordPress automatiseringslösning.
- Lär dig allt om SEO (search engine optimization) that you can, this is a huge topic, you will never fully learn it, but the more you know the more successful blog will be.
- Håll dig positiv, your blog will unlikely blossom overnight, it takes months of hard work, but in the end dedication and good content pays off.
Good luck and start blogging!


