
Today I am going to show you how to start a blog from scratch. And you won’t believe how easy it is to do.
So, let’s start your blogging journey!
We will need 4 things:
- domeniu – Domain is the name of the blog which you type in the browser address bar. “www.HostingPill.com” is the domain of this site.
- hosting – Hosting is the “home” of your blog where it will “stay”. It is usually a server at a web hosting company.
- WordPress – WordPress is the “software” that will power your new blog.
- Design și teme – To make your blog attractive design-wise you will need to install WordPress themes.
Aflați mai multe despre tipuri de site-uri web puteți crea cu WordPress și știți cum puteți protect the blog odată terminat.
Există două modalități prin care puteți cumpăra domenii și găzduire:
- Cumpărați domenii și găzduire de la aceeași gazdă web
- Sau cumperi ambele separat
If you ask me, I would recommend going for Option 2 (buying separately) for two reasons:
- Obțineți oferte mai bune atunci când achiziționați domenii și găzduiți separat.
- Reduceți riscul cumpărându-l de la companii separate.
Vă recomand Namecheap pentru obținerea domeniilor dvs. și Bluehost pentru găzduire web.
Namecheap, după cum numele implică vinde nume de domeniu la un preț bun, nu este necesar să vă achiziționați domeniul și găzduirea de la același furnizor, așa că am făcut cumpărături.
BlueHost - Eu sunt folosind Bluehost de aproximativ 8 ani acum pentru unele dintre site-urile mele și le-am găsit a fi destul de fiabile.
In this step by step guide, I’m going to buy a domain, set up web hosting, install WordPress, configure WordPress and then talk about how you can make money blogging.
 Cum să începeți un blog
Pasul 1. Înregistrați-vă domeniul
NOTĂ: Dacă dețineți deja un domeniu, puteți sări peste acest lucru și puteți merge direct la
Cum să configurați gazduirea pentru WordPress secţiune.
În primul rând, este timpul să achiziționați domeniul. Vei dori să te gândești la ce domeniu vrei și ce spune despre blogul tău WordPress.
Crede-mă, alegerea numelui de domeniu potrivit este o sarcină dificilă în zilele noastre, deoarece toate cele „bune sunt deja dispuse”.
Poate doriți să verificați acestea 7 Sfaturi pentru nume de domeniu to get the right name for your site or you can use these tools to generați idei de nume de domeniu.
Once you have listed some of the domain name options, it’s time to check their availability.
Și pentru asta, urmați pașii de mai jos:
Pasul 1. Mergi la pagina www.Namecheap.com și tastați domeniul dorit în caseta de căutare a domeniului.

Pasul 2. If your domain is available then add it to the cart, consider also purchasing other TLD (Top level domains) of your name, for example, if your domain is ‘mytestdomain.com’ you might also want to pick up ‘mytestdomain.net’ and ‘mytestdomain.org’.
If your domain isn’t available, you’ll have to think of something else!

Pasul 3. Click on ‘View Cart’. Make sure everything is as you expect and double-check your domain name is spelled correctly. If you are buying a .com domain, you will notice that you also must pay a small ICANN fee.

Pasul 4. Confirmă comanda ta, aș recomanda setarea domeniului la reînnoire automată.

Pasul 5. Acum vă va cere să vă creați un cont, să completați toate detaliile și să vă asigurați că vă amintiți parola!

Pasul 6. În pagina următoare, vă solicită să completați informațiile de contact ale contului. Dacă nu ați optat pentru confidențialitatea domeniului, aceste informații sunt publice pentru oricine. Faceți clic pe „Continuați”

Pasul 7. Pay for your domain, you can choose from a credit card or PayPal. Click ‘Continue’ and that’s it, you are now the proud owner of your new domain.

Pasul 2. Configurați gazduirea pentru WordPress
Alegerea right web hosting company is a very important factor in starting a blog.
Piața este inundată cu sute de companii de găzduire web și angajează toate tactici pentru a-ți face afacerea.
I have listed & answered few questions that most first-time site owners have about hosting.
Le puteți vedea aici.
Acum, că sunteți gata, să trecem la găzduirea noastră.
We will setup your Bluehost account to start your first blog.
It offer a free domain (on Annual plans) and a 30 day money back guarantee, so you never have to worry about anything.
Pasul 1. Mergi la pagina www.Bluehost.com și faceți clic pe butonul Începeți.

Pasul 2. Selectați planul pe care doriți să îl achiziționați. Pentru această demo, vom merge cu Planul lor de bază.

Pasul 3. On this page, depending on whether you have a domain or want to get a new one, you can make your selection.

Pasul 4. Once you have the domain, it’s time to enter your contact details.

Pasul 5. Acum selectați planul pentru care doriți să mergeți. Cu cât selectați mai mult termenul, cu atât veți primi mai multe reduceri.

Pasul 6. Introduceți datele cardului de credit și efectuați plata.

Pasul 7. După ce ați făcut acest lucru, creați parola pe acest ecran (nu uitați să stocați parola undeva pentru referințe viitoare)

Pasul 8. Now that you have created the password, it’s time to login!

Pasul 3. Conectați-vă domeniul la gazduire
Așadar, odată ce ați achiziționat hostingul dvs. WordPress de la Bluehost va trebui să vă setați Namecheap domeniu pentru a puncta această găzduire.
Pasul 1. Conectare la dvs. BlueHost cont
Pasul 2. Faceți clic pe setările domeniului
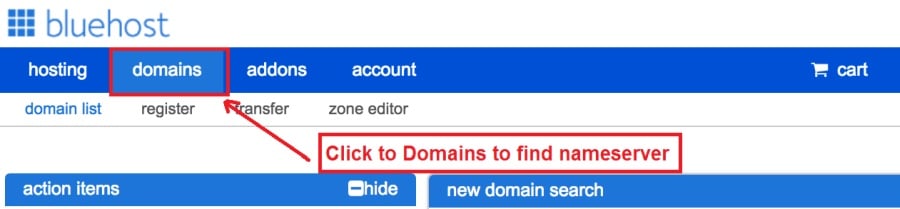
Pasul 3. Click on the ‘Nameservers’ tab
Here are the default Nameservers of Bluehost:
NS1.Bluehost.com
NS2.Bluehost.com

Pasul 5. Mergi la pagina Namecheap și Autentificare.
Pasul 6. Once you logged in go Domain List ==> Domains ==> Select Domain ==> Select Manage ==> Under NameServers, select Custom and place your Bluehostsunt numele de acolo

Pasul 7. Faceți clic pe Salvați modificările.
Poate dura până la 24 de ore până la finalizarea acestei modificări, așa că nu vă faceți griji dacă nu funcționează imediat.
Pasul 4. Instalează WordPress
Next, we need to install WordPress on the Bluehost găzduire.
BTW, WordPress is a blogging platform for writing blog posts.
din fericire Bluehost are o instalare automată așa că vă voi arăta asta.
Pasul 1. Logati pentru a Bluehost

Pasul 2. În secțiunea site web faceți clic pe „Instalare WordPress”

Pasul 3. Selectați domeniul pe care doriți să îl utilizați pentru această instalare WordPress, probabil că veți avea doar un singur domeniu. Lăsați câmpul director liber.

Pasul 4. Now enter your blog name (can be changed later), username, email address, and password. Make sure to keep a note of these details. Make sure your password is secure, use an online password randomizer if possible, people will try to breach your WordPress blog.

Pasul 5. Puteți urmări progresul instalării în partea de sus a paginii, deși instalarea durează de obicei 5 minute.


După cum vedeți, este simplu să instalați WordPress.
Now you can browse to http://yourdomain.com/wp-admin to login.
Step 5. Create a Blog in WordPress
Let’s get logged into the new WordPress blog.
1. Accesați http://yourdomain.com/wp-admin și introduceți numele de utilizator și parola.

2. Acum ar trebui să poți vedea tabloul de bord de admin.

Odată conectat, merită să fie selectate câteva lucruri înainte de a trece la teme, pluginuri și adăugarea de conținut.
Personalizați titlul și setați prima pagină
Există câteva lucruri pe care îmi place întotdeauna să le stabilesc imediat după instalarea WordPress
Settings -> General Settings. Here you can set your blog title, tagline, main email address, time zone, date format & Language. Make sure you set all of these things correctly now, as it may come back to haunt you if you don’t!

Settings -> Reading. Here you can decide what function you want your WordPress blog to take. You can set your front page to take people straight into the blog post or you can set which static page you want to be your home page.

Aceasta este tot ceea ce trebuie să stabilim deocamdată. Putem trece pe chestii mai interesante!
Cum creez noi pagini și postări?
To add new pages, go to Pages -> Add new, fill in your title, add some content and click publish. If you aren’t ready to publish the page, click draft.

To add a new post go to Posts -> Add New, it’s then the same procedure as above.

Cum se adaugă pagini / postări în meniu
To add these pages to the menu, go to Appearance -> Menu. Select your menu and select ‘add to menu’, you can then drag and drop to arrange it.

Teme și design
With WordPress, it’s really easy to create any design you can imagine without writing a single piece of code. And that is made possible only by WordPress themes.
WordPress has a lot of free theme designs to choose from.
Cum să găsiți tema WordPress perfectă
Dacă nu găsiți ceea ce căutați aici, puteți alege mai multe opțiuni aici:
ThemeForest – One of the oldest and the largest marketplace for WordPress theme. You get tons of high-quality themes at reasonable prices.

creativemarket – A newer marketplace with quite a variety of WordPress themes. The themes on this site are quite different in terms of design than what you get on Themeforest.

GretaThemes – Another great platform where you can get free and premium beautiful WordPress theme for your site.

Astra – Astra is the most lightweight and fully customizable WordPress theme.

It provides basic and advanced design options for blogs, single blog pages with a dedicated Blog Pro addon. Astra works seamlessly with all popular page builders like Beaver Builder, Elementor, etc.
How do I Install WordPress Theme
To install a new theme for your WordPress blog, follow these steps:
Pasul 1. Când vă conectați la tabloul de bord, selectați „Aspect” și apoi teme din meniul din stânga.

Pasul 2. Faceți clic pe butonul „Adaugă nou”
Pasul 3. Search for your WordPress theme using the search bar at the top right. If you have been provided a theme file you can select upload theme from the top of the page.

Pasul 4. Faceți clic pe Instalare
Pasul 5. After a minute or so the new theme will finish installing. Now you can click customize and see what options you can change. This will vary a lot from theme to theme but usually, you can edit things like your logo, the rough layout of the page and some colors.


Instala plugin-uri
Ce este un plugin?
Plugins – as the name suggests are tools that add functionality to your WordPress blog. The best thing which I like about WordPress is – these plugins.
Plugins can turn your site from a simple blog to a fully-featured e-commerce store, a user forum, a video streaming site, a member’s only site, and much more. Of course, you can combine most of these plugins together to add huge functionality to your blog.
De exemplu, dacă utilizați site-ul dvs. WordPress pentru a vinde produse online, poate fi benefic să adăugați un forum de asistență.
Ori de câte ori doriți să adăugați funcționalitate pe un site WordPress, uitați-vă la pluginuri înainte de a căuta să creezi ceva singur / să plătești un dezvoltator care să îl facă pentru tine.
Instalarea pluginurilor este ușoară, partea grea este să decideți ce pluginuri doriți să instalați. Există mii de plugin-uri disponibile gratuit, există și multe plugin-uri premium disponibile.
Where I can find more WordPress Plugins?
Cele mai bune două resurse de pe internet pentru plugin-uri WordPress sunt:
1. WordPress.org – Tons of free plugins! But beware – some of the plugins are demo versions of the paid ones. Still, it’s a good place to find what you are looking for.

2. CodeCanyon – Home to some of the best plugins on the internet. Although they are paid, they offer really good value for money. I usually get my plugins from here.

Și există câteva avantaje de a merge pentru pluginuri plătite CodeCanyon:
- You get 6 months of free support from the plugin developer. So, if something is not working, you can approach the plugin developer via CodeCanyon și o vor repara pentru tine. Mai mult, puteți prelungi suportul pentru garanție timp de 12 luni, plătind o taxă nominală.
- Plugin-urile sunt de înaltă calitate, verificate în detaliu CodeCanyon. So, there are no chances of any malware in them. I had a bad experience in the past when I bought some free plugins from some random site.
După ce te-ai decis asupra unui plugin, iată cum îl instalezi.
Cum să instalați un plugin WordPress
Pasul 1. From the Admin Dashboard select Plugins -> Add New
Pasul 2. Căutați pluginul dorit sau încărcați-l dacă aveți fișierele

Pasul 3. Faceți clic pe Install și acordați câteva minute pentru instalare, cu cât este mai mare pluginul, cu atât va dura mai mult pentru instalare.
Pasul 4. From the Plugins -> Plugins page activate your plugin, depending on the plugin you are using you may then be prompted to fill in some additional settings.
Here are some of my favorite Plugins:
Plugin-uri gratuite:
- Contact form 7 (Free)– This is a simple free email contact form for your blog. It’s easy to set up, always works, and doesn’t take up much space!
- Askimet (gratuit) - Dacă aveți în vedere chiar să permiteți comentarii pe blogul dvs. WordPress, aveți nevoie de pluginul de spam pentru comentarii Askimet. Acest plugin reduce masiv numărul de comentarii spam pe care le veți primi.
- Yoast SEO (gratuit) – Download this plugin before you download any. It’s a MUST HAVE plugin for SEO.
Plugin-uri plătite:
- Compozitor vizual (plătit) – It’s THE BEST Page Builder for WordPress. Just drag and drop and you can create stunning page layouts in minutes. Love it!
- Popups Ninja (plătit) – If you ever want to have the ability for the user to signup for your email newsletter from your blog, this is the plugin to have. Few clicks and you get a beautiful popup done.
- BackupGuard (Paid) – It’s too easy to accidentally break your WordPress blog when installing a 3rd Party Plugin or theme, make sure you always au copii de rezervă. And this plugin does just that. It’s a lifesaver!
Cum să faci bani de pe blogul tău
Now that you have your WordPress blog nicely set up, with some content, a tema de WordPress netedă, and some great functionality added by Plugins it’s time to monetize your blog! There are two core methods to for making money from your blog, and everything boils down to these
Afiliere:
Affiliate marketing is where you promote other company’s products directly and earn a commission from any sales made.
For example, say you have a football blog, you could add affiliate links to football boots in your posts and make a commission off any boots sold, typically this would be 5 – 15%.
Există sute de scheme de marketing afiliat acolo, ar trebui să cercetezi acest lucru în funcție de nișa ta, ai fi surprins câte companii au scheme. Amazon offers one of the most popular ones, it’s easy too!
Add special affiliate links to ANY product on the Amazon and make a commission of 4 – 10%. Amazon may not be the best paying site (this will vary wildly depending on the niche of your blog), but they do offer a HUGE range of products.
publicitate
Adverts are simple, got spare space on your blog, place an advert, often you will find these placed in the sidebar and within the content of any articles. Adverts can generate anything from $0.05 to $5 per click depending on the niche of your blog.
Google AdSense is the de facto online advertising company, simply fill in a 2-page signup form and you can start serving adverts to all your visitors. You don’t have to talk directly to companies to sell your advertising space.
Google’s advertising pay-outs differ massively from niche to niche, a highly competitive niche like credit cards, insurance, loans, etc.. will pay higher than less competitive ones.
Acest lucru se datorează naturii agenților de publicitate care licitează pentru a obține reclama, în același blog cu cât este mai popular „cu atât poți câștiga mai mult.
Typically, you might expect something like a 0.5 – 3% click-through rate, i.e. the number of your visitors who actually click on the adverts.
O combinație bună a ambelor strategii este de obicei recomandată.
Pasii urmatori
Now that your WordPress blog has been set up and you’ve monetized it’s time to start expanding and really pushing your blog.
Here are my top tips going forward:
- Programează conținut regulat, you won’t always be in the mood to write content, use the built-in post scheduler so you can write multiple posts when you feel like it while still allowing regular content to flow. Articles every few days are better than 5 on the same day. Here is another Soluție de automatizare WordPress.
- Aflați totul despre SEO (search engine optimization) that you can, this is a huge topic, you will never fully learn it, but the more you know the more successful blog will be.
- Păstrați pozitiv, your blog will unlikely blossom overnight, it takes months of hard work, but in the end dedication and good content pays off.
Good luck and start blogging!


