
Today I am going to show you how to start a blog from scratch. And you won’t believe how easy it is to do.
So, let’s start your blogging journey!
We will need 4 things:
- lén – Domain is the name of the blog which you type in the browser address bar. “www.HostingPill.com” is the domain of this site.
- hýsing – Hosting is the “home” of your blog where it will “stay”. It is usually a server at a web hosting company.
- WordPress – WordPress is the “software” that will power your new blog.
- Hönnun og þemu – To make your blog attractive design-wise you will need to install WordPress themes.
Frekari upplýsingar um tegundir vefsíðna þú getur búið til með WordPress og vitað hvernig þú getur protect the blog þegar upp er staðið.
Það eru tvær leiðir til að kaupa lén og hýsa:
- Þú kaupir lén og hýsir hjá sama vefþjóninum
- Eða þú kaupir hvort fyrir sig
If you ask me, I would recommend going for Option 2 (buying separately) for two reasons:
- Þú færð betri tilboð þegar þú verslar lén og hýsir sérstaklega.
- Þú dregur úr áhættu með því að kaupa hana frá aðskildum fyrirtækjum.
Ég mæli með namecheap fyrir að fá lénin þín og Bluehost til að hýsa vefinn.
namecheap, eins og nafnið gefur til kynna selur lén fyrir gott verð, það er engin þörf á að kaupa lénið þitt og hýsingu frá sama birgi svo ég hef verslað.
BlueHost - Ég er með Bluehost í um það bil 8 ár hjá sumum síðum mínum og hefur fundist þær vera nokkuð áreiðanlegar.
In this step by step guide, I’m going to buy a domain, set up web hosting, install WordPress, configure WordPress and then talk about how you can make money blogging.
 Hvernig á að stofna blogg
Skref 1. Skráðu lénið þitt
ATH: Ef þú ert nú þegar með lén geturðu sleppt þessu og farið beint til
Hvernig á að setja upp hýsingu fyrir WordPress kafla.
Fyrstu hlutirnir fyrst, það er kominn tími til að kaupa lénið. Þú vilt hugsa um hvaða lén þú vilt og hvað það segir um WordPress bloggið þitt.
Trúðu mér, að velja rétt lén er erfitt verkefni nú á dögum þar sem allir „þeir góðu eru þegar farnir“.
Þú gætir viljað kíkja á þessar 7 Ráð fyrir lénsheiti to get the right name for your site or you can use these tools to búa til hugmyndir um lénsheiti.
Once you have listed some of the domain name options, it’s time to check their availability.
Og fylgdu skrefunum hér fyrir neðan:
Skref 1. Fara á www.Namecheap.com og sláðu lénið sem þú vilt inn í lénsleitarboxið.

Skref 2. If your domain is available then add it to the cart, consider also purchasing other TLD (Top level domains) of your name, for example, if your domain is ‘mytestdomain.com’ you might also want to pick up ‘mytestdomain.net’ and ‘mytestdomain.org’.
If your domain isn’t available, you’ll have to think of something else!

Skref 3. Click on ‘View Cart’. Make sure everything is as you expect and double-check your domain name is spelled correctly. If you are buying a .com domain, you will notice that you also must pay a small ICANN fee.

Skref 4. Staðfestu pöntun þína, ég myndi mæla með því að setja lénið sjálfkrafa til endurnýjunar.

Skref 5. Það mun nú biðja þig um að stofna reikning, fylla út allar upplýsingar og ganga úr skugga um að þú munir lykilorðið!

Skref 6. Á næstu síðu biður það þig um að fylla út upplýsingar um tengiliði reikningsins. Ef þú hefur ekki valið um einkalíf léns, þá eru þessar upplýsingar opinberar fyrir alla. Smelltu á 'Halda áfram'

Skref 7. Pay for your domain, you can choose from a credit card or PayPal. Click ‘Continue’ and that’s it, you are now the proud owner of your new domain.

Skref 2. Setja upp hýsingu fyrir WordPress
Velja the right web hosting company is a very important factor in starting a blog.
Markaðurinn er flóð af hundruðum fyrirtækja sem hýsa vefinn og þau beita öllum aðferðum til að fá fyrirtæki þitt.
I have listed & answered few questions that most first-time site owners have about hosting.
Þú getur séð þau hér.
Nú þegar þú ert tilbúinn skulum við komast í hýsingu okkar.
We will setup your Bluehost account to start your first blog.
It offer a free domain (on Annual plans) and a 30 day money back guarantee, so you never have to worry about anything.
Skref 1. Fara á www.Bluehost. Með og smelltu á Byrjaðu hnappinn.

Skref 2. Veldu áætlunina sem þú vilt kaupa. Í þessari kynningu munum við fylgja grunnáætlun þeirra.

Skref 3. On this page, depending on whether you have a domain or want to get a new one, you can make your selection.

Skref 4. Once you have the domain, it’s time to enter your contact details.

Skref 5. Veldu nú áætlunina sem þú vilt fara í. Því lengra sem þú velur, því meiri afsláttur færðu.

Skref 6. Sláðu inn kreditkortaupplýsingar þínar og greiððu.

Skref 7. Þegar það er búið skaltu búa til lykilorðið þitt á þessum skjá (ekki gleyma því að geyma lykilorðið þitt einhvers staðar til framtíðar)

Skref 8. Now that you have created the password, it’s time to login!

Skref 3. Tengdu lénið þitt við hýsinguna
Svo þegar þú hefur keypt WordPress hýsinguna þína frá Bluehost þú þarft að stilla namecheap lén til að benda á þessa hýsingu.
Skref 1. Innskráning þínum BlueHost account
Skref 2. Smelltu á lénsstillingar
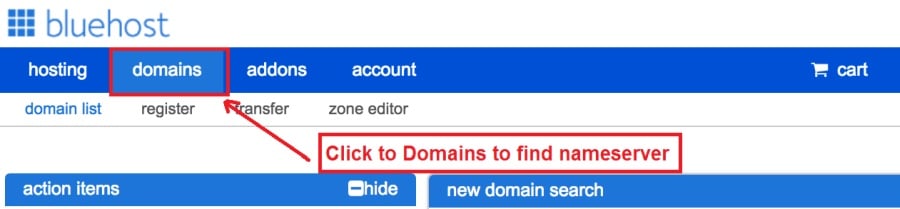
Skref 3. Click on the ‘Nameservers’ tab
Here are the default Nameservers of Bluehost:
NS1.Bluehost. Með
NS2.Bluehost. Með

Skref 5. Go to Namecheap and Login.
Skref 6. Once you logged in go Domain List ==> Domains ==> Select Domain ==> Select Manage ==> Under NameServers, select Custom and place your Bluehostnafnaþjónarnir þar

Skref 7. Smelltu á Vista breytingar.
Það getur tekið allt að sólarhring þar til þessari breytingu er lokið svo ekki hafa áhyggjur ef hún virkar ekki strax.
Skref 4. Settu upp WordPress
Next, we need to install WordPress on the Bluehost hýsingu.
BTW, WordPress is a blogging platform for writing blog posts.
Sem betur fer Bluehost er með sjálfvirka uppsetningu svo ég mun sýna þér það.
Skref 1. Innskráning á Bluehost

Skref 2. Smelltu á 'Setja upp WordPress' í vefsíðunni

Skref 3. Veldu lénið sem þú vilt nota fyrir þessa WordPress uppsetningu, þú munt líklega aðeins hafa eitt lén. Skildu skráarsviðið autt.

Skref 4. Now enter your blog name (can be changed later), username, email address, and password. Make sure to keep a note of these details. Make sure your password is secure, use an online password randomizer if possible, people will try to breach your WordPress blog.

Skref 5. Þú getur fylgst með framvindu uppsetningarinnar efst á síðunni, þó venjulega taki uppsetningin 5 mínútur.


Eins og þú sérð er það einfalt að setja WordPress upp.
Now you can browse to http://yourdomain.com/wp-admin to login.
Step 5. Create a Blog in WordPress
Let’s get logged into the new WordPress blog.
1. Farðu á http://yourdomain.com/wp-admin og sláðu inn notandanafn og lykilorð.

2. Þú ættir nú að geta séð stjórnborðsstjórnborðið.

Þegar þú hefur skráð þig inn er það þess virði að fá nokkur atriði flokkuð áður en við förum yfir í þemu, viðbætur og bæta við efni.
Aðlaga titil og setja forsíðu
Það eru nokkur atriði sem mér finnst alltaf gaman að setja strax eftir að WordPress er sett upp
Settings -> General Settings. Here you can set your blog title, tagline, main email address, time zone, date format & Language. Make sure you set all of these things correctly now, as it may come back to haunt you if you don’t!

Settings -> Reading. Here you can decide what function you want your WordPress blog to take. You can set your front page to take people straight into the blog post or you can set which static page you want to be your home page.

Það er það eina sem við verðum að setja okkur fyrir núna. Við getum farið á áhugaverðara efnið!
Hvernig bý ég til nýjar síður og færslur?
To add new pages, go to Pages -> Add new, fill in your title, add some content and click publish. If you aren’t ready to publish the page, click draft.

To add a new post go to Posts -> Add New, it’s then the same procedure as above.

Hvernig á að bæta við síðum / færslum á matseðilinn
To add these pages to the menu, go to Appearance -> Menu. Select your menu and select ‘add to menu’, you can then drag and drop to arrange it.

Themes & Design
With WordPress, it’s really easy to create any design you can imagine without writing a single piece of code. And that is made possible only by WordPress themes.
WordPress has a lot of free theme designs to choose from.
Hvernig á að finna hið fullkomna WordPress þema
Ef þú finnur ekki það sem þú ert að leita að hérna geturðu valið fleiri valkosti hér:
themeforest – One of the oldest and the largest marketplace for WordPress theme. You get tons of high-quality themes at reasonable prices.

Skapandi markaður – A newer marketplace with quite a variety of WordPress themes. The themes on this site are quite different in terms of design than what you get on Themeforest.

GretaTemas – Another great platform where you can get free and premium beautiful WordPress theme for your site.

Astra – Astra is the most lightweight and fully customizable WordPress theme.

It provides basic and advanced design options for blogs, single blog pages with a dedicated Blog Pro addon. Astra works seamlessly with all popular page builders like Beaver Builder, Elementor, etc.
How do I Install WordPress Theme
To install a new theme for your WordPress blog, follow these steps:
Skref 1. Þegar þú ert skráður inn á stjórnborðið velurðu 'Útlit' og síðan þemu í vinstri valmyndinni.

Skref 2. Smelltu á hnappinn 'Bæta við nýjum'
Skref 3. Search for your WordPress theme using the search bar at the top right. If you have been provided a theme file you can select upload theme from the top of the page.

Skref 4. Smelltu á Setja inn
Skref 5. After a minute or so the new theme will finish installing. Now you can click customize and see what options you can change. This will vary a lot from theme to theme but usually, you can edit things like your logo, the rough layout of the page and some colors.


Setja Tappi
Hvað er viðbót?
Plugins – as the name suggests are tools that add functionality to your WordPress blog. The best thing which I like about WordPress is – these plugins.
Plugins can turn your site from a simple blog to a fully-featured e-commerce store, a user forum, a video streaming site, a member’s only site, and much more. Of course, you can combine most of these plugins together to add huge functionality to your blog.
Til dæmis, ef þú notar WordPress síðuna þína til að selja vörur á netinu, þá gæti verið hagkvæmt að bæta við vettvangi fyrir stuðning.
Alltaf þegar þú vilt bæta virkni við WordPress síðu skaltu líta á viðbætur áður en þú skoðar að búa til eitthvað sjálfur / borga verktaki til að gera það fyrir þig.
Það er auðvelt að setja upp viðbætur, harði hlutinn er að ákveða hvaða viðbætur þú vilt setja upp. Það eru þúsundir viðbóta ókeypis, það eru líka mörg aukagjald í viðbót.
Where I can find more WordPress Plugins?
Tvö bestu auðlindirnar á netinu fyrir WordPress tappi eru:
1. WordPress.org – Tons of free plugins! But beware – some of the plugins are demo versions of the paid ones. Still, it’s a good place to find what you are looking for.

2. CodeCanyon – Home to some of the best plugins on the internet. Although they are paid, they offer really good value for money. I usually get my plugins from here.

Og það eru fáir kostir þess að fara fyrir greiddar viðbætur frá CodeCanyon:
- You get 6 months of free support from the plugin developer. So, if something is not working, you can approach the plugin developer via CodeCanyon og þeir munu laga það fyrir þig. Það sem meira er, þú getur framlengt ábyrgðarstuðning í 12 mánuði með því að greiða nafngjald.
- Viðbæturnar eru vandaðar, vandlega skoðaðar af CodeCanyon. So, there are no chances of any malware in them. I had a bad experience in the past when I bought some free plugins from some random site.
Þegar þú hefur ákveðið að tappi hér er hvernig þú setur það upp.
Hvernig á að setja upp WordPress viðbót
Skref 1. From the Admin Dashboard select Plugins -> Add New
Skref 2. Leitaðu að viðbótinni sem þú vilt nota, eða settu hana inn ef þú ert með skrárnar

Skref 3. Smelltu á Setja upp, og gefðu honum nokkrar mínútur til að setja upp, því stærri viðbótin því lengri tíma mun taka að setja upp.
Skref 4. From the Plugins -> Plugins page activate your plugin, depending on the plugin you are using you may then be prompted to fill in some additional settings.
Here are some of my favorite Plugins:
Ókeypis viðbætur:
- Contact form 7 (Free)– This is a simple free email contact form for your blog. It’s easy to set up, always works, and doesn’t take up much space!
- Askimet (ókeypis) - Ef þú ert jafnvel að íhuga að leyfa athugasemdir á WordPress blogginu þínu þarftu Askimet athugasemd ruslpóstforritsins. Þessi tappi fækkar gegnheill fjölda spam athugasemda sem þú færð.
- Yoast SEO (ókeypis) – Download this plugin before you download any. It’s a MUST HAVE plugin for SEO.
Greidd viðbætur:
- Sjón tónskáld (greitt) – It’s THE BEST Page Builder for WordPress. Just drag and drop and you can create stunning page layouts in minutes. Love it!
- Ninja sprettiglugga (greitt) – If you ever want to have the ability for the user to signup for your email newsletter from your blog, this is the plugin to have. Few clicks and you get a beautiful popup done.
- BackupGuard (Paid) – It’s too easy to accidentally break your WordPress blog when installing a 3rd Party Plugin or theme, make sure you always hafa afrit. And this plugin does just that. It’s a lifesaver!
Hvernig á að græða peninga úr blogginu þínu
Now that you have your WordPress blog nicely set up, with some content, a klókur WordPress þema, and some great functionality added by Plugins it’s time to monetize your blog! There are two core methods to for making money from your blog, and everything boils down to these
Tengja:
Affiliate marketing is where you promote other company’s products directly and earn a commission from any sales made.
For example, say you have a football blog, you could add affiliate links to football boots in your posts and make a commission off any boots sold, typically this would be 5 – 15%.
Það eru mörg hundruð tengd markaðssetningarkerfi þarna úti, þú ættir að rannsaka þetta frekar eftir sess þinni, þú myndir koma á óvart hversu mörg fyrirtæki eru með kerfin. Amazon offers one of the most popular ones, it’s easy too!
Add special affiliate links to ANY product on the Amazon and make a commission of 4 – 10%. Amazon may not be the best paying site (this will vary wildly depending on the niche of your blog), but they do offer a HUGE range of products.
Auglýsing
Adverts are simple, got spare space on your blog, place an advert, often you will find these placed in the sidebar and within the content of any articles. Adverts can generate anything from $0.05 to $5 per click depending on the niche of your blog.
Google AdSense is the de facto online advertising company, simply fill in a 2-page signup form and you can start serving adverts to all your visitors. You don’t have to talk directly to companies to sell your advertising space.
Google’s advertising pay-outs differ massively from niche to niche, a highly competitive niche like credit cards, insurance, loans, etc.. will pay higher than less competitive ones.
Þetta er vegna eðlis auglýsenda sem bjóða að fá auglýsingu sína settar, í því sama, því vinsælli „bloggið“ þitt, því meira sem þú getur staðið til að afla þér.
Typically, you might expect something like a 0.5 – 3% click-through rate, i.e. the number of your visitors who actually click on the adverts.
Venjulega er mælt með góðri samsetningu beggja aðferða.
Næstu skref
Now that your WordPress blog has been set up and you’ve monetized it’s time to start expanding and really pushing your blog.
Here are my top tips going forward:
- Tímasettu reglulegt efni, you won’t always be in the mood to write content, use the built-in post scheduler so you can write multiple posts when you feel like it while still allowing regular content to flow. Articles every few days are better than 5 on the same day. Here is another WordPress sjálfvirkni lausn.
- Lærðu allt um SEO (search engine optimization) that you can, this is a huge topic, you will never fully learn it, but the more you know the more successful blog will be.
- Vertu jákvæður, your blog will unlikely blossom overnight, it takes months of hard work, but in the end dedication and good content pays off.
Good luck and start blogging!


