
Today I am going to show you how to start a blog from scratch. And you won’t believe how easy it is to do.
So, let’s start your blogging journey!
We will need 4 things:
- domain – Domain is the name of the blog which you type in the browser address bar. “www.HostingPill.com” is the domain of this site.
- Hosting – Hosting is the “home” of your blog where it will “stay”. It is usually a server at a web hosting company.
- WordPress – WordPress is the “software” that will power your new blog.
- Design & Themes – To make your blog attractive design-wise you will need to install WordPress themes.
Hibal-i ang bahin sa lahi sa mga website mahimo ka maghimo gamit ang WordPress ug mahibal-an kung giunsa nimo mahimo protect the blog sa higayon nga kini.
Adunay duha ka paagi nga mahimo nimong mapalit ang mga domain ug pag-host:
- Nagpalit ka mga domain ug pag-host gikan sa parehas nga web host
- O gipalit nimo nga parehas
If you ask me, I would recommend going for Option 2 (buying separately) for two reasons:
- Nakakuha ka og mas maayo nga kasabutan sa pagbaligya sa mga domain ug lainlain ang pag-host.
- Gipamub-an nimo ang peligro pinaagi sa pagpalit niini sa gilain nga mga kompanya.
Nagrekomendar ko Namecheap alang sa pagkuha sa imong mga domain ug Bluehost alang sa web hosting.
Namecheap, ingon nga gipasabut sa ngalan nagbaligya mga ngalan sa domain alang sa usa ka maayong presyo, dili kinahanglan nga paliton ang imong domain ug pag-host gikan sa parehas nga supplier aron ako molihok sa palibot.
BlueHost - Ako sa paggamit sa Bluehost sulod sa mga 8 nga tuig na karon alang sa pipila sa akong mga site ug nakit-an nga kini kasaligan.
In this step by step guide, I’m going to buy a domain, set up web hosting, install WordPress, configure WordPress and then talk about how you can make money blogging.
 Giunsa ang Pagsugod sa usa ka Blog
Lakang 1. Pagrehistro sa Imong Domain
PAHINUMDOM: Kung ikaw adunay kaugalingon nga domain, mahimo nimong laktawan kini ug direkta nga moadto
Giunsa ang Setup Hosting alang sa WordPress seksyon.
Una nga mga butang una, panahon na aron mapalit ang domain. Gusto nimong hunahunaon kung unsang domain ang gusto nimo ug kung unsa ang giingon niini bahin sa imong blog sa WordPress.
Tumoo ka kanako, ang pagpili sa tama nga ngalan sa domain usa ka lisud nga buluhaton karon tungod kay ang tanan nga mga "maayong mga butang nawala na".
Mahimo nimong susihon kini 7 Mga Tip sa Ngalan sa domain to get the right name for your site or you can use these tools to paghimo mga ideya sa ngalan sa domain.
Once you have listed some of the domain name options, it’s time to check their availability.
Ug alang niana, sunda ang mga lakang sa ubos:
Lakang 1. Lakaw ngadto sa www.Namecheap.com ug i-type ang domain nga gusto nimo sa kahon sa pagpangita sa domain.

Lakang 2. If your domain is available then add it to the cart, consider also purchasing other TLD (Top level domains) of your name, for example, if your domain is ‘mytestdomain.com’ you might also want to pick up ‘mytestdomain.net’ and ‘mytestdomain.org’.
If your domain isn’t available, you’ll have to think of something else!

Lakang 3. Click on ‘View Cart’. Make sure everything is as you expect and double-check your domain name is spelled correctly. If you are buying a .com domain, you will notice that you also must pay a small ICANN fee.

Lakang 4. Pagkumpirma sa imong order, girekomenda ko ang pagbutang sa domain sa Auto-Renew.

Lakang 5. Pangutan-on ka karon nga maghimo usa ka account, pun-a ang tanan nga mga detalye ug siguruha nga nahinumdom ka sa password!

Lakang 6. Sa sunod nga panid, gihangyo ka niini nga pun-on ang kasayuran sa pagkontak sa imong account. Kung wala ka magpili alang sa privacy sa domain, nan kini nga kasayuran publiko alang sa bisan kinsa nga makakita. Pag-klik 'Padayon'

Lakang 7. Pay for your domain, you can choose from a credit card or PayPal. Click ‘Continue’ and that’s it, you are now the proud owner of your new domain.

Lakang 2. Paghimo Hosting Alang sa WordPress
Pagpili sa right web hosting company is a very important factor in starting a blog.
Ang merkado napuno sa gatusan nga mga kompanya sa web hosting ug gigamit nila ang tanan nga mga taktika aron makuha ang imong negosyo.
I have listed & answered few questions that most first-time site owners have about hosting.
Mahimo nimo kini dinhi.
Karon, nga andam ka na, adto na kami sa among pag-host.
We will setup your Bluehost account to start your first blog.
It offer a free domain (on Annual plans) and a 30 day money back guarantee, so you never have to worry about anything.
Lakang 1. Lakaw ngadto sa www.Bluehost.com ug i-klik ang Start Start Button.

Lakang 2. Pilia ang plano nga gusto nimong paliton. Alang sa kini nga demo, mokuyog kami sa ilang Batakang Plano.

Lakang 3. On this page, depending on whether you have a domain or want to get a new one, you can make your selection.

Lakang 4. Once you have the domain, it’s time to enter your contact details.

Lakang 5. Karon pilia ang plano nga gusto nimong maadto. Mas taas ang termino nga imong napili, labi ka diskwento nga makuha nimo.

Lakang 6. Pagsulod sa mga detalye sa imong credit card ug buhata ang bayad.

Lakang 7. Kung nahuman na, buhata ang imong password sa kini nga screen (ayaw kalimti nga i-store ang imong password sa usa ka lugar alang sa reperensya sa umaabot)

Lakang 8. Now that you have created the password, it’s time to login!

Lakang 3. Ikonektar ang imong Domain sa Pag-host
Mao nga, kung napalit na nimo ang imong WordPress hosting gikan Bluehost kinahanglan nimo nga itakda ang imong Namecheap domain aron itudlo kini nga host.
Lakang 1. Login sa imong BlueHost asoy
Lakang 2. Pag-klik sa mga setting sa domain
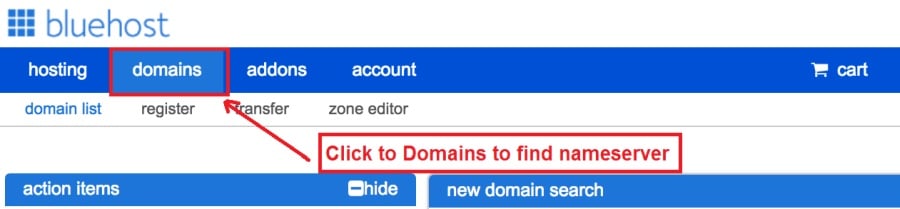
Lakang 3. Click on the ‘Nameservers’ tab
Here are the default Nameservers of Bluehost:
NS1.Bluehost.com
NS2.Bluehost.com

Lakang 5. Lakaw ngadto sa Namecheap ug Pag-login
Lakang 6. Once you logged in go Domain List ==> Domains ==> Select Domain ==> Select Manage ==> Under NameServers, select Custom and place your BluehostAng mga ngalan sa tigpangadto didto

Lakang 7. Pag-klik sa mga pagbag-o.
Mahimo nga hangtod 24 oras ang pagkompleto sa kini nga pagbag-o busa dili mabalaka kung dili kini molihok dayon.
Lakang 4. Pag-instalar sa WordPress
Next, we need to install WordPress on the Bluehost host.
BTW, WordPress is a blogging platform for writing blog posts.
Salamat kaayo Bluehost adunay us aka awtomatikong pag-instalar aron ipakita ko kanimo.
Lakang 1. Pag-login Bluehost

Lakang 2. Sa seksyon sa website pag-klik sa 'I-install ang WordPress'

Lakang 3. Pilia ang domain nga gusto nimo gamiton alang sa kini nga pag-instalar sa WordPress, lagmit adunay usa ra ka domain. Ayaw ibilin nga blangko ang kapatagan sa direktoryo.

Lakang 4. Now enter your blog name (can be changed later), username, email address, and password. Make sure to keep a note of these details. Make sure your password is secure, use an online password randomizer if possible, people will try to breach your WordPress blog.

Lakang 5. Mahimo nimong subayon ang pag-uswag sa pag-install sa tumoy sa panid, bisan kung ang kasagaran nga pag-instalar nagkinahanglan og 5 minuto.


Ingon sa imong nakita nga prangka nga mag-instalar ang WordPress.
Now you can browse to http://yourdomain.com/wp-admin to login.
Step 5. Create a Blog in WordPress
Let’s get logged into the new WordPress blog.
1. Lakaw sa http://yourdomain.com/wp-admin ug isulod ang imong username ug password.

2. Mahimo ka na karon makit-an ang dashboard sa admin.

Sa higayon nga naka-log in sulit ang pagkuha sa pipila ka mga butang nga nahauna sa wala pa kami maglihok sa mga tema, plugins ug pagdugang sulud.
Ipasibo ang ulohan ug I-set ang Pahinungdan nga panid
Adunay pipila ka mga butang nga kanunay nako gusto nga ibutang dayon pagkahuman sa pag-install sa WordPress
Settings -> General Settings. Here you can set your blog title, tagline, main email address, time zone, date format & Language. Make sure you set all of these things correctly now, as it may come back to haunt you if you don’t!

Settings -> Reading. Here you can decide what function you want your WordPress blog to take. You can set your front page to take people straight into the blog post or you can set which static page you want to be your home page.

Mao ra na ang kinahanglan natong itakda karon. Mahimo kitang molihok sa mas makaiikag nga butang!
Giunsa ko paghimo ang bag-ong mga Pahina ug mga Post?
To add new pages, go to Pages -> Add new, fill in your title, add some content and click publish. If you aren’t ready to publish the page, click draft.

To add a new post go to Posts -> Add New, it’s then the same procedure as above.

Giunsa ang Pagdugang Mga Pahina / Mga Post sa Menu
To add these pages to the menu, go to Appearance -> Menu. Select your menu and select ‘add to menu’, you can then drag and drop to arrange it.

Themes & Design
With WordPress, it’s really easy to create any design you can imagine without writing a single piece of code. And that is made possible only by WordPress themes.
WordPress has a lot of free theme designs to choose from.
Giunsa pagpangita ang hingpit nga tema sa WordPress
Kung dili nimo makit-an kung unsa ang imong gipangita dinhi, mahimo ka moadto alang sa daghang mga kapilian dinhi:
Themeforest – One of the oldest and the largest marketplace for WordPress theme. You get tons of high-quality themes at reasonable prices.

Pagmarka – A newer marketplace with quite a variety of WordPress themes. The themes on this site are quite different in terms of design than what you get on Themeforest.

Mga GretaThemes – Another great platform where you can get free and premium beautiful WordPress theme for your site.

Astra – Astra is the most lightweight and fully customizable WordPress theme.

It provides basic and advanced design options for blogs, single blog pages with a dedicated Blog Pro addon. Astra works seamlessly with all popular page builders like Beaver Builder, Elementor, etc.
How do I Install WordPress Theme
To install a new theme for your WordPress blog, follow these steps:
Lakang 1. Kung naka-log in sa admin dashboard pilia ang 'Appearance' ug dayon ang mga tema gikan sa wala nga kamot nga menu.

Lakang 2. Pag-klik sa 'Add New' button
Lakang 3. Search for your WordPress theme using the search bar at the top right. If you have been provided a theme file you can select upload theme from the top of the page.

Lakang 4. I-klik ang Install
Lakang 5. After a minute or so the new theme will finish installing. Now you can click customize and see what options you can change. This will vary a lot from theme to theme but usually, you can edit things like your logo, the rough layout of the page and some colors.


instalar Plugins
Unsa ang usa ka plugin?
Plugins – as the name suggests are tools that add functionality to your WordPress blog. The best thing which I like about WordPress is – these plugins.
Plugins can turn your site from a simple blog to a fully-featured e-commerce store, a user forum, a video streaming site, a member’s only site, and much more. Of course, you can combine most of these plugins together to add huge functionality to your blog.
Pananglitan, kung gigamit nimo ang imong site sa WordPress aron ibaligya ang mga produkto sa online mahimo’g mapuslanon nga magdugang usa ka forum alang sa suporta.
Kanus-a nimo gusto nga idugang ang pag-andar sa usa ka site sa WordPress, tan-awa ang mga plugins sa wala pa tan-awa ang paghimo sa usa ka butang / pagbayad sa usa ka developer aron buhaton kini alang kanimo.
Sayon ang pag-install sa mga plugins, ang lisud nga bahin ang magdesisyon kung unsang mga plugins ang gusto nimo i-install. Adunay mga liboan ka mga plugins nga magamit nga libre, adunay daghang mga premium nga plugin nga magamit.
Where I can find more WordPress Plugins?
Ang duha nga labing kaayo nga mga kapanguhaan sa internet alang sa WordPress Plugins mao ang:
1. WordPress.org – Tons of free plugins! But beware – some of the plugins are demo versions of the paid ones. Still, it’s a good place to find what you are looking for.

2. CodeCanyon – Home to some of the best plugins on the internet. Although they are paid, they offer really good value for money. I usually get my plugins from here.

Ug adunay pipila nga mga bentaha sa pag-adto alang sa mga bayad nga plugin gikan sa CodeCanyon:
- You get 6 months of free support from the plugin developer. So, if something is not working, you can approach the plugin developer via CodeCanyon ug sila ayohon kini alang kanimo. Unsa pa, mahimo nimo nga ipaabut ang suporta sa garantiya sa 12 nga bulan pinaagi sa pagbayad sa usa ka nominal fee.
- Ang mga plugins taas nga kalidad, hingpit nga gisusi CodeCanyon. So, there are no chances of any malware in them. I had a bad experience in the past when I bought some free plugins from some random site.
Sa higayon nga nakadesisyon ka na sa usa ka plugin ania kung giunsa nimo kini gi-install.
Giunsa ang Pag-instalar sa usa ka WordPress Plugin
Lakang 1. From the Admin Dashboard select Plugins -> Add New
Lakang 2. Pagpangita alang sa plugin nga gusto nimo, o pag-upload kung adunay mga file

Lakang 3. Pag-klik sa Pag-instalar, ug hatagan kini pila ka minuto nga mai-install, labi ka daghan ang plugin nga kini kinahanglan nga i-install.
Lakang 4. From the Plugins -> Plugins page activate your plugin, depending on the plugin you are using you may then be prompted to fill in some additional settings.
Here are some of my favorite Plugins:
Libre nga mga Plugin:
- Contact form 7 (Free)– This is a simple free email contact form for your blog. It’s easy to set up, always works, and doesn’t take up much space!
- Askimet (Libre) - Kung gihunahuna nimo bisan ang pagtugot sa mga komentaryo sa imong blog sa WordPress kinahanglan nimo ang plugin sa komentar nga Askimet. Ang kini nga plugin daghang nga mikunhod ang gidaghanon sa mga komento sa spam nga imong makuha.
- Yoast SEO (Libre) – Download this plugin before you download any. It’s a MUST HAVE plugin for SEO.
Gibayad nga mga Plugin:
- Visual Composer (Gibayaran) – It’s THE BEST Page Builder for WordPress. Just drag and drop and you can create stunning page layouts in minutes. Love it!
- Ninja Popups (Gibayaran) – If you ever want to have the ability for the user to signup for your email newsletter from your blog, this is the plugin to have. Few clicks and you get a beautiful popup done.
- BackupGuard (Paid) – It’s too easy to accidentally break your WordPress blog when installing a 3rd Party Plugin or theme, make sure you always adunay backups. And this plugin does just that. It’s a lifesaver!
Giunsa paghimo ang Salapi gikan sa imong Blog
Now that you have your WordPress blog nicely set up, with some content, a tema sa slick WordPress, and some great functionality added by Plugins it’s time to monetize your blog! There are two core methods to for making money from your blog, and everything boils down to these
Kaayohan:
Affiliate marketing is where you promote other company’s products directly and earn a commission from any sales made.
For example, say you have a football blog, you could add affiliate links to football boots in your posts and make a commission off any boots sold, typically this would be 5 – 15%.
Adunay mga gatusan nga mga pamaagi sa pagbaligya sa kaamgohan didto, kinahanglan nimo nga panukiduki kini nga dugang pa sa imong niche, gusto ka mahingangha kung unsang mga kompanya ang adunay mga laraw. Amazon offers one of the most popular ones, it’s easy too!
Add special affiliate links to ANY product on the Amazon and make a commission of 4 – 10%. Amazon may not be the best paying site (this will vary wildly depending on the niche of your blog), but they do offer a HUGE range of products.
Adverts
Adverts are simple, got spare space on your blog, place an advert, often you will find these placed in the sidebar and within the content of any articles. Adverts can generate anything from $0.05 to $5 per click depending on the niche of your blog.
Google AdSense is the de facto online advertising company, simply fill in a 2-page signup form and you can start serving adverts to all your visitors. You don’t have to talk directly to companies to sell your advertising space.
Google’s advertising pay-outs differ massively from niche to niche, a highly competitive niche like credit cards, insurance, loans, etc.. will pay higher than less competitive ones.
Tungod kini sa kinaiyahan sa mga tigpaanunsyo nga nag-awhag nga ibutang ang ilang advert, sa niining parehas nga labi ka 'tanyag' sa imong blog sa labi ka makabarog nga kumita.
Typically, you might expect something like a 0.5 – 3% click-through rate, i.e. the number of your visitors who actually click on the adverts.
Ang usa ka maayo nga kombinasyon sa parehong mga estratehiya sagad girekomenda.
Sunod nga mga Lakang
Now that your WordPress blog has been set up and you’ve monetized it’s time to start expanding and really pushing your blog.
Here are my top tips going forward:
- Pag-eskedyul kanunay nga sulud, you won’t always be in the mood to write content, use the built-in post scheduler so you can write multiple posts when you feel like it while still allowing regular content to flow. Articles every few days are better than 5 on the same day. Here is another Solusyon sa WordPress automation.
- Hibal-i ang tanan bahin sa SEO (search engine optimization) that you can, this is a huge topic, you will never fully learn it, but the more you know the more successful blog will be.
- Padayon nga positibo, your blog will unlikely blossom overnight, it takes months of hard work, but in the end dedication and good content pays off.
Good luck and start blogging!


